how to fix a wifi antenna in a laptop

Title: USE YOUR WIFI ANTENNAS shorts
Channel: mryeester
USE YOUR WIFI ANTENNAS shorts by mryeester
how to fix wifi antenna laptop, repair laptop wifi antenna, laptop wifi antenna not working, how do laptop wifi antennas work, how can i improve the wifi signal on my laptop
Laptop WiFi Antenna Dead? This SHOCKING Fix Will Restore Your Signal!
Laptop WiFi Blues? This Unbelievable Trick Might Save the Day!
Ever felt the agonizing frustration of a laptop with a Wi-Fi signal that’s weaker than a kitten’s meow? You're not alone. It's a common digital dilemma. The dreaded "no internet" notification can send shivers down your spine. Surely, you’ve experienced the slow loading pages. Perhaps you've encountered dropped video calls. It’s enough to make you want to throw your laptop across the room! But before you resign yourself to a life of tethering or expensive repairs, take a deep breath. Because there's a good chance that what you think is a dead Wi-Fi antenna is actually a fixable problem.
The Mystery of the Vanishing Wi-Fi Signal
First, let's explore the potential culprits. Your laptop's Wi-Fi issues are rarely straightforward. Often, the problem isn't a complete antenna failure. More often, it’s something else entirely. For instance, it could be a software glitch, a driver conflict, or even a simple physical obstruction. Therefore, assume the worst and start checking basic steps! However, resist the urge to panic. Diagnosing the source is critical before you can even attempt the remedy. Thus, we'll explore practical solutions.
Troubleshooting Steps Before You Start Ripping Things Apart
Before you even consider taking your laptop apart, try the simple solutions! They might be the key to unlocking your Wi-Fi signal. Actually, performing these preliminary steps can often resolve the issue. Firstly, restart your laptop. This simple step can resolve myriad issues, including Wi-Fi problems. It's like hitting the reset button. Next, check your Wi-Fi switch. Many laptops have a physical switch or a function key combination. Make certain it's turned on. Also, check your router. Is it functioning properly? Testing the connection with another device can quickly tell you if the issue is with your laptop or your internet.
Delving Deeper: Software Solutions to Wi-Fi Woes
If the basic steps fail, let's investigate deeper. Consequently, the problem may lie within your software. Besides, sometimes the Wi-Fi driver has issues. For example, outdated, corrupted, or incompatible drivers can cause connection problems. Therefore, it is essential to update or reinstall your Wi-Fi adapter driver. Here's how:
- Go to Device Manager.
- Expand "Network adapters."
- Right-click on your Wi-Fi adapter (look for names like "Wireless Network Adapter").
- Select "Update driver" or "Uninstall device".
- Restart your laptop.
Subsequently, check for Windows Updates. Especially if your Operating system is out of date. Because Windows Updates often include driver updates and bug fixes. Furthermore, you can also troubleshoot network problems using the built-in Windows Network Troubleshooter. This tool automatically detects and attempts to resolve common Wi-Fi issues.
The Unexpected Fix: A Physical Adjustment That Works!
Imagine this, after all of this, it still doesn't work? Although it sounds unbelievable, there's a surprisingly effective physical adjustment. In some cases, the Wi-Fi antennas inside your laptop are affected by subtle factors. Sometimes, moving your laptop’s position slightly can dramatically improve your signal. Then, try moving closer to the router. Alternatively, open the laptop’s lid at different angles. Moreover, placing your laptop near a window may help. Remember, Wi-Fi signals are radio waves. Therefore, they can be blocked or absorbed by materials.
The Shocking "Tin Foil" Trick (Yes, Really!)
Furthermore, here’s a technique that may seem crazy. However, it can sometimes work wonders. This method involves using a piece of aluminum foil. Consequently, it can act as a reflector. Basically, it redirects the Wi-Fi signal towards your antenna. Consequently, this can improve the signal strength.
- Cut a small piece of aluminum foil, large enough to cover the back of your laptop screen.
- Shape it into a curved reflector, mimicking a satellite dish.
- Tape the foil, carefully, to the back of your laptop screen.
- Test your Wi-Fi signal.
Of course, results vary, but this trick has worked for many users. In fact, it's worth a try. Because it's easy and costs nothing.
When to Call in the Tech Cavalry
If you’ve tried everything, don’t despair. Though, it might be time to seek professional help. Perhaps, it's a hardware malfunction. For example, the Wi-Fi card itself might be faulty. Consequently, the antenna could be damaged. Additionally, the connection cables inside could be loose or broken. A technician can diagnose and repair these issues. Therefore, it's always best to know your options.
Final Thoughts: Triumph Over the Wi-Fi Woes
Fighting weak Wi-Fi is a common battle. However, it's a battle you can often win. Moreover, you have many options. Therefore, before you give up, try the suggested solutions. Because you might just have a simple fix. Ultimately, remember that perseverance and a little bit of troubleshooting can save the day. Finally, enjoy your supercharged signal!
Wifi's DEAD?! The SHOCKING Fix You NEED (Laptop!)Laptop WiFi Antenna Dead? This SHOCKING Fix Will Restore Your Signal!
Hey everyone! Have you ever been mid-binge of your favorite show, deep in an important work project, or trying to video chat with loved ones, only to be cut off by that dreaded "No Internet Connection" message? It's the digital equivalent of your car refusing to start – incredibly frustrating and seemingly impossible to fix without a trip to the mechanic (or, in this case, the IT guy). But trust me, before you start panicking and envisioning a life unplugged, there's a good chance the culprit isn't your entire internet setup, but rather something a bit more… localized. Today, we're diving headfirst into the world of laptop WiFi antennas, specifically addressing the issue of a seemingly "dead" one, and – spoiler alert – exploring a shockingly simple fix that just might bring your signal back from the brink! We are going to revive your connection and keep you connected!
1. The Silent Killer: Recognizing the Symptoms of a Failing WiFi Antenna
Think of your laptop's WiFi antenna as its ears. When it's working perfectly, you get clear, strong reception. But when it starts to fail, things get… fuzzy. The first sign? Weak signal strength. You might notice you have to be right next to your router to get a decent connection, or that websites are loading at a snail's pace. Other telltale signs include:
- Intermittent Disconnections: Your WiFi cuts out randomly, leaving you staring blankly at a loading screen. This is like your ears briefly going deaf in a loud room.
- No Networks Detected: Your laptop refuses to see any available WiFi networks, even though you know they're there. It's like your ears have suddenly shut down.
- Slow Download and Upload Speeds: Forget streaming in HD; you're struggling to even send an email with a large attachment. It's like trying to yell across a stadium.
- Error Messages: Your operating system might throw up cryptic error messages related to network adapters or WiFi drivers.
If you're experiencing any of these issues, chances are your WiFi antenna is the problem, and like an ailing patient, it requires immediate care for a swift recovery.
2. Understanding the Culprit: What Actually Is a WiFi Antenna (And Where Is It Hiding?)
Before we get to the fix, let's quickly understand what we're dealing with. Your laptop's WiFi antenna is a tiny, usually hidden, component responsible for receiving and transmitting radio waves. Think of it as a tiny radio station tuned to your home network. In most laptops, there are actually two antennas, cleverly tucked away – often in the screen bezel or around the hinge. These antennas work together to provide a stronger, more reliable signal. They’re like the antennae of a ship that sends and receives signals from distant ports.
3. Diagnostics 101: Simple Checks Before You Start Panicking
Okay, so you think your WiFi antenna might be the problem. Before we jump into surgery, let's rule out a few other potential culprits:
- Restart Your Laptop: Yes, the classic "turn it off and on again" trick. It might seem basic, but it resolves a surprising number of issues.
- Restart Your Router: Sometimes, the problem isn't your laptop at all; it's the router. Unplug it for 30 seconds, plug it back in, and see if that helps.
- Check Your Distance: Are you too far from the router? Move closer and see if the signal improves.
- Run the Windows Network Troubleshooter: Windows has a built-in troubleshooter that can often identify and fix basic network problems.
If these steps don't work, then we move to the next.
4. The SHOCKING Fix: Reseating Your WiFi Card (The Secret Weapon!)
Here's the moment you've been waiting for! Often, the primary cause of a "dead" WiFi antenna isn't a hardware failure, but rather a loose connection. Inside your laptop, the WiFi antenna is connected to the WiFi card (also known as the network adapter) via small, delicate wires. Over time, these wires can come loose due to bumps, jostling, or even just natural wear and tear. The fix is to reseat the WiFi card. Here's how (Note: This will void your warranty, so proceed with caution):
- Power Down and Unplug: Completely shut down your laptop and unplug the power adapter. This is crucial for safety.
- Locate the Access Panel: Most laptops have a small access panel on the underside, usually held in place by a few screws, often labeled "RAM" or "SSD." Consult your laptop's manual if you're unsure.
- Remove the Panel: Carefully unscrew the panel and set it aside.
- Find the WiFi Card: The WiFi card is usually a small, rectangular component, often near the RAM or hard drive. It will have wires (the antenna cables) connected to it.
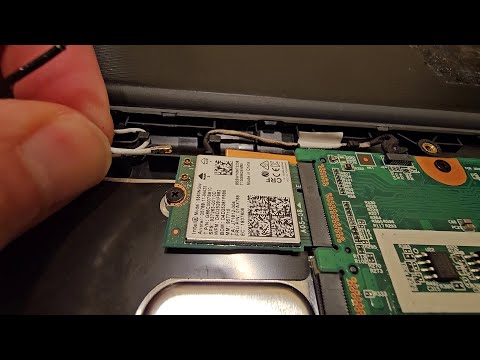
- Unplug the Antenna Cables: Gently disconnect the small antenna wires from the WiFi card. These usually just snap off. Take note of where they were attached so you can reconnect them later.
- Remove and Reseat the WiFi Card: Carefully remove the WiFi card. It's usually secured by a clip or a screw. Then, firmly reseat it into its slot.
- Reconnect the Antenna Cables: Reconnect the antenna wires to the WiFi card. Make sure they're securely snapped in.
- Replace the Panel and Test: Put the access panel back on, screw it back in, and power up your laptop. Hopefully, your WiFi is back in action!
5. Safety First: Important Precautions When Opening Up Your Laptop
- Static Electricity: Always ground yourself before touching any internal components. You can do this by touching a metal object (like a faucet) to discharge any static buildup.
- Gentle Hands: Work carefully and gently. Avoid using excessive force.
- Take Pictures: Before you begin, take pictures of the inside of your laptop. This will help you put everything back together correctly.
- Consult Your Manual: Your laptop's manual is your best friend. It will contain specific instructions for accessing and working on your machine.
6. Troubleshooting After the Fix: What if it Still Doesn't Work?
If reseating the WiFi card doesn't solve the problem, don't despair! Here are a few other things to try:
- Driver Updates: Outdated or corrupted drivers can cause WiFi issues. Go to your laptop manufacturer's website and download the latest WiFi drivers for your model.
- Hardware Issues: It's possible the WiFi card itself is faulty. Consider replacing it. These cards are typically fairly inexpensive.
- Antenna Damage: If the wired antenna cables are damaged, you may have a tricky fix on your hands. Consider a professional repair.
7. Enhancing Your WiFi Experience: Optimizing Your Router Settings for Peak Performance
Even if your WiFi antenna is working perfectly, you can still improve your connection by optimizing your router settings. Here are a few tips:
- Channel Selection: Your router uses a specific channel to broadcast its signal. Try switching to a different channel to avoid interference from other WiFi networks in your area.
- Update Router Firmware: Ensure your router's firmware is up-to-date. Firmware updates often include performance improvements and bug fixes.
- Placement Matters: Place your router in a central location, away from walls, metal objects, and other electronic devices that can interfere with the signal.
8. Beyond the Basics: Advanced Tips for Boosting Your WiFi Signal
Want to go the extra mile? Here are a few advanced tips:
- External USB WiFi Adapter: This can be a great alternative or upgrade your WiFi setup.
- Replace the Antenna Wires: If you're comfortable with DIY, you could replace the antenna wires
- Consider a WiFi Extender: If you have a large home or office, a WiFi extender can help boost your signal in areas with weak coverage.
9. Common Mistakes to Avoid When Troubleshooting Your WiFi Antenna
- Forgetting to Unplug: Always unplug your laptop before working on the internal components.
- Forcing Connections: Be gentle! Don't force anything.
- Ignoring Static Electricity: Ground yourself before touching the components.
- Skipping Driver Updates: Make sure you have the latest drivers.
10. The Importance of a Strong Connection: Why a Reliable WiFi Signal Matters
In today's digital world, a reliable WiFi signal is more crucial than ever. From work to entertainment to staying connected with loved ones, we rely on our WiFi for almost everything. A strong, stable connection enhances your productivity and quality of life.
11. The Power of Information: Why Knowing Your Laptop's Components is Key
Understanding the inner workings of your laptop, and its components like the WiFi antenna, empowers you to troubleshoot problems on your own. It can save you time, money, and the frustration of being disconnected.
12. The Benefits of DIY Repair: Saving Money and Gaining Skills
Learning how to troubleshoot and repair your laptop can be a rewarding experience. Not only can you save money, but you also
Unlock Your Laptop's Wi-Fi: The Phone Hotspot Secret!Wifi antenna cable connector repair Kablosuz anten kablosu konnektr onarm

By Merakl Bilgisayarc Wifi antenna cable connector repair Kablosuz anten kablosu konnektr onarm by Merakl Bilgisayarc
HP Pavilion 14-ab166us Network Card and Antenna Upgrade

By TechTube HP Pavilion 14-ab166us Network Card and Antenna Upgrade by TechTube
How to remove and reattach WiFi antenna cables
By James Has Answers How to remove and reattach WiFi antenna cables by James Has Answers

Title: Laptop wifi antenna repair Perth
Channel: cirrus Link Repair
Laptop wifi antenna repair Perth by cirrus Link Repair
My Laptop Work
Laptop WiFi Antenna Dead? This SHOCKING Fix Will Restore Your Signal!
Have you ever found yourself wrestling with a laptop that refuses to connect to the internet, despite a seemingly strong WiFi signal displayed on your other devices? The culprit might be a malfunctioning or disconnected WiFi antenna within your laptop. This seemingly minor component is absolutely crucial for receiving and transmitting the wireless signals that deliver your digital world. We understand your frustration, and the good news is that in many cases, fixing a dead laptop WiFi antenna is a straightforward process that can be completed at home. Don't toss your laptop aside just yet; let's delve into the most probable causes and reveal the surprisingly effective fixes you can utilize.
Understanding the Enemy: Pinpointing the WiFi Antenna's Demise
Before we dive into the repair process, let’s uncover the primary suspects behind the silent WiFi antenna. Recognizing what went wrong is often half the battle.
Loose Antenna Connections: Inside your laptop's chassis, thin wires connect the WiFi card to the antennas, often positioned around the screen. These wires are frequently prone to becoming loose. They could have come undone due to everyday bumps, travel jostles, or even just the natural aging of your machine. This is the most common issue.
Physical Damage to Antenna Wires: Over time, the antenna wires, being delicate, can suffer from physical wear and tear. Frequent opening and closing of your laptop screen can pinch or fray these wires, disrupting the signal flow.
WiFi Card Malfunction: Although less frequent, the WiFi card itself can fail. This card, usually a separate module within the laptop, handles the actual receiving and transmitting of WiFi signals. Heat, age, or power surges can inflict damage on it.
Software Conflicts and Drivers: Sometimes, the problem isn't hardware, but rather software-related. Outdated or corrupted network drivers can interfere with the WiFi card's functionality, leading to connection woes. We will cover this in the troubleshooting step.
Tools of the Trade: What You'll Need for the Rescue Mission
Before you start, gather the necessary tools. You will need these:
- Small Phillips Head Screwdriver Set: This type of set is a must-have for opening your laptop. Different models necessitate specific sizes, so a multi-bit set is beneficial.
- Pry Tool or Spudger: A plastic tool to help pry open the laptop's casing without causing damage.
- Anti-Static Wrist Strap: This is a crucial piece of equipment to prevent electrostatic discharge (ESD) from harming sensitive electronic components inside your laptop.
- Magnifying Glass: Helpful for examining small connectors and wire connections.
- Bright Lighting: Good visibility is essential for performing delicate internal work.
- Replacement Antenna Wires (Optional): If the existing wires are damaged, it's a good idea to have replacements on hand. These can often be found online, and knowing your laptop model number is vital to finding the correct components.
Step-by-Step Recovery: The Antenna Repair Protocol
Now, put your detective hat on. Here’s a detailed guide to revive your laptop's WiFi connection:
1. Preparation is Paramount: Power Down and Unplug
Completely power down your laptop. Disconnect the power adapter and remove the battery. This is a vital precaution to prevent electrical hazards and to protect your laptop's components during the repair process.
2. The Disassembly Dance: Accessing the Interior
- Locate the Screws: Refer to your laptop's service manual or search online for instructions specific to your model. This will show you where all the screws are positioned.
- Remove the Screws: Use the appropriate screwdriver from your set to remove all the screws. Be sure to keep track of the screws. Place them in a safe location, like a small container or a labeled organizer, to avoid them getting lost.
- Open the Casing: With the screws removed, use the pry tool or spudger to gently separate the top and bottom halves of the laptop's casing. Start along the edges, working your way around. Be gentle and patient, as some laptops have clips that can be easily broken.
3. Pinpointing the WiFi Card and Antennas
- Locate the WiFi Card: The WiFi card is typically a small, rectangular card (often mounted inside a metal shield), located in the lower regions of the laptop. It connects to the motherboard.
- Identify the Antenna Wires: Follow the thin wires that connect to the WiFi card. These wires should lead to the antennas, which are usually positioned around the laptop's screen (in the display bezel) or sometimes in the lid.
4. The Connection Check: Rebooting the Signal
- Examine the Antenna Wire Connections: Carefully inspect the connections where the antenna wires attach to the WiFi card. Are they securely fastened? Ensure they are properly plugged into the card.
- Inspect the Wires: Examine the entire length of the antenna wires. Look for any signs of damage, such as cuts, fraying, or kinks.
- Reconnect the Wires: If any wires are loose, carefully reconnect them. If you are unsure, consult your laptop's service manual for the specific connection points. The connectors are often small, so be careful not to bend or damage them.
5. WiFi Card Inspection: The Hardware Evaluation
- Check the WiFi Card Seating: Make sure the WiFi card is firmly seated in its slot on the motherboard. Gently press down on the card to ensure it is properly connected.
- Remove and Reinstall (if necessary): If you feel comfortable doing so, you can remove the WiFi card, clean the contacts with a small brush or a bit of isopropyl alcohol, and then reinstall it.
- Look for Damaged Components: Inspect the WiFi card for any obvious signs of damage, such as burnt areas or swollen components.
6. Reassembly and Testing: Putting It All Back Together
- Close the Casing: Carefully replace the top half of the laptop casing, making sure all the clips and connectors are properly aligned.
- Reinstall the Screws: Secure the casing by reinserting all the screws you removed earlier.
- Reinsert the Battery: Put the battery back inside your laptop.
- Power Up and Test: Connect the power adapter and power on your laptop. Test your WiFi connection immediately. Look for your available networks and try to connect to your home WiFi.
7. The Software Side: Driver Troubleshooting
If the hardware checks out but your WiFi still struggles, software issues may be the root cause.
- Update Your Drivers: Outdated drivers can negatively affect your WiFi card. Go to your laptop manufacturer's website and download the latest drivers for your specific laptop model and operating system.
- Reinstall Drivers: If updating doesn’t fix the issue, try uninstalling and reinstalling the network adapter drivers.
- Check for Software Conflicts: Sometimes, other software or third-party utilities can interfere with your WiFi connection. Try disabling recently installed programs or add-ons to see if they are the problem.
Advanced Troubleshooting: Taking It to the Next Level
- Replacement Antenna Wires: If you find that your antenna wires are physically damaged, replacing them is often the best solution.
- WiFi Card Replacement: In rare cases, the WiFi card itself may be faulty. Consider replacing the WiFi card with a compatible one.
Success! Keeping Your WiFi Strong
We hope these steps have helped you to restore your laptop's WiFi functionality. Regular cleaning and gentle handling of your laptop can reduce the likelihood of these problems. If you've tried all of these steps and your WiFi is still failing, consider taking your laptop to a professional repair shop.
