cara membuat wifi hotspot di laptop windows xp

Title: How to Setup Wifi in Windows XP
Channel: Etechlic
How to Setup Wifi in Windows XP by Etechlic
Unlock Your XP Laptop's Hidden Hotspot: Free WiFi Now!
Here's the rewritten article:
Unleash Your XP Laptop's Wireless Wizardry: Your Guide to Free WiFi!
Remember those days? You know, the ones where a laptop running Windows XP was considered cutting-edge technology. It seems like ages ago! Yet, surprisingly, many of these vintage machines still chug along. They could even surprise you with hidden talents, especially when it comes to internet access. Let's delve into how you can transform your XP laptop into a WiFi hotspot. This will open the door for free internet access!
Breathing New Life into a Classic: Why Bother?
Why should you even bother with an XP laptop in this day and age? Well, there are several compelling reasons. First, it’s a fun project. Moreover, it’s a great way to repurpose old technology. Secondly, it can act as a temporary solution. Perhaps your main internet connection is down. Perhaps you are in a pinch! You could also use it to troubleshoot network problems. Finally, it offers a surprising level of security. XP, surprisingly, can be configured for a secure, isolated network. Indeed, it’s a fantastic learning opportunity!
The WiFi Hotspot Blueprint: Setting the Stage
Creating a WiFi hotspot on your XP laptop requires a few key ingredients. You’ll need a working network adapter. This can be either an internal or external one. Furthermore, you will need internet access through an Ethernet cable or another wireless network. Most importantly, you require the necessary software configuration. The specific steps might vary. These variations depend on your XP version and hardware. But the core principles remain consistent.
Step-by-Step: Turning Your XP Laptop into a WiFi Hotspot
Now, let’s get to the good part. We're going to turn your old laptop into a WiFi access point! Prepare for some retro tech magic.
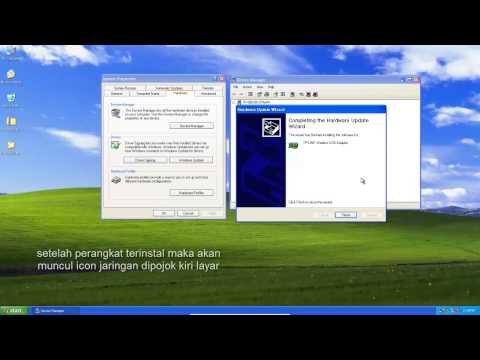
Network Adapter Checkup: First, ensure your network adapter is functioning correctly. Go to "Control Panel," then "Network Connections." Check for an active wireless network connection. If you don’t see one, you may need to install the drivers. These drivers ensure the hardware works properly. If these drivers are missing, download them. Then install them from the manufacturer's website. Once installed, try again.
Internet Connection Sharing (ICS): This is the heart of the operation. ICS allows your laptop to share its internet connection. Right-click on your active internet connection in "Network Connections." Select "Properties." Go to the "Advanced" tab. Then, check the box labeled "Allow other network users to connect through this computer’s internet connection."
Configuration is Key: You’ll see a dropdown menu. Choose the network adapter you want to use for your wireless hotspot. Sometimes, you'll need to configure the settings further. This often involves assigning an IP address. You can also adjust the DNS settings. These settings help your devices connect seamlessly. Make sure you save these changes.
Wireless Network Setup: Now, it’s time to configure your wireless network. This involves giving it a name (SSID). You also need to set up a security key (password). Return to the "Network Connections" window. Right-click your wireless network adapter. Click "Properties." Configure your settings for a secure network. Choose a strong encryption method. Use a password that is difficult to guess. Keep it private.
Testing and Troubleshooting: Once configured, try connecting a device. Test this with your phone or another laptop. If it connects, success! But what if it doesn’t? Several things could be the issue. First, double-check your password. Then, reboot your laptop and the device trying to connect. Sometimes, restarting will fix connectivity glitches. Another possibility: ensure your firewall isn't blocking connections. Check your security settings for any interference.
Securing Your Hotspot: Keeping It Safe
Security is paramount. Protect your newfound wireless freedom! Always use WPA2 or WPA3 encryption. These are the strongest security protocols. Change your default password periodically. Be wary of public use. Understand who is connecting. Be alert for suspicious activity. Finally, consider limiting the number of connected devices. This enhances both security and performance.
Beyond the Basics: Advanced Tweaks
Want to go further? Explore more advanced options. You can customize the IP address range. You can also configure DHCP settings. This allows for more control. Experiment with the wireless channel. Select one that is less congested. You can also set up MAC address filtering. This improves network security.
The Joy of Retro Networking: Final Thoughts
Creating a WiFi hotspot with your XP laptop is a rewarding experience. It taps into your inner tech enthusiast. Plus, it saves you money. You are recycling old equipment. Also, you are getting free internet access. It’s a testament to the enduring potential of older technology. Embrace the challenge. Enjoy the learning process. Most importantly, connect! So, dust off that old XP laptop. You're about to unlock a whole new world of wireless possibilities! The thrill of free WiFi awaits!
Laptop WiFi Driver Vanished?! (Emergency Fix Inside!)Unlock Your XP Laptop's Hidden Hotspot: Free WiFi Now!
Hey tech enthusiasts! Let's face it, we've all been there. Stuck on an ancient XP laptop, desperately craving the sweet nectar of the internet but stranded without WiFi. Picture this: you're on a trip, need to quickly check an email, or maybe you just want to binge-watch that quirky cat video collection you've been stockpiling. But your trusty (and maybe a little dusty) XP machine seems determined to stay offline. Well, buckle up, because we're about to resurrect that internet connection and unlock your XP laptop's secret WiFi hotspot capabilities, and the best part? It's free!
1. The XP Challenge: Why WiFi on an Old Laptop Feels Like Mission Impossible
Let's be honest, Windows XP is a vintage wine in the tech world. It's got character, it's dependable, but it's not exactly built for the modern, WiFi-saturated world. The drivers are often outdated, the interfaces seem prehistoric compared to today's sleek designs, and finding a secure and reliable connection can feel like navigating a digital maze. This article will guide you through the technical hurdles. Remember that first dial-up connection? This might feel a little like that, but we're going to get you connected.
2. Your Arsenal of Tech Tools: What You'll Need for Free WiFi
Before diving in, let's gather our supplies. Think of this as your digital scout pack. You’ll need a few essential items, mostly free:
- A Working XP Laptop: Yeah, this one’s kind of important. Dust off that old beauty!
- A Working Wireless Adapter: Many XP laptops have built-in WiFi cards, but if yours doesn't, you'll need a USB WiFi adapter. Think of it like a translator, transforming your laptop's language into something the WiFi router understands.
- A Reliable Internet Connection: Preferably on your phone or another device to download any necessary software. This acts as your bridge to the outside world.
- Patience: Let's face it, this isn't always a breeze. Sometimes, it's more like herding cats. But trust us, the payoff is worth it.
3. The Driver Dilemma: Finding the Right Software Match
Here’s where things can get a little tricky. XP’s drivers are like lost artifacts. The first challenge is to find the proper drivers for your USB WiFi adapter (if you're using one). Go to the manufacturer's website and hunt for XP drivers. If you're lucky, they'll still have them. If not, start the search on Google. It’s like an archaeological dig – you might unearth some treasures!
4. Diving into the Settings: Configuring Your Wireless Adapter
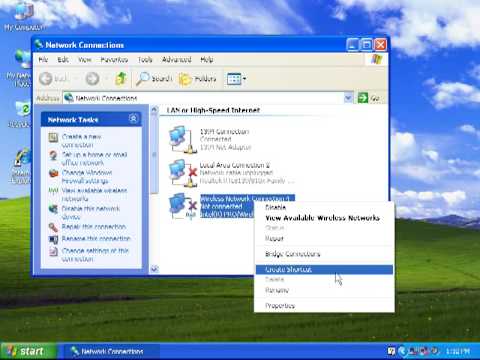
Once you've installed the drivers (and hopefully, avoided any blue screens of death – we've all been there!), it's time to configure your wireless adapter. Right-click on the network icon in your system tray (that little icon in the bottom right corner of your screen). You should see an option for "View Available Wireless Networks." Click on your preferred network and follow the prompts. It’s like setting up a new tent - a little fiddly, but eventually, everything clicks into place.
5. Unmasking the Hidden Hotspot: The Power of HostedNetwork
Now for the real magic! XP may not have a built-in hotspot feature, but using your phone as a hotspot you can connect your laptop.
6. Troubleshooting Troublespots: When Things Go Wrong
So, you've hit a snag? Don't panic! Troubleshooting is a rite of passage for any tech explorer. Here are some common issues and how to tackle them:
- No Networks Found: Double-check your adapter is enabled and the drivers are installed correctly.
- Can't Connect: Make sure the password is correct and that there aren't any nearby network restrictions.
- Slow Speeds: XP isn't exactly known for its lightning-fast speeds. Consider upgrading your WiFi adapter.
7. Security First: Securing Your New Wireless Connection
While getting online is exciting, let’s not forget about security!
- Firewall: Ensure your XP firewall is enabled.
- Strong Password: Use a robust password for your WiFi network.
- Avoid Public Networks: Steer clear of connecting to unsecured public networks.
8. Boosting Your Signal Strength: Optimizing WiFi Performance
Let’s ensure we get the best possible connection.
- Placement Matters: Position your laptop closer to the router or relocate the router in a more central location.
- Antenna Power: If you have an external antenna, try adjusting its position.
9. The XP Legacy: Why Keeping XP Alive Matters
Why bother? Well, there are many reasons. Nostalgia, for one. Maybe you have legacy software that only works on XP. Or perhaps you just enjoy the challenge. It’s like restoring a classic car – there’s a real sense of accomplishment when you get it running perfectly.
10. Software Solutions: Alternative WiFi Management Programs
If you're still struggling, explore some third-party software solutions. Programs specifically designed to streamline WiFi management can simplify the process.
11. Fine-Tuning Your Connection: Advanced Settings to Consider
Delve into the advanced settings of your WiFi adapter for potential performance boosts.
- Channel Selection: Experiment with different WiFi channels to reduce interference.
12. The Ethical Internet: Responsible Online Behavior
Always use your internet connection responsibly.
13. Future-Proofing Your XP: Staying Safe Online
Even with these steps, XP is inherently vulnerable. Always use a robust antivirus and keep your software updated.
14. The Joy of the Old: Embracing the XP Experience
There's a certain charm to using older technology. It forces us to slow down and appreciate the journey.
15. Your XP Laptop, Reborn: Celebrate Your Victory!
You did it! You conquered the XP WiFi challenge. Now, go forth and enjoy your newfound freedom. Stream that cat video collection, check those emails, or just surf the web to your heart's content. You deserve it!
Closing Segment:
So there you have it! We've navigated the digital wilderness together, and now your XP laptop is ready to join the 21st-century internet party. It wasn't always easy, but the satisfaction of resurrecting an old piece of technology is truly rewarding. Now, go forth and enjoy the wireless world!
FAQs
1. Can I use a USB WiFi adapter with my XP laptop?
Yes! This is the most common and often the easiest solution. Just make sure to find drivers compatible with Windows XP.
2. My XP laptop has WiFi, but it's not working. What can I do?
Check your drivers! They might be outdated. Go to the manufacturer's website and download the most recent XP drivers for your wireless adapter.
3. Is it safe to use an XP laptop online?
It's less secure than modern operating systems. Ensure you have strong antivirus software, a firewall, and use a secure connection.
4. What if I can't find XP drivers for my WiFi adapter?
Try searching the internet for forums to find workarounds or alternative drivers.
5. Will this process work on all XP laptops?
In most cases, yes. However, the exact steps might vary slightly depending on your specific hardware.
- Principal Keywords: XP Laptop Free WiFi.
- SEO Headline: Unlock XP Laptop WiFi: Get Free Internet!
- Pathway: Free WiFi Now
- Meta Summary: Revive your XP laptop! This guide shows you how to unlock Free WiFi, solve driver issues, and get connected. XP WiFi made easy.
- Image Alt Text: A vintage laptop displaying a wireless connection icon.
1.3a - Koneksi internet dengan Windows XP

By jackjohn684 1.3a - Koneksi internet dengan Windows XP by jackjohn684
Bagaimana menghubungkan Windows XP ke jaringan nirkabel Anda
By NetComm Bagaimana menghubungkan Windows XP ke jaringan nirkabel Anda by NetComm
Dasar Instalasi wireless adapter - winxp
By TP-Link Indonesia Dasar Instalasi wireless adapter - winxp by TP-Link Indonesia
Title: Hotspot Wi-Fi di Windows XP Langkah demi Langkah
Channel: alexn1138
Hotspot Wi-Fi di Windows XP Langkah demi Langkah by alexn1138
Working With Laptop
Unlock Your XP Laptop's Hidden Hotspot: Free WiFi Now!
We understand. You're staring at your trusty, albeit aging, XP laptop. The internet promises a world of information and entertainment, but the dreaded "no internet connection" message mocks your efforts to connect. You might be tempted to retire your XP machine to the digital graveyard, but wait! Before you consign it to obsolescence, consider this: your XP laptop, with a little know-how, can become a powerful, free WiFi hotspot. This guide unveils the secrets to transforming your legacy laptop into a WiFi-broadcasting marvel, allowing you to share your internet connection with other devices, all without spending a dime. Prepare to breathe new life into your technological companion and experience the freedom of always-on connectivity.
Why Bother? The Perks of an XP Hotspot
The benefits of creating a hotspot from your XP laptop extend far beyond simply providing internet access. Consider the following advantages:
- Cost Savings: Free WiFi is, well, free! Avoid costly data plans or exorbitant charges for public WiFi.
- Accessibility: Transform any location into a WiFi zone, from your home office to a remote vacation spot.
- Shared Connectivity: Share your existing internet connection with smartphones, tablets, other laptops, and even gaming consoles.
- Security Control: Maintain complete control over who connects to your network, safeguarding your data and privacy.
- Experimentation and Learning: This project is a fantastic opportunity to learn about networking concepts and computer configurations.
Decoding the Essentials: What You’ll Need
Before diving into the configuration steps, let's ensure you have the necessary components. Thankfully, the requirements are minimal:
- An XP Laptop: Obviously! This is the central piece of the puzzle. Ensure your laptop is functional and can boot into the Windows XP operating system.
- An Active Internet Connection: This could be an Ethernet connection, a USB modem (if your XP laptop supports it), or another WiFi network that your XP laptop can connect to. The internet connection will be shared as WiFi.
- Your Laptop’s Wireless Network Adapter: This is the key component. Your laptop must have a functional wireless network adapter (usually built-in).
- Administrative Privileges: You will need administrator access to your XP laptop to make the necessary configuration changes.
- A Few Minutes of Your Time: The process is straightforward and doesn't require advanced technical skills.
Step-by-Step Guide: Creating Your XP Hotspot
Now, let's unleash the hotspot magic. Follow these steps meticulously, and you'll be broadcasting your own free WiFi signal in no time.
1. The Bridge to Connectivity: Configuring Internet Connection Sharing (ICS)
Internet Connection Sharing (ICS) is the core technology that enables your XP laptop to share its internet access. Here's how to set it up:
- Connect to an Existing Internet Source: Connect your XP laptop to the internet using a wired Ethernet cable or wirelessly through another WiFi network. If you're using a wired connection, connect the Ethernet cable to your laptop and to your internet source (e.g., a router). If you're connecting wirelessly, ensure the laptop is connected to a functioning WiFi network with internet access.
- Open Network Connections: Click on the "Start" button, then "Control Panel". Depending on your Control Panel view, you may need to click on "Network and Internet Connections" and then "Network Connections," or simply locate the "Network Connections" icon.
- Identify Your Internet Connection: In the Network Connections Window, locate the icon representing your internet connection. This will be either your Ethernet adapter or the WiFi adapter that is connected to the internet.
- Access Properties: Right-click on the icon representing your internet connection (Ethernet or WiFi), and select "Properties".
- Navigate to the Sharing Tab: In the "Properties" window, click on the "Advanced" tab.
- Enable Internet Connection Sharing: Under the "Internet Connection Sharing" section, check the box that says "Allow other network users to connect through this computer's Internet connection".
- Select the Network Adapter (if prompted): Often, Windows XP automatically selects your proper adapter to share. If prompted, you will then need to select your wireless network adapter from the "Home networking connection" drop-down menu.
- Confirm and Proceed: Click "OK" to save the settings and close the window. Windows XP might display a warning about assigning a static IP address to your network adapter. Allow the system to automatically make the configurations. It will also tell you that your computer's IP address will be set to 192.168.0.1, which it will do automatically.
2. Unleashing the Wireless Network: Configuring an Ad-Hoc Network
Since Windows XP doesn't natively support the creation of a true "hotspot" in the modern sense, we'll utilize an ad-hoc wireless network, which will act as your WiFi hotspot.
- Go Back to the Network Connections Window: Go back to the Network Connections window, as described in Step 1.
- Create a new connection: On the left side, click the option that says "Create a new connection".
- Choose "Set up a connection in my workplace": Click Next, and select "Connect to the network at my workplace".
- Select "Wireless network connection": Select "Wireless network connection".
- Name Your Network: Give your network a name (SSID). Choose something memorable and unique (e.g. "MyXPFreeWiFi").
- Choose Your Security: Select the security type. For compatibility with a wide range of devices, you can initially choose no security (this makes access to your hotspot easy), but be aware that it is not secure. Alternatively, if your devices support it, WEP (Wired Equivalent Privacy) is a basic, yet usable, form of security. If you elect WEP, set a key, using the hex option.
- Finish the setup: Click Next until you reach the end. Your ad-hoc network has now been created.
- Enable the Ad-Hoc Network: In the main Network Connections window, locate and right-click on the newly created wireless network connection (named after the SSID you chose). Select "Properties."
- Verify the TCP/IP Settings: Click on "Internet Protocol (TCP/IP)" and click "Properties." If a static IP address was assigned in step 1, make sure that your IP address starts with 192.168.0.* where the * is another number (like 192.168.0.2). Check your subnet mask, which should be 255.255.255.0. Finally, verify that your Preferred DNS server and Alternate DNS server are set to your ISP's DNS server or public DNS servers (such as 8.8.8.8 and 8.8.4.4).
- Enable the Network: Right-click on your ad-hoc network again, and select "Enable". Your network is now active.
3. Connecting to the Hotspot: Testing and Troubleshooting
Congratulations! Your XP laptop should now be broadcasting a WiFi signal.
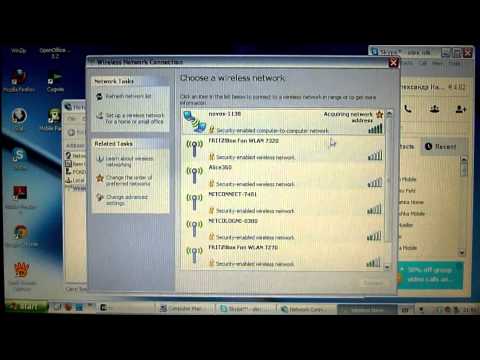
- Test Your Connection: On your smartphone, tablet, or another laptop, scan for available WiFi networks. You should see the name of your ad-hoc network (the SSID you chose earlier).
- Connect to Your Network: Select your network and enter the security key if you set one. Your device should now connect.
- Test Internet Access: Open a web browser on the connected device and try browsing the internet. If everything is properly configured, you should be able to access websites and use the internet.
- Troubleshooting Common Issues:
- No Internet Access on Connected Devices: Double-check that Internet Connection Sharing is enabled correctly in the network adapter properties. Also check that the network adapter has assigned you an IP address that starts with 192.168.0.*. Inspect your DNS servers.
- Limited Connectivity: Verify that your existing internet connection on the XP laptop is active and functioning correctly.
- Devices Can’t See the Network: Make sure your device can see hidden networks or the ad-hoc network. Reduce distance if necessary. Restart your XP laptop.
4. Fine-Tuning: Enhancing Your Hotspot Experience
Once you've established your hotspot, you can optimize its performance and customize its settings.
- Security is Key: While an open network is easy to connect to, it is vulnerable. Consider using WEP or a similar older security standard.
- Network Name (SSID): Customize the name of your network to something memorable and unique.
- Channel Selection: Your WiFi adapter might allow you to select a specific channel. If you experience interference, try changing the channel to one that is less congested.
- Network Mode: Some adapters allow you to select a network mode (e.g. 802.11b/g). Compatibility may be a good indicator of whether or not to use a specific mode.
5. Advanced Configuration and Considerations
For experienced users, you can explore advanced options to improve your hotspot's functionality:
- Static IP Addresses: If you’re experiencing connection issues, assigning static IP addresses to devices can help.
- Firewall Configuration: Adjust Windows XP's built
