how to convert laptop into wifi hotspot windows 7

Title: How to Create a WiFi Hotspot with Windows 7
Channel: 1stepatatime
How to Create a WiFi Hotspot with Windows 7 by 1stepatatime
Turn Your Windows 7 Laptop into a WiFi Hotspot: The Secret Trick!
Unleash Your Inner WiFi Wizard: Secretly Transform Your Windows 7 Laptop into a Hotspot
Ever wished you could share your internet connection, but lacked the extra hardware? Well, prepare to be amazed. You can turn your trusty Windows 7 laptop into a WiFi hotspot. It is a surprisingly simple process. Trust me, it's easier than you think! Forget expensive routers. This secret trick is at your disposal. Are you ready to become a WiFi guru? Let's dive in.
Setting the Stage: Prepping Your Windows 7 Machine
Before we begin, we need to ensure everything is ready. First, confirm your laptop has a working internet connection. This could be through Ethernet or another WiFi network. Second, ensure your laptop has a WiFi adapter. Most laptops have these built-in. This functionality is essential for creating a hotspot. Afterwards, you can proceed. Thirdly, make sure you have administrator access. After all, you’ll be altering network settings.
Unveiling the Magic: The Command Prompt's Role
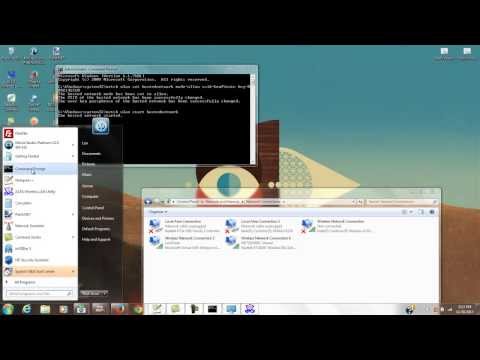
The command prompt is the key. This is where the magic happens. Therefore, locate the command prompt. Click the Windows "Start" button. Then, type "cmd" into the search bar. Next, right-click "Command Prompt" in the results. Select "Run as administrator." This step is crucial. You will need administrative privileges to change network configurations. Consequently, a new window will open, ready for your commands.
Crafting Your Virtual Hotspot: The Command Line Instructions
Now, let's get down to the important part. The first command creates the virtual hotspot. Thus, type this command into the command prompt: netsh wlan set hostednetwork mode=allow ssid=[YourHotspotName] key=[YourPassword]. Replace [YourHotspotName] with your desired hotspot name. For instance, use something catchy like "MyAwesomeWiFi." Then, replace [YourPassword] with a secure password. Ensure it has at least eight characters. This password protects your hotspot. Press Enter.
Next, activate the hotspot. Type the following command: netsh wlan start hostednetwork. This action starts the WiFi hotspot. Finally, you can now share your internet connection.
Sharing the Spoils: Configuring Internet Sharing
The hotspot is active, but it doesn't yet share your internet. You must manually set this up. Firstly, open the "Network and Sharing Center." You can find this in the Control Panel. Secondly, locate the adapter connected to the internet. It will usually be your Ethernet connection or the WiFi you're already using. Thirdly, right-click this connection and select "Properties." A properties window will appear.
After this, select the "Sharing" tab. Check the box that says "Allow other network users to connect through this computer's Internet connection." This grants access. In the drop-down menu, choose the "Microsoft Hosted Network Virtual Adapter." It often says "Wireless Network Connection 2" or something similar. Click "OK" to save the changes. Therefore, other devices will connect now.
Troubleshooting Troubles: Common Hiccups and Fixes
Sometimes, things don't go as planned. Hence, let's troubleshoot some common issues. If the hotspot doesn't start, double-check your commands. Ensure there are no typos. Also, make sure the Wireless Hosted Network Service is running. If devices can't connect, verify the password. Then check your internet connection.
Making it Permanent: Auto-Start Your Hotspot
Wouldn't it be great if your hotspot started automatically? It's possible. Create a batch file. Open Notepad. Input these commands: netsh wlan start hostednetwork. Save the file. Name it something like "StartHotspot.bat." Save the file with ".bat" as the extension. Next, place this file in your "Startup" folder. Your hotspot will then start automatically.
Security First: Maintaining Safe Browsing
Security is essential. Consequently, always use a strong password. Change your password regularly. Consequently, avoid using public WiFi hotspots. Furthermore, update your antivirus software. Finally, be mindful of the websites you visit. These steps ensure a safe and secure browsing experience.
Beyond the Basics: Advanced Customization
You can customize your hotspot further. For example, you can change the network name. You can also modify the password. Re-run the netsh commands. Thus, you can also monitor connected devices. This provides greater control.
Conclusion: Embracing Your Newfound WiFi Powers
Congratulations! You've transformed your Windows 7 laptop into a WiFi hotspot. Now, you can share your internet connection on the go. Moreover, you’ve saved money. You now have WiFi for your other devices. Hence, share this technique with your friends. Embrace your newfound WiFi powers. Go forth and connect the world!
Laptop WiFi Hotspot: Instant Mobile Internet - No More Dead Zones!Okay, buckle up, tech adventurers! Today, we're diving headfirst into a topic that can rescue us from Wi-Fi desperation: turning your trusty Windows 7 laptop into a Wi-Fi hotspot. Consider this your digital life raft when the internet currents go rogue. We'll uncover the "secret trick" – and trust me, it’s easier than assembling IKEA furniture (though the internet feels just as perplexing sometimes!).
Turn Your Windows 7 Laptop into a WiFi Hotspot: The Secret Trick!
Let’s face it: Wi-Fi is the lifeblood of the 21st century. It's how we connect, work, binge-watch, and occasionally, sanity-check our social media feeds. But what happens when your main Wi-Fi connection goes down, or you're stuck in a remote location craving connectivity? The answer, my friends, lies in that often-overlooked gem of a machine: your Windows 7 laptop.
1. Why Bother? The Wi-Fi Hotspot Advantage
Before we get our hands dirty, let's talk about why this is so darn useful. Think of it as your personal internet concierge. Imagine you’re traveling and your hotel Wi-Fi is as reliable as a politician's promise. Or, picture a scenario where your smartphone's data plan is running low, and you need to download a massive file. Turning your laptop into a hotspot is like instantly creating a personal Wi-Fi bubble, a fortress against the internet’s inconveniences. It’s about flexibility, control, and staying connected on your terms. It's the digital equivalent of having a Swiss Army Knife - ever ready for any connectivity challenge.
2. The Hidden Power of Windows 7: Wired Network Magic
Here’s the secret, the magic trick revealed! Windows 7 has a hidden power, a buried function that allows your wired network connection, usually reserved for Ethernet cables, to be shared as a wireless hotspot. Most of us just use the Wi-Fi card, forgetting that often a second one, a bit more obscure, is hidden inside. This allows you the flexibility to connect all your devices using its internal hardware. Ready? Let's dive in.
3. Preparing Your Laptop: Essential Prerequisites
Before we get started, double-check a few things, just like ensuring you have enough gas before driving a car.
- Windows 7, Obviously: This is a Windows 7-centric adventure, so ensure your laptop is running that operating system.
- A Working Ethernet Connection: You’ll want to be plugged into the internet via an Ethernet cable. This is the lifeline, the source of the future Wi-Fi.
- Administrative Privileges: You'll need to be logged in as an administrator. This is crucial because, as the saying goes, “with great power comes great responsibility” – and in this case, the power to share your internet.
4. Step-by-Step: The Secret Revealed!
Now, let's get technical, but don’t worry, it’s not rocket science. We’ll break it down into bite-sized pieces.
- Step 1: Open Network and Sharing Center: Click on the network icon in your system tray (usually in the bottom-right corner of your screen). Then, click "Open Network and Sharing Center." This is where the real magic begins. It's your central control panel.
- Step 2: Change Adapter Settings: In the Network and Sharing Center, click "Change adapter settings" on the left-hand side. This takes you to a window showing all your network connections. Think of it as a digital passport control.
- Step 3: Bridge the Connections (The Secret Sauce): This is where the magic happens. You are going to bridge the connections.
- Right-click on both your Ethernet connection (the one connected to the internet) and your Wireless Network Connection (the one you want to share).
- Select “Bridge Connections."
- Step 4: Wait Patiently: While the system works its magic, a new "Network Bridge" icon will appear, indicating the system is functioning. It may take a few moments.
- Step 5: Test Your New Hotspot: Grab another device, like a smartphone or another laptop, and search for available Wi-Fi networks. You should see the network broadcasted from your Windows 7 device. Connect to this new hotspot, and see if it works!
5. Configuration Considerations: A Smarter Approach
What if this doesn’t work straight away? Then let's dive into what is known as configuration.
- If connecting is tricky:
- Restart Your Devices: Sometimes, the simplest solution is the most effective. Restart both your laptop and the device you're trying to connect. Think of it as a digital reset button.
- Check Firewall Settings: Your firewall might be blocking the connection. Temporarily disable your firewall (try this as a last resort!) or configure it to allow the connection.
- Troubleshoot the Network: If all else fails, use the built-in Windows Troubleshooter. It's like having a virtual tech support specialist right on your device.
6. Security First: Protecting Your New Hotspot Fortress
Just like you lock your front door, you need to secure your new Wi-Fi hotspot. Never allow an unsecured Wi-Fi network.
- Set a Strong Password: This is the most crucial step! In fact, it's the first line of defense. Choose a strong, unique password for your Wi-Fi network.
- Enable Encryption: Make sure WPA2 or WPA3 encryption is enabled. This is the security protocol that protects your data.
- Monitor Connected Devices: Keep an eye on the devices connected to your network. Unnecessary devices can sometimes pose a risk of allowing potential vulnerabilities.
7. Sharing Is Caring: Connecting the Dots
Once you've successfully created your hotspot, you can connect any device that has Wi-Fi capability. Smartphones, tablets, other laptops – they all benefit from your newfound internet generosity. You're essentially creating a personal network, allowing all connected devices to do as they will.
8. Troubleshooting Common Issues: When Things Get a Little Messy
Sometimes, things go awry. Let’s address some common hiccups:
- No Internet Access: Check your Ethernet connection first. Make sure your laptop is actually receiving internet before attempting to share it. (Like trying to share a meal you don't have!)
- Slow Speeds: Internet speeds slow with many devices on the network. Consider the capacity of your internet connection and the number of devices connected. Bandwidth is finite!
- Connection Drops: The issue could lie with your laptop's Wi-Fi adapter or the connecting devices. Check for driver updates and ensure the location is a place of reasonable connectivity.
9. The Power of Sharing, Responsibly
Remember, what you share is precious. Sharing your internet connection can be incredibly helpful, but it's important to be responsible.
- Monitor Data Usage: If you have a data cap on your internet plan, keep an eye on how much data is being used. A surprise bill can ruin your day.
- Be Mindful of Security: Protect your network and the devices connected to it. Security should be your top priority.
10. Beyond the Basics: Advanced Tweaks
Want to get fancy? You can do more.
- Choose a Specific Network Name (SSID): This allows you to easily identify your network.
- Set a Speed Limit: Many tools can control the bandwidth each device is allowed to use.
- Utilize Third-Party Software: There are various programs specifically designed for creating Wi-Fi hotspots, offering more advanced features.
11. The Ethical Implications: A Shared Responsibility
Sharing your internet connection is generally acceptable, but always be mindful of the ethical considerations.
- Respect Internet Usage Policies: Be aware of the terms and conditions of your internet service provider.
- Avoid Illegal Activities: Do not use your hotspot for illegal purposes.
12. A Word on Battery Life: Powering Your Digital Lifeboat
Creating a Wi-Fi hotspot consumes more power than regular usage.
- Keep Your Laptop Plugged In: Whenever possible, have your laptop connected to a power source.
- Monitor Battery Drain: Be aware of how quickly your battery is draining while the hotspot is active.
13. Is This the Only Method? Alternative Solutions
While the bridging connection method is quite possibly the simplest, other options exist.
- Use Third-Party Software: Several software packages can turn your laptop into a hotspot.
- Consider a USB Wi-Fi Adapter: If your built-in Wi-Fi card is unreliable, a USB adapter might be a viable route.
14. Embracing the Freedom: What’s Next?
Now that you've unlocked your Windows 7 laptop’s hotspot capabilities, consider the possibilities! Whether it's a trip, a bad internet connection, or a desire to experience complete internet freedom, you’re ready.
15. Conclusion: Go Forth and Connect!
And there you have it! You now have a powerful tool in your digital arsenal. You’ve learned how to turn your Windows 7 laptop into a Wi-Fi hotspot. You're ready to connect and create your own private Wi
Unlock Your Laptop's Hidden WiFi Hotspot: CMD Trick Revealed!Turn your Windows 7 Laptop into a Wi-Fi Hotspot or Repeater
By Len Farneth Turn your Windows 7 Laptop into a Wi-Fi Hotspot or Repeater by Len Farneth
How to turn your Windows 7810 Laptop or PC into a WiFi Hotspot UpdatedHD

By iTech How to turn your Windows 7810 Laptop or PC into a WiFi Hotspot UpdatedHD by iTech
How to turn your Windows 7810 Laptop into a WiFi Hotspot
By iTech How to turn your Windows 7810 Laptop into a WiFi Hotspot by iTech
Title: Turn Your Windows 7 Laptop into a WiFi Hotspot 2
Channel: AvoidErrors
Turn Your Windows 7 Laptop into a WiFi Hotspot 2 by AvoidErrors
Laptop Wifi Hotspot
Turn Your Windows 7 Laptop into a WiFi Hotspot: The Secret Trick Revealed!
In a world increasingly reliant on seamless connectivity, the ability to transform your Windows 7 laptop into a functional WiFi hotspot is not just a convenience; it's a necessity. Imagine being stranded without a Wi-Fi signal, desperately needing to check an email, access important files, or simply unwind with some online entertainment. Fortunately, the process is straightforward, empowering you to share your laptop's internet connection with other devices, such as smartphones, tablets, and even other laptops, granting you internet access almost anywhere. We’re going to delve deep into the secrets of this often-overlooked yet incredibly useful capability.
Understanding the Basics: What is a Hosted Network?
Before we launch into the practical steps, let's clarify the core concept: a hosted network. In simple terms, this is your Windows 7 laptop acting as a miniature wireless router. Utilizing either your laptop's built-in Ethernet connection or an existing wireless connection, the laptop broadcasts its internet signal, creating a private, secured network that other devices can join. The beauty lies in its flexibility and simplicity; it requires no expensive additional hardware. With just a few commands and settings, you can transform your laptop into a hub, providing Wi-Fi where it’s otherwise unavailable.
Step-by-Step Guide: Activating the Hosted Network
The process of creating a WiFi hotspot on a Windows 7 laptop involves leveraging the command prompt. This may sound intimidating to some, but don't worry. We’ll guide you through each step, ensuring a smooth and successful setup.
Opening the Command Prompt with Administrator Privileges: This is the cornerstone of the entire process. Navigate to the start menu, type "cmd" into the search bar, and then, right-click on "cmd.exe" and select "Run as administrator." This action is crucial, as it grants the command prompt the necessary permissions to modify your network settings. Without administrator privileges, the procedures detailed ahead will fail.
Initiating the Hosted Network: At the command prompt, type the following command and press enter:
netsh wlan set hostednetwork mode=allow ssid="YourHotspotName" key="YourPassword".- Replace
"YourHotspotName"with your desired network name. Choose something that will be easily recognizable and memorable. - Replace
"YourPassword"with the password you wish to use to secure your hotspot. Remember to select a strong, complex password to protect your network. (Eight characters or more is a good starting point)
This command, when executed successfully, configures the fundamental parameters of your hosted network: the SSID (Service Set Identifier, or what the network will be called) and the pre-shared key (the password).
- Replace
Starting the Hosted Network: Now that the network is configured, the next step is to start it. Type the following command into the command prompt and hit enter:
netsh wlan start hostednetwork. This command activates the hosted network, making it visible to other devices.Sharing Your Internet Connection: This is the most important step; the whole purpose of the exercise is to share your active internet connection.
- Open the "Network and Sharing Center." You can typically find it by clicking the network icon in your system tray (bottom-right of the screen) and then clicking "Open Network and Sharing Center."
- Click on "Change adapter settings" on the left-hand side of the Network and Sharing Center window. This will display a list of your network adapters.
- Identify the adapter currently used to connect to the internet (this could be your Ethernet connection or your existing WiFi adapter).
- Right-click on this adapter and select "Properties."
- Click on the "Sharing" tab.
- Check the box that says, "Allow other network users to connect through this computer's Internet connection."
- In the "Home networking connection" drop-down menu, select the "Microsoft Hosted Network Virtual Adapter" (it is often clearly labeled as such).
- Click "OK" to save the changes.
By enabling Internet connection sharing, you have essentially designated the selected network adapter as the source from which the hosted network will derive its internet access.
Verifying the Connection: Your Windows 7 laptop is now broadcasting a Wi-Fi signal. On another device, such as a smartphone or another laptop, scan for available Wi-Fi networks. You should see the network name you specified in step two. Connect to the network using the password you defined. If the connection is successful, you should be able to browse the internet on the connecting device.
Troubleshooting Common Issues: Keeping Your Hotspot Running Smoothly
Despite the straightforward setup, you may encounter issues. Here are some of the common problems and ways to address them:
"The hosted network couldn't be started." This often indicates a driver problem or a conflict with other network settings. Ensure your wireless adapter drivers are up to date. You can update drivers by going to, the "Device Manager" (search in the start menu) right-clicking on your wireless adapter, and selecting "Update driver software." Also, check for any other network adapters that may be interfering. Disable any unnecessary or conflicting adapters.
No Internet Access on Connected Devices: This is the most frequent complaint, which is usually a sharing issue. Double-check the Internet Connection Sharing settings (Step 4 above). Ensure you have correctly selected the correct network adapter to share from and, more importantly, that the "Allow other network users to connect through this computer's Internet connection" box is still checked. Sometimes, the connection sharing setting may become disabled or un-checked due to system updates or other changes.
Limited Connectivity: This can be caused by several factors. First, ensure that your Windows Firewall is not blocking the hosted network's traffic. You might need to create an exception for the hosted network in your firewall settings. Second, check that your router (if applicable) isn't configured to limit the number of devices that can connect to it.
Interference: Wireless signals are susceptible to interference from other devices. If you experience slow speeds or intermittent connections, try changing the channel your hosted network is using. This can often be done via the properties of the hosted network adapter. Look under the Advanced tab, and you can typically find a setting relating to wireless channel selection. Experiment by changing the channel number.
The Hosted Network Doesn't Start After a Reboot: The hosted network configuration may not always persist after a system reboot. You can create a simple batch file (a .bat file) to automatically start the hosted network whenever your laptop starts up. Open Notepad, and enter the following commands:
batch
netsh wlan start hostednetwork
Save this file with a name likestartwifi.bat. Place this file in your "Startup" folder. To do this, press the Win + R keys, typeshell:startup, and press Enter. Then, simply copy the.batfile into the opened startup folder. This ensures the hosted network automatically starts when Windows 7 boots up.
Beyond the Basics: Advanced Customization
While the default settings work well, you can further customize your hosted network for more advanced functionality:
Setting a Static IP Address: If you intend to host a server (e.g., for file sharing or gaming) or require a consistent IP address, you can assign a static IP address to the hosted network adapter. Open the “Network Connections” (from the Network and Sharing Center). Right-click on the "Microsoft Hosted Network Virtual Adapter" and select "Properties." Select “Internet Protocol Version 4 (TCP/IPv4)” and click “Properties.” Under “Use the following IP address,” enter an unused IP address within your router’s IP address range. For example, if your router’s IP address is 192.168.1.1, you could use 192.168.1.100. Also, enter the subnet mask (usually 255.255.255.0), the default gateway (your router’s IP address), and your preferred DNS servers (Google’s DNS servers: 8.8.8.8 and 8.8.4.4).
Adjusting Power Settings: To prevent the hosted network from being automatically disabled to save power, go to "Device Manager," find your wireless network adapter, right-click, select "Properties," go to the “Power Management” tab, and uncheck the box that says "Allow the computer to turn off this device to save power." This is especially important if you intend to use your hotspot for extended periods.
Monitoring and Managing Connections: While Windows 7 doesn't have a built-in tool to monitor connected devices, you can use third-party software to gain more control. These applications often show you the devices connected to your hotspot, their MAC addresses, and the bandwidth they are using.
Security Best Practices: Safeguarding Your Hotspot
Security is paramount, especially when you're sharing your internet connection. Before using your laptop as a hotspot, carefully consider these security measures:
Use a Strong Password: Avoid simple, easily guessable passwords. Use a combination of uppercase and lowercase letters, numbers, and symbols. The longer the password, the better.
Use WPA2-PSK Encryption. This type of encryption offers strong protection against unauthorized access. Your hosted network should
