connect laptop to wifi tv
Title: Cara Menghubungkan LaptopPC ke SMART TV dengan WiFi
Channel: Eko Zulkaryanto
Cara Menghubungkan LaptopPC ke SMART TV dengan WiFi by Eko Zulkaryanto
connect laptop to wifi tv, connect laptop to tv wifi direct, connect laptop to tv wifi windows 10, connect laptop to tv wireless windows 10, connect laptop to tv wireless samsung, connect laptop to tv wireless miracast, connect laptop to tv wireless shortcut key, connect laptop to tv wireless lg, connect laptop to tv wireless bluetooth, connect laptop to tv wireless sony bravia
WiFi TV? Laptop Connection HACKS You NEED!
Unlock Your Ultimate Home Entertainment: WiFi TV and Laptop Connection Secrets!
So, you desire the ultimate home entertainment setup, right? You deserve seamless streaming and impressive screen mirroring capabilities. You arrived at the right place. You're probably thinking about your WiFi TV. You may also be pondering how to connect your laptop. Fear not, because you've landed on the right guide. We're about to explore some essential hacks. These will transform your viewing experience.
Understanding the Wireless Wonders of WiFi TV
First off, let's praise the marvel that is the WiFi TV. It’s more than just a screen; it’s a portal. Consider your living room as a hub of entertainment. The WiFi TV leverages the power of your home network. Because of it, you can enjoy a world of streaming content. Think Netflix, Hulu, and all your favorite services. You do not need any cumbersome cables. With a good internet connection, you're all set. This is a significant upgrade from older setups.
Mastering the Art of Laptop-to-TV Connections
Next, let's tackle the laptop integration. Your laptop holds a treasure trove of entertainment. It can be brimming with movies, presentations, and personal videos. Therefore, it's often the key to unlocking maximum viewing pleasure. However, connecting it to your TV isn't always straightforward. In most cases, it's easier than you realize.
The HDMI Harmony: The Simplest Solution
The HDMI cable is your steadfast companion. Fortunately, it offers the simplest route to success. Nearly every modern laptop and TV supports HDMI. Simply connect the cable. Your TV should instantly display your laptop's screen. This is plug-and-play simplicity at its finest. The connection quality is usually outstanding.
Screen Mirroring Magic: Wireless Freedom
Alternatively, screen mirroring offers a wireless allure. This is the preferred method if you dislike the idea of cables. Many smart TVs have built-in screen mirroring features. They use protocols like Miracast or Apple's AirPlay. Usually, the process is quite easy to initiate. On your laptop, find the screen mirroring option. Then, select your TV from the available devices. Consequently, your laptop's display will appear on your TV.
Troubleshooting Common Connection Conundrums
Occasionally, you might encounter some hiccups. But do not worry, we’ll work through it together. For instance, ensure both your laptop and TV are on the same WiFi network. Sometimes, a simple reboot can work wonders. If the video quality seems off, check your cable or network speed. Remember to update your device’s software to the latest version. Following these steps often resolves connectivity challenges.
Elevating Your Streaming Experience
Moreover, let’s optimize your streaming experience. A stable internet connection is critical. Therefore, consider upgrading your internet plan. Position your router strategically for optimal WiFi coverage. Because of it, you'll minimize buffering and lag. Closing other bandwidth-intensive applications will also help. Make sure you are getting everything you are paying for.
Laptop Connectivity for Enhanced Productivity
Your laptop isn’t just for entertainment. It's also a powerful productivity tool. Connecting it to your TV can transform your workspace. Extend your display to the larger screen. This allows you to multitask with ease. Hence, you can work on presentations. You may also display complex spreadsheets with increased clarity.
Beyond the Basics: Advanced Connection Strategies
For advanced users, there are additional hacks. Consider using a wireless video adapter. These small devices transmit video signals from your laptop to your TV. They are an excellent option for situations where cables are undesirable. Consider exploring various streaming apps on your laptop. Many support casting directly to your TV. This can enhance your overall viewing experience.
Maintaining Your Entertainment Setup
Last but not least, remember regular maintenance. Keep your devices updated with the latest software. Also, clear out unnecessary files to maintain performance. Doing so will contribute to a smoother viewing experience. Clean your TV screen gently to prevent dust and grime. Regularly check your cables for any damage.
Conclusion: Embrace the Future of Home Entertainment
In conclusion, mastering WiFi TV and laptop connections is within your reach. You now wield the knowledge to transform your entertainment setup. You're ready to enjoy movies, shows, and presentations with ease. Go forth and create your ideal home entertainment haven! Embrace your newfound skillset. Enjoy your upgraded viewing experience to the fullest!
Is Your Wi-Fi Torturing You? Find Out NOW! (Laptop Test)WiFi TV? Laptop Connection HACKS You NEED!
Hey tech enthusiasts! Let's be honest, staring at a tiny laptop screen when you've got a glorious, big-screen TV is a bit like eating a gourmet meal with a teaspoon. We all know the feeling – yearning to watch that Netflix binge-worthy series or share vacation photos on the big screen. But, let's be honest, the technology can sometimes feel like a tangled web of confusing protocols. Fear not, because we're diving headfirst into the world of connecting your laptop to your TV, unlocking the secrets of seamless streaming and eliminating the tech-induced headaches. Think of this as your ultimate survival guide!
1. The Great TV-Laptop Divide: Why the Struggle?
Let's face it, sometimes the simplest things become the most complex. You've got two fantastic pieces of tech – your laptop and your TV – but getting them to play nicely together can feel like trying to coordinate a synchronized swimming routine with a toddler and a grumpy cat. The underlying problem? Compatibility, protocols, and a dash of outdated knowledge. But, we're going to banish all the confusion.
2. Understanding Your Arsenal: Connections 101
Before we jump into the hacks, let's understand the weapons in our arsenal. Your TV and laptop likely speak a few different "languages" when it comes to connections.
- HDMI (High-Definition Multimedia Interface): The gold standard! This is your go-to for both video AND audio. Think of it as the superhighway of connectivity – fast, efficient, and delivering the best quality.
- VGA (Video Graphics Array): Older but still kicking. VGA primarily handles video, so you'll need a separate audio cable (like a 3.5mm audio jack) for sound. It’s like using a horse-drawn carriage when you could be using a speed boat.
- Wi-Fi (Wireless Fidelity): The magic of modern convenience! Allows you to connect wirelessly – no wires needed! We'll delve deeper into this later.
- USB-C: Increasingly common and versatile. USB-C can often transmit video and audio, depending on the capabilities of your laptop and TV.
3. The HDMI Hero: Your Plug-and-Play Paradise
For most of us, HDMI is the simplest and best solution. It’s plug-and-play magic!
- The Process: Simply connect an HDMI cable from your laptop's HDMI port to your TV's HDMI port. Boom! Your TV should automatically detect the connection.
- The Result: You should immediately see your laptop's screen mirrored on your TV. Audio should also be transferred.
- Troubleshooting: If it doesn't work, double-check the cable connection. Make sure your TV is on the correct HDMI input. And, if all else fails, restart both your laptop and TV. Sometimes, a simple restart is all it takes to reset the connection.
- Pro Tip: Invest in a quality HDMI cable. A flimsy cable can lead to poor picture quality and dropped connections. Think of it as buying a good pair of running shoes – it makes all the difference.
4. VGA and Friends: When HDMI Isn't an Option
VGA is a legacy connection. It’s still useful if your TV is older or if you're dealing with unusual circumstances.
- The Process: Connect the VGA cable. Then, connect a separate audio cable (usually a 3.5mm audio jack) from your laptop's audio output to your TV's or sound system's audio input.
- The Result: You should see your laptop's screen on your TV. You’ll hear the audio through your TV or connected sound system.
- Troubleshooting: If you can't get audio, check the audio settings on your laptop to ensure the correct output device is selected.
5. The Wonderful World of Wireless: Wi-Fi Streaming Secrets
Let's get to the good stuff – wireless connection! This is where the real freedom lies.
- Smart TVs: Most modern TVs are "smart TVs." They have built-in Wi-Fi and often support screen mirroring technologies like Miracast, Apple AirPlay, or Chromecast. Check your TV's manual for specifics.
- Miracast: A popular standard for screen mirroring on Windows laptops. Simply go to your laptop's settings, search for "Project to a wireless display," and follow the prompts. It’s generally a breeze.
- AirPlay (Apple-centric): If you have a Mac and an Apple TV, AirPlay is a fantastic option. It's incredibly easy to use, offering seamless streaming.
- Chromecast: Google's Chromecast is a small streaming device that plugs into your TV's HDMI port. You can then "cast" content from your laptop (using the Chrome browser or other compatible apps).
- Troubleshooting Wireless Connections: Ensure both your laptop and TV are connected to the same Wi-Fi network. Restarting both devices is often a good first step. If you're experiencing lag or buffering issues, consider moving your devices closer to your router or improving your internet speed.
6. Laptop Setting Adjustments: Tailoring Your Experience
Once you’ve established a connection, you may need to tweak some settings to optimize your viewing experience.
- Display Settings: In your laptop's display settings, you can choose whether to mirror your laptop's screen, extend your display (creating a second screen), or show only the content on your TV.
- Resolution and Aspect Ratio: Adjust the resolution to match your TV's resolution for the best picture quality. Ensure the aspect ratio is correct to avoid distorted images.
- Audio Settings: If you're using a separate audio system, you may need to select it as your default audio output in your laptop's settings.
7. Casting Content With Ease: YouTube, Netflix, and Beyond
Streaming content? This is where the magic really happens!
- Built-in Apps: Many smart TVs have built-in apps for popular streaming services like Netflix, Hulu, and Amazon Prime Video. Use the TV's remote to navigate these apps.
- Casting from Apps: Use the "cast" button (often a square with a Wi-Fi symbol) within apps on your laptop (like the Chrome browser, Netflix, etc.) to stream content directly to your TV.
- Web Browsing: Use your laptop's web browser to access content on your TV. Displaying a web page on your TV is simple.
8. Speed Test: Optimizing Your WiFi for Streaming
Poor Wi-Fi is the enemy of smooth streaming. A quick speed test can reveal any bottlenecks.
- Online Speed Tests: Use a website like Speedtest.net to see your internet download and upload speeds.
- Troubleshooting Slow Wi-Fi: If your speeds are slow, try moving your router closer to your TV and laptop or upgrading to a faster internet plan. You could also consider ethernet for more stability.
9. The Bluetooth Bonus: Audio Excellence
Bluetooth can also be useful for audio streaming.
- Pairing: Pair your laptop with your TV or a Bluetooth-enabled soundbar.
- Audio Settings: Select your Bluetooth device as your default audio output in your laptop's settings.
10. The Miracast Marvel: Unleashing Screen Mirroring
Miracast offers a simple and direct way to mirror your laptop's screen to your TV wirelessly.
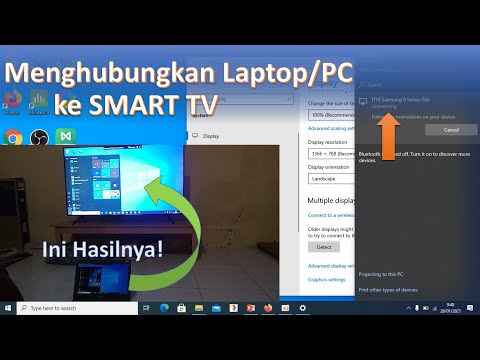
- Quick Setup: From Windows, open the Action Center (usually with the speech bubble icon near the clock) and select "Connect." Choose your TV from the list.
- Enjoying the Show: Once connected, everything on your laptop's screen is mirrored on your TV.
11. AirPlay Adventures: Seamless Apple Integration
If you're in the Apple ecosystem, AirPlay offers a seamless way to stream from your Mac to your Apple TV.
- Easy Connection: Make sure your Mac and Apple TV are on the same Wi-Fi network. Click the AirPlay icon (it looks like a small TV with a triangle) in your Mac's menu bar (the top right corner).
- Mirroring or Extending: Choose to mirror your entire screen or use your TV as a second display.
- Pro Tip: AirPlay often works flawlessly, making it a great choice for movies, videos, and presentations.
12. Chromecast Conundrums: Casting Across Platforms
Chromecast doesn’t require a smart TV. Just a Chromecast dongle.
- Setup: Plug the Chromecast into your TV's HDMI port and follow the setup instructions.
- Casting from Chrome: In Chrome, click the three dots in the top right corner, then select "Cast." Choose your Chromecast device.
- Casting Apps: Many apps (like Netflix, YouTube, Spotify) have built-in Chromecast support.
13. Avoiding Common Pitfalls: Ensuring Smooth Sailing
Let’s address some common issues that can disrupt your streaming sessions.
- Network Congestion: Too many devices using the same Wi-Fi network can slow things down. Try to limit the number of devices streaming at the same time.
- Outdated Drivers: Ensure your laptop's graphics drivers are up to date. Outdated drivers can cause display problems.
- **Interference
Tutorial Cara Menghubungkan Laptop ke Smart TV Tanpa Kabel & Wifi

By anto gibran Tutorial Cara Menghubungkan Laptop ke Smart TV Tanpa Kabel & Wifi by anto gibran
Cara Menghubungkan Dekstop PC ke TV Nirkabel, Gratis, Tanpa WIFI, Tanpa HDMI Langkah demi Langkah 2022

By rizisuper Cara Menghubungkan Dekstop PC ke TV Nirkabel, Gratis, Tanpa WIFI, Tanpa HDMI Langkah demi Langkah 2022 by rizisuper
Cara Menghubungkan Laptop ke TV Samsung 2022 tanpa kabel, tanpa wifi ataupun bluetooth.

By Gio Abdulfatah Cara Menghubungkan Laptop ke TV Samsung 2022 tanpa kabel, tanpa wifi ataupun bluetooth. by Gio Abdulfatah

Title: Cara Menghubungkan & Mencerminkan Layar Laptop di Smart TV Apa Pun Secara Nirkabel Tanpa Aplikasi
Channel: MJ Tube
Cara Menghubungkan & Mencerminkan Layar Laptop di Smart TV Apa Pun Secara Nirkabel Tanpa Aplikasi by MJ Tube
Working With Laptop
WiFi TV? Laptop Connection HACKS You NEED!
Are you tired of the tangled web of wires that seem to perpetually ensnare your living room? Do you dream of streaming your favorite shows and movies seamlessly from your laptop to your television, untethered and free? If so, you've come to the right place. Bid farewell to frustrating setups and embrace a world of effortless connection with the following game-changing laptop-to-TV hacks. These strategies will transform your viewing experience, allowing you to enjoy your content on a larger screen with unparalleled ease.
Unveiling the Wireless Wonders: WiFi TV Streaming Options
The modern age offers a plethora of options for wirelessly connecting your laptop to your TV, eliminating the need for cumbersome cables. Let's delve into some of the most effective methods to achieve a smooth, wireless streaming experience.
Leveraging the Power of Smart TVs: If you own a Smart TV, chances are it already possesses built-in capabilities to connect directly to your laptop via your home Wi-Fi network. These televisions often support technologies like Miracast, Chromecast, or even have their own proprietary versions of wireless connection. Consult your TV's manual or the manufacturer's website to determine the specific wireless protocols it supports. Once you've identified the compatible options, the setup is usually straightforward:
- Ensure Compatibility: Check if your laptop and Smart TV are on the same Wi-Fi network. This is fundamental for establishing a successful connection.
- Initiate Screen Mirroring: On your laptop, access your display settings. Windows users can typically find this by right-clicking on the desktop and selecting "Display settings." MacOS users can access display preferences in "System Preferences." Look for an option to "connect to a wireless display" or "mirror your screen."
- Select Your TV: A list of available wireless displays should appear. Select your Smart TV from this list.
- Confirm Connection: Your TV may prompt you to accept the connection request. Follow the on-screen instructions to authorize the connection.
- Enjoy Wireless Streaming: Your laptop's screen should now be mirrored on your TV, allowing you to stream videos, browse the web, and present content wirelessly.
This method is often the most convenient and straightforward, providing a high-quality, lag-free streaming experience.
Chromecast: The Universal Streaming Solution: A Chromecast device is a small, affordable gadget that plugs directly into your TV's HDMI port. It allows you to stream content from your laptop (or other devices) to your TV over Wi-Fi.
- Setup is Simple: Plug the Chromecast into your TV's HDMI port and connect it to a power source (usually via USB).
- Install the Google Home App: Download the Google Home app on your laptop or smartphone. This app manages the Chromecast device.
- Connect to Your Wi-Fi: Follow the instructions in the Google Home app to connect your Chromecast to your home Wi-Fi network.
- Cast via Chrome Browser: Open the Chrome browser on your laptop. Click on the three vertical dots in the upper right corner of the browser, and select "Cast." Choose your Chromecast device from the list that appears. You can cast the entire screen or specific tabs.
- Cast from Compatible Apps: Many streaming services and apps, such as Netflix, YouTube, and Hulu, have built-in Chromecast support. Look for the "Cast" icon (usually a rectangle with a Wi-Fi symbol) within these apps to send content to your TV.
Chromecast offers exceptional versatility, supporting a vast array of apps and content, making it an ideal choice for most users.
Miracast: The Direct Wireless Connection: Miracast is a wireless display standard that enables devices to connect directly to a TV without needing to be on the same Wi-Fi network (though this can also be setup via Wi-Fi).
- Check Compatibility: Ensure both your laptop and TV support Miracast. Most modern devices do. Check your laptop's display settings (as described above) to see if Miracast is an available option. Your TV's documentation will confirm if it supports Miracast.
- Initiate Mirroring: On your laptop, access the display settings and look for an option to "connect to a wireless display."
- Select Your TV: Your TV should appear in the list of available devices. Select it to initiate the connection.
- Enjoy Wireless Display: Once the connection is established, your laptop's screen will be mirrored on your TV.
Miracast bypasses the need for a router in some setups, offering a direct connection that can be beneficial in certain situations, such as when the Wi-Fi signal is weak or unavailable.
Conquering the Cable Conundrum: Wired Laptop-to-TV Connections
While wireless connections offer unparalleled convenience, wired connections still hold a place in the realm of laptop-to-TV connectivity due to their reliability and potentially higher bandwidth capabilities. Here's how to master the art of wired connections:
The HDMI Highway: The Universal Standard: High-Definition Multimedia Interface (HDMI) is the industry standard for connecting devices to your TV. It carries both audio and video signals, delivering a crisp and clear picture along with exceptional sound quality.
- Locate the HDMI Ports: Both your laptop and TV should have HDMI ports. These are typically located on the side or back of the devices.
- Acquire an HDMI Cable: Invest in a high-quality HDMI cable of sufficient length. The length you need will depend on the distance between your laptop and TV.
- Connect the Devices: Plug one end of the HDMI cable into your laptop's HDMI port and the other end into an HDMI port on your TV.
- Select the Correct Input: On your TV, use the remote control to select the appropriate HDMI input source. Your TV will usually display a list of available inputs, such as "HDMI 1," "HDMI 2," etc.
- Adjust Display Settings (if Necessary): Your laptop should automatically detect the TV and mirror its display. However, you may need to adjust display settings to optimize the output. In your laptop's display settings, you can choose to mirror the display, extend the display (using the TV as a second monitor), or display on only one screen. You can also adjust the resolution and refresh rate for an optimal picture.
HDMI provides a direct, reliable, and high-quality connection, making it a top choice for anyone prioritizing picture and sound performance.
The Versatile VGA Connection (and Adapters): Video Graphics Array (VGA) is an older video connection standard. While less common on modern laptops and TVs, it still offers a viable connection option, especially if you're dealing with older devices. However, VGA only transmits video. You'll need a separate audio cable to transmit sound.
- Identify Ports: Check your laptop and TV for VGA ports.
- Acquire a VGA Cable: Purchase a VGA cable of the appropriate length.
- Connect the Devices: Plug one end of the VGA cable into your laptop's VGA port and the other end into the TV's VGA port.
- Connect Audio (If Needed): If your TV lacks a direct audio input for a VGA connection, you'll likely need a 3.5mm audio cable (the same type as for headphones) to connect your laptop's audio output to your TV's audio input.
- Select the Correct Input: On your TV, select the VGA input source.
- Adjust Display Settings: As with HDMI, you may need to adjust display settings on your laptop to optimize the display resolution and output.
VGA is a functional option but is generally inferior to HDMI in terms of both video quality and ease of use. Adapters may be needed to convert from newer laptop output ports (like USB-C) to VGA.
USB-C to HDMI/VGA Adapters: Bridging the Gap: Many modern laptops exclusively feature USB-C ports for both data transfer and display output. If your laptop falls into this category, you'll need an adapter to connect to your TV.
- Choose the Right Adapter: Select an adapter that matches your TV's input type (HDMI or VGA). Numerous USB-C to HDMI adapters are readily available.
- Connect the Adapter: Plug the USB-C adapter into your laptop's USB-C port.
- Connect the Cable: Connect an HDMI or VGA cable (depending on your adapter) from the adapter to your TV.
- Follow the Standard Connection Steps: Follow the same steps for selecting the input source and adjusting the display settings as outlined above for HDMI and VGA connections.
Adapters are essential for maximizing compatibility and ensuring you can connect your laptop to any TV, regardless of its input ports.
Troubleshooting Tips to Ensure Seamless Streaming
Even with the best setup, you might encounter connectivity issues. Here are some troubleshooting tips to resolve common problems:
Wi-Fi Interference: If you're experiencing choppy video or frequent disconnections with a Wi-Fi connection, consider these factors:
- Router Placement: Ensure your router is centrally located and away from physical obstructions that could interfere with the signal (e.g
