how to connect wifi to dell laptop windows 10

Title: Fix Dell Laptop Wi-Fi is Not Working Problem in Windows 1087 2025
Channel: FIXsage
Fix Dell Laptop Wi-Fi is Not Working Problem in Windows 1087 2025 by FIXsage
how to connect wifi to dell laptop windows 10, how do i connect my wifi to my dell laptop
Dell WiFi Nightmare? Solved! (Windows 10 Fix Inside)
Dell WiFi Woes Vanquished! A Windows 10 Rescue Mission
Ever wrestled with a stubborn Dell laptop, its WiFi connection a flickering phantom? Frustration mounts when your workday grinds to a halt. That blank cursor mocks your attempts to Google a simple fix. Well, breathe easy. This isn't another tech gibberish article. We will cut through the jargon and show you how to conquer those connectivity demons. This solution is specifically for Windows 10 Dell laptops, offering real-world answers to your WiFi woes. Preparing to say "goodbye" to dropped signals? Excellent!
The WiFi Villain: Identifying the Culprit
Before deploying any fixes, identify the root cause. Is the problem intermittent, or is WiFi consistently absent? Consider the environment. Thick walls, metal objects, or other electronics can interfere. Sometimes, the issue is not your Dell, but the router. Restart the router and modem. That simple step works wonders more often. If other devices connect flawlessly, the finger points at your Dell. The problem could also be outdated drivers, faulty network settings, or software conflicts. To get started, eliminate the obvious.
Driver Dilemma: Updating Your Network's Lifeline
Outdated network drivers are a common culprit. Think of drivers as the language your Dell speaks to connect to the WiFi. If the language is garbled, communication fails. The remedy? Download and install the latest drivers.
Here’s a simple approach:
- Access Device Manager: Right-click the Windows Start button. Select "Device Manager."
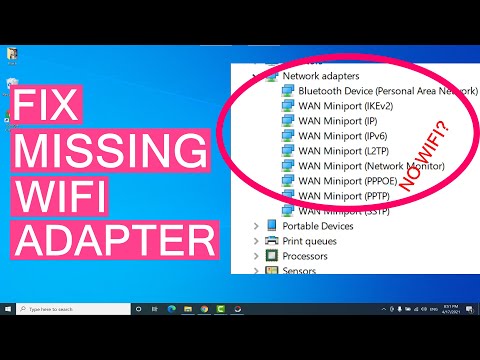
- Find Your Network Adapter: Expand the "Network adapters" section. Locate your WiFi adapter (Intel, Dell Wireless, etc.).
- Update the Driver: Right-click your adapter. Choose "Update driver." Select "Search automatically for drivers." Windows will search online. If an update is found, install it.
- Manual Magic (If Needed): Sometimes, Windows doesn’t find the newest driver. Visit Dell's support website. Enter your service tag. Download the latest WiFi driver specific to your model. Install it.
- Restart: After updating, restart your laptop.
Following these steps addresses potential driver issues directly.
The Windows 10 WiFi Reset: A Fresh Start
Sometimes, Windows holds onto conflicting network settings. A fresh start can work. This won't delete saved WiFi passwords. Don't worry about that.
Here’s how to reset your network settings:
- Open Settings: Click windows start button. Go to “Settings."
- Network & Internet: Select "Network & Internet."
- Network Reset: Scroll down to "Network reset." Click it.
- Reset Now: Click "Reset now."
- Confirm: Windows may prompt you. Confirm the reset. The laptop will restart.
This reset clears any corrupted settings. It often clears up WiFi problems, too.
Power Management Puzzles: Preventing WiFi Shutdown
Windows often conserves battery power. It might shut down your WiFi adapter. This is counterproductive. It can lead to dropped connections. To fix this:
- Device Manager Revisited: Open Device Manager (as above).
- Find Your Adapter: Expand "Network adapters." Locate your WiFi adapter.
- Properties: Right-click your adapter. Select "Properties."
- Power Management Tab: Click the "Power Management" tab.
- Uncheck the Box: Uncheck "Allow the computer to turn off this device to save power."
- Apply & OK: Click "Apply" then "OK."
This prevents Windows from selectively disabling the WiFi to save power.
Troubleshooting Tools: Unveiling the Mystery
Windows has built-in tools. These tools help pinpoint the problem. They’re surprisingly effective.
- Network Troubleshooter: Right-click the WiFi icon in your system tray. Select "Troubleshoot problems." Windows will run diagnostics. It will suggest fixes.
- Command Prompt Tricks: Open Command Prompt as an administrator (search for "cmd" and right-click to "Run as administrator."). Type "netsh winsock reset" then press Enter. Type "netsh int ip reset" then press Enter. Restart your laptop. This can fix underlying network configuration problems.
These tools offer a proactive approach to diagnostics.
Beyond the Basics: Advanced Considerations
If the above steps don’t fix the issue, dive deeper. Consider these additional factors:
Check Your Antivirus/Firewall: Some security software can interfere. Temporarily disable your antivirus. See if WiFi problems vanish. If so, adjust your firewall settings. Allow your WiFi adapter to communicate freely.
Router Firmware: Outdated router firmware can cause compatibility problems. Access your router's settings. Update the firmware. Refer to your router's manual for instructions.
Consider Interference: Move the laptop closer to the router. Test the connection. Remove potential sources of interference (microwaves, Bluetooth devices, etc.).
Hardware Check: In rare cases, the WiFi adapter itself might fail. Consider professional repair or replacement if all other methods fail.
Victory Achieved: Reconnecting to the Digital World
Successfully resolving Dell WiFi problems is empowering. Following these steps should banish the frustration. Remember, persistence is key. Try each solution methodically. You'll restore a stable, reliable connection. You can now browse with confidence. Share this guide with anyone facing a similar challenge. Now, go forth and conquer the digital landscape!
Unlock Your Laptop's WiFi Hotspot: Windows 7 Tethering Trick!Dell WiFi Nightmare? Solved! (Windows 10 Fix Inside)
Hey there, fellow tech travelers! If you're reading this, chances are you’ve experienced the dreaded Dell WiFi nightmare. The constant dropping of connections, the infuriatingly slow speeds, the complete refusal to connect… we’ve all been there. And let me tell you, it can be as frustrating as trying to herd cats while wearing oven mitts! But fear not, because after countless hours of troubleshooting, trial and error, and maybe a few choice words directed at my Dell laptop, we’ve cracked the code. This guide is your lifeline, your digital knight in shining armor, ready to slay the WiFi dragon and bring your Dell back to its connected glory!
1. That Pesky Dell WiFi Problem: A Familiar Foe?
So, what exactly are we dealing with? The Dell WiFi problem, in its various forms, can manifest as a complete lack of connection, intermittent disconnections, incredibly slow browsing speeds, or even the frustrating "limited connectivity" message. It's like your laptop has decided to take a permanent vacation from the internet, and you're stuck twiddling your thumbs. We've seen it all, from brand-new laptops fresh out of the box to older models that have seen their fair share of online battles. We're talking everything from XPS models to Inspiron and Latitude, the issue seems to affect them all. And no matter what Dell model you’re clinging to, the solution often boils down to a few key areas, as we will quickly discover.
2. Understanding the Culprit: Why Is Your Dell WiFi Acting Up?
Before we dive into the fixes, let's understand why this is happening. Think of your Dell's WiFi adapter as a tiny radio receiver. It needs to communicate with your router, the broadcasting tower of your home network. Several things can interfere with this communication. Driver issues, outdated software, router problems, interference from other devices, and even your Windows 10 settings can all throw a wrench in the works. It’s like standing in a crowded room trying to hear someone whispering across the room – a lot of noise and distractions can confuse things.
3. The Windows 10 Driver Dilemma: Your First Line of Defense
One of the most common culprits is outdated or corrupted drivers. Think of drivers as the interpreters that allow your Dell's WiFi adapter to speak the same language as your operating system. If the interpreter isn't up-to-date, things get lost in translation. Here’s how to solve this:
Step 1: The Device Manager Detective: Right-click on the Start button (the Windows icon) and select "Device Manager." Think of this as your computer's internal detective agency.
Step 2: Locate the Network Adapters: Expand the "Network Adapters" section. You'll see a list of network devices, including your WiFi adapter (it might be called something like "Intel Wireless-AC 9260" or similar, depending on your model).
Step 3: Update That Driver! Right-click on your WiFi adapter and select "Update driver." Choose "Search automatically for drivers." Windows will try to find the latest and greatest driver for you.
Step 4: Reboot, Restart, Reconnect: After the driver update, restart your computer. This is crucial! Then, try connecting to your WiFi again. Fingers crossed!
4. Beyond the Drivers: Assessing Router Issues
Sometimes, the problem isn't your Dell at all; it’s the router itself. Think of your router as the gatekeeper to the internet. It can get overloaded, have its own software glitches, or simply be too far away from your laptop.
Restart Your Router: This is the digital equivalent of pressing the reset button on a game console. Unplug your router for 30 seconds, then plug it back in. Give it a few minutes to fully boot up, then try connecting again.
Check Router Placement: Is your router hidden behind a thick wall or crammed in a cupboard? WiFi signals need space to breathe. Move your router to a more central, open location.
Distance Matters: Are you trying to connect from the other side of the house? The further away you are from the router, the weaker the signal.
5. The Network Adapter Troubleshooting Toolkit
If updating drivers and restarting your router haven’t worked, we need to dig a little deeper into the network adapter settings within Windows 10.
Reset Your Network Settings: Search for “Network reset” in the Windows search bar. This will reset your network adapters to their default settings, often fixing configuration conflicts. Be warned: you'll need to re-enter your WiFi password afterward.
Disable and Re-enable: In Device Manager (as described in Section 3), right-click on your WiFi adapter and select "Disable device." Wait a few seconds, then right-click again and select "Enable device." This is like giving your adapter a kickstart.
6. Power Management Mayhem: Unleashing Your WiFi
Windows 10 (and, truthfully, most operating systems) has power-saving features that can sometimes throttle your WiFi adapter to conserve battery life. While great for extending battery life, this can also lead to slow speeds or dropped connections. Let's fix that:
Device Manager Once More: Go back to Device Manager.
Properties Check: Right-click on your WiFi adapter, then select "Properties."
Power Management Tab: Click on the "Power Management" tab. Uncheck the box that says, "Allow the computer to turn off this device to save power." This will ensure your WiFi stays fully powered.
7. The Windows Troubleshooter: Your Built-In Savior?
Windows has a built-in troubleshooter specifically designed for network problems. It's like having a tech support wizard right inside your computer.
Access the Troubleshooter: Search for "Troubleshoot" in the Windows search bar.
Look for Network Problems: Select "Network Adapter" in the troubleshooter list. Then, follow the on-screen instructions. It will automatically identify and attempt to fix common problems.
8. Antenna Alignment: Improving Reception
Believe it or not, the way your Dell's internal antennas are positioned can sometimes affect your WiFi signal.
External Antennas (if available): Some Dell laptops have external antennas. Ensure these are properly positioned, often vertically, for optimal signal reception.
Internal Antennas: While you can't physically adjust internal antennas, consider avoiding anything that might cause interference, like a laptop bag directly on top of the hinge.
9. The Wireless Mode Mystery: Decoding Your Connection Settings
Sometimes, the problem lies in the wireless mode (802.11b/g/n/ac) your WiFi adapter is using. Your router and adapter need to agree on the same mode. A discrepancy can lead to all sorts of connection problems.
Router Settings: Log into your router's settings (usually by typing its IP address into a web browser; check your router's manual for details). Look for the "Wireless Mode" or "Mode" setting. Make sure it supports the standard your Dell's WiFi adapter uses (802.11n or 802.11ac are generally preferred for speed and compatibility).
Adapter Settings: In Device Manager, right-click on your WiFi adapter, select "Properties," and go to the "Advanced" tab. Here, look for settings like "Wireless Mode" or "802.11 Mode." Experiment with different settings to see what works best.
10. Firewall Follies: Checking for Restrictions
Sometimes, your firewall (either Windows Firewall or a third-party firewall) might be blocking your Dell's access to the internet. It's like an overly zealous bouncer at a club, turning away legitimate traffic.
Check Your Firewall Settings: Access your firewall settings (search for "Windows Defender Firewall" in the Windows search bar). Make sure there are no rules blocking your Dell's WiFi adapter or specific network applications.
Temporary Disable (for testing): As a troubleshooting step only, temporarily disable your firewall to see if it's the culprit. If your WiFi suddenly works, you know the firewall is the issue, and you can reconfigure its settings accordingly.
11. Interfering Neighbors: The Channel Chaos
WiFi signals can get congested, especially in areas with a lot of wireless networks. Imagine a crowded highway during rush hour; it's hard to get anywhere fast.
- Change Your Router's Channel: Log into your router's settings and find the "Wireless Channel" setting. Experiment with different channels (1, 6, and 11 are often good starting points). You can even use a WiFi analyzer app on your smartphone or another device to identify the least congested channels in your area.
12. MAC Address Matters: Granting Access
MAC addresses are unique identifiers for your devices. Sometimes, your router might have a setting to allow only specific MAC addresses to connect, or it may be blocking yours.
- Check Your Router's MAC Filter: Log into your router settings and hunt for a "MAC address filtering" feature. If it's enabled, ensure your Dell's MAC address is allowed. You can find your Dell's MAC address in the Device Manager (right-click on your WiFi
How to Add Wireless Wifi Network Manually in Windows 10 PC or Laptop

By Discover You How to Add Wireless Wifi Network Manually in Windows 10 PC or Laptop by Discover You
How to Turn on Wifi on Window 10 in Laptop Wifi Not Turning on Problem Solved Wifi Turned Off

By Zeeshan Awan How to Turn on Wifi on Window 10 in Laptop Wifi Not Turning on Problem Solved Wifi Turned Off by Zeeshan Awan
Fix WiFi Not Showing in Settings On Windows 10 Fix Missing WiFi 2025

By Sandeep Singh Fix WiFi Not Showing in Settings On Windows 10 Fix Missing WiFi 2025 by Sandeep Singh
Title: How To Fix Wireless Adapter Missing In Windows 10 Get WiFi Adapter Back
Channel: Sandeep Singh
How To Fix Wireless Adapter Missing In Windows 10 Get WiFi Adapter Back by Sandeep Singh
Wifi On Laptop Phone
Dell WiFi Nightmare? Solved! (Windows 10 Fix Inside)
The ubiquitous blue glow of your Dell laptop. The promise of connectivity. The reality? A frustratingly intermittent WiFi signal, dropping connections at the most inopportune moments. We, the internet users, have all been there. The frustration mounts: a crucial presentation looms, a deadline is fast approaching, or perhaps you’re simply trying to unwind with your favorite streaming service. And then, the dreaded WiFi drop. No signal. The blinking icon of frustration.
We, and countless other users, have experienced this. Let’s banish this digital discontent. This isn’t just about getting back online; it’s about reclaiming your time, your productivity, and your peace of mind. This guide is engineered to help you transcend the digital doldrums of unreliable WiFi on your Dell laptop, specifically within the multifaceted realm of Windows 10.
Diagnosing the Dell WiFi Debacle: Pinpointing the Culprit
Before implementing any fixes, a proper diagnosis is paramount. Think of it like a medical examination for your digital device. Where does the pain truly originate? Several factors can contribute to a flaky WiFi connection on a Dell laptop. Often, it's a multifaceted problem. Consider the following:
- Driver Issues: Outdated or corrupted network adapter drivers are the usual suspects. These are the software gatekeepers that translate instructions between your Dell’s hardware and Windows 10. An unresponsive, or out-of-date driver produces a chain reaction of issues.
- Network Adapter Configuration: Incorrect settings within your network adapter can stifle your connection. This includes everything from the selected network band to power management settings.
- Router Compatibility: Older routers and compatibility issues can sometimes have a detrimental effect. If your router is outdated, it might struggle with the newer WiFi standards supported by your Dell.
- Interference: WiFi signals are susceptible to interference from other devices. This includes microwave ovens, Bluetooth devices, and even neighboring WiFi networks.
- Windows 10 Updates: We’ve all been there. A Windows update that seems to introduce more problems than it solves. Updates can sometimes clash with your network adapter and, ironically, create connectivity issues.
Tackling the Root: Driver Updates and Reinstallations
Drivers, the often-overlooked code that makes your hardware communicate effectively, are the critical foundation for WiFi functionality. In essence, they translate data. When a driver malfunctions, everything goes wrong.
Step 1: Identifying Your Network Adapter
You have to know what you’re working with, so open the Device Manager. Press the Windows key, and type "Device Manager" and press Enter. Expand "Network adapters.” There you'll find the model of your WiFi adapter, often listed under a name such as "Intel Wireless-AC 9260" or "Dell Wireless 1820A 802.11ac". Make a note of the exact model number.
Step 2: Downloading the Latest Drivers
There are a few avenues here.
- Dell Support Website: This is the safest route. Visit the Dell support website, enter your service tag or model number, and navigate to the "Drivers & Downloads" section. Search for your network adapter model. Download the latest driver designed specifically for your Dell laptop and Windows 10. Always prioritize drivers provided directly by Dell.
- Manufacturer's Website (Intel, Broadcom, etc.): If you know the manufacturer of your network adapter (e.g., Intel), you can visit their website and download the latest driver directly. This is a viable option, but be cautious to ensure compatibility with your specific Dell model.
- Avoid Generic Driver Update Software: These utilities can sometimes install the wrong drivers, leading to instability.
Step 3: Uninstalling the Existing Driver (If Necessary)
Sometimes a fresh start is needed. Go back to the Device Manager. Right-click on your WiFi adapter and select "Uninstall device.” In the confirmation dialog, check the box that says "Delete the driver software for this device” if it appears. Restart your laptop. Windows will attempt to reinstall a generic driver automatically. This offers you the opportunity to install your downloaded driver.
Step 4: Installing the New Driver
After the restart (or, if Windows didn't automatically reinstall a driver, before the restart), install the downloaded driver. Double-click the downloaded ".exe" file and follow the on-screen instructions. Reboot your Dell laptop once more.
Optimizing Network Adapter Settings
Once you've updated your drivers, fine-tuning your network adapter settings can significantly improve its performance and stability.
Step 1: Accessing Adapter Properties
In the Device Manager, right-click your WiFi adapter and select "Properties”.
Step 2: Navigating to the Advanced Tab
Within the Properties window, click on the "Advanced" tab. Here, you'll find a list of settings you can adjust. The specific settings available will vary depending on your network adapter model, but these are universally impactful:
- 802.11n/ac/ax Mode (or similar): Make sure this is set to the highest standard supported by your router and your Dell. This will often be “802.11ac” or “802.11ax” if your network and adapter support it. Select the highest supported standard, and you'll gain speed.
- Wireless Mode: This setting can influence performance. "Auto" can sometimes be problematic. Experiment with setting it to a specific mode (e.g., "802.11ac") if your router and adapter support it.
- Power Management: Open the Power Management tab (if present). Uncheck "Allow the computer to turn off this device to save power.” This prevents Windows from randomly disabling your adapter to save battery life, a common cause of dropped connections.
Step 3: Applying Changes and Restarting
Click "OK" to save your changes. You may need to restart your laptop for the new settings to take effect.
Troubleshooting Common Problems: A Practical Checklist
Sometimes, even with the above steps, problems persist. Here’s a final troubleshooting checklist for those stubborn WiFi woes:
- Restart Your Router: This simple step often resolves temporary glitches on your router. Unplug your router and modem for 30 seconds, then plug them back in. Wait for them to fully restart before testing your connection.
- Check Your Router’s Firmware: Outdated firmware can cause compatibility issues. Consult your router’s manual to learn how to update its firmware.
- Test on Other Devices: Verify if the problem affects all devices connected to your WiFi network. If other devices are experiencing the same issues, the problem likely lies with your router or internet service provider.
- Run the Windows Network Troubleshooter: Windows has a built-in troubleshooter that can often identify and fix common network problems. Right-click the WiFi icon in your system tray (the bottom right corner of your screen) and select "Troubleshoot problems.”
- Disable Bluetooth (Temporarily): Bluetooth and WiFi can sometimes interfere with one another, especially if both are operating on the 2.4 GHz band. Try temporarily disabling Bluetooth to see if it improves your WiFi performance.
- Check for Physical Obstructions: Ensure there are no physical obstructions between your laptop and the router. Walls, metal objects, and appliances can weaken the WiFi signal.
- Consider a WiFi Analyzer App: These apps (available for smartphones and laptops) can help you identify interference from other WiFi networks and choose a less congested channel for your router.
- Factory Reset Your Network Settings (As a Last Resort): In rare cases, your Windows 10 network settings can become corrupted. To reset them, open the "Settings" app, go to "Network & Internet," then "Status." Click "Network reset" and follow the prompts. Be aware that this will erase your saved WiFi passwords, so make sure you have them handy.
Beyond the Fix: Maintaining a Healthy WiFi Environment
Once you've fixed your WiFi woes, maintaining a healthy WiFi environment is imperative. Staying connected is paramount, so consider these preventative actions:
- Regular Driver Updates: Periodically check for updated drivers. The Dell SupportAssist tool (if installed) can often automate this process.
- Optimize Router Placement: Position your router in a central location, away from walls and obstructions. Elevate it off the floor to improve signal propagation.
- Secure Your Network: Use a strong password for your WiFi network and enable WPA2 or WPA3 encryption.
- Monitor Your Connection: Periodically test your internet speed and signal strength. This helps you detect potential problems early.
By following these steps, you can effectively diagnose and resolve common WiFi issues on your Dell laptop running Windows 10, transforming a source of frustration into an arena of seamless connectivity. We're here to provide solutions, not just suggestions, offering precise steps to bring your Dell WiFi back from the brink. Embrace the power of a consistently reliable connection. Eliminate the digital doldrums.
