enable wifi tethering in laptop windows 7

Title: CARA MENGAKTIFKAN WIFI DI WINDOWS 7
Channel: Rdn Channel
CARA MENGAKTIFKAN WIFI DI WINDOWS 7 by Rdn Channel
Unlock Your Laptop's WiFi Hotspot: Windows 7 Tethering Trick!
Transform Your Windows 7 Laptop into a Powerful WiFi Hotspot: A Simple Guide
Imagine yourself stranded; no internet access, but you have your trusty Windows 7 laptop. Frustration mounts, right? But wait! There’s a secret weapon hidden within your operating system. You can turn your laptop into a WiFi hotspot, sharing its internet connection with other devices. So, let’s dive into this clever trick.
Setting the Stage: Understanding the Basics
Before we begin, let’s clarify a few fundamental concepts. Your Windows 7 laptop acts as a bridge. It takes an existing internet connection. Then, it rebroadcasts it as a WiFi signal. This process, often called "tethering," allows sharing with phones, tablets, or other laptops. Essentially, it’s creating a localized WiFi network.
Unveiling the Magic: A Step-by-Step Tutorial
Ready to get started? Here's a straightforward guide to setting up your Windows 7 hotspot:
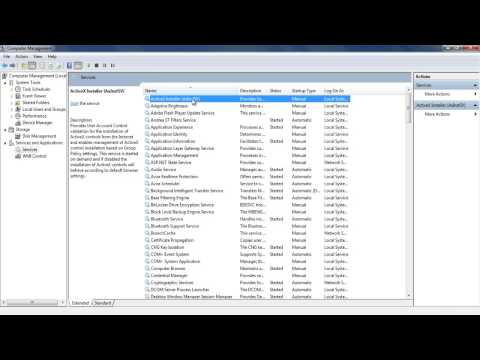
Access the Network and Sharing Center: First, navigate to your control panel. Locate and open the "Network and Sharing Center." You will find it there. Alternatively, simply click on the network icon in your system tray.
Setting Up a Wireless Hosted Network: Now, click on "Change adapter settings." After that, right-click on your active network adapter. In the context menu, select "Properties."
Enabling Internet Connection Sharing: In the properties window, select the "Sharing" tab. Next, check the box that says, "Allow other network users to connect through this computer's Internet connection." Choose which connections to share it with.
Configuring the Hosted Network: Further down, click the "Settings" button. There, you should be able to configure your newly created hotspot. It should be relatively simple.
Launching Your Hotspot: You’re almost there! Open the command prompt. Search for "cmd" in your start menu. Right-click on it and select "Run as administrator."
Entering the Necessary Commands: In the command prompt, we deploy our final steps. Type the following command and press Enter:
netsh wlan set hostednetwork mode=allow ssid="YourHotspotName" key="YourPassword"Replace "YourHotspotName" with your preferred network name. Also, replace "YourPassword" with your chosen password. Make it something secure but also memorable.Starting the Hosted Network: Next, type:
netsh wlan start hostednetworkand press Enter. This command activates your hotspot.
Troubleshooting Common Hiccups
Sometimes, things won’t go perfectly. So, what if things don’t work out? Here are a few common issues and solutions.
If your hotspot doesn’t start, check your network adapter drivers. Updating them can often solve the problem. Also, ensure your internet connection is working correctly before starting. Another possible hiccup? Your firewall might be blocking the connection. Temporarily disable your firewall for testing purposes. If this works, add an exception for the hotspot to your firewall rules.
Optimizing Your Hotspot Experience
So, you’ve created your hotspot. How can you ensure it runs smoothly?
First, consider your laptop’s location. Place it in an open area. This ensures the best signal reach for your other devices. Also, manage your bandwidth usage. Streaming videos or downloading large files will consume significant bandwidth. Limit these activities when others are connected. Finally, choose a strong password. This protects your network from unauthorized access.
Beyond the Basics: Advanced Tips
Want to take your hotspot game to the next level?
You can adjust your power settings. Ensure your laptop doesn't go to sleep while the hotspot is in use. This prevents interruptions. Also, consider the security protocols. WPA2 is generally more secure than WEP. So, make sure your hotspot uses it.
Celebrating Your Success and Embracing Connectivity
Congratulations, you’ve transformed your laptop. You now have a functional WiFi hotspot. This simple trick provides a lifeline in various situations. For example, it helps when traveling or when you have limited internet access.
So, next time you find yourself without a connection, remember this tutorial. It empowers you. Now, you know precisely how to share your internet connection. Thus, you stay connected, regardless of the circumstances. Now go forth and connect!
Unlock Your Phone's Wi-Fi: Laptop Hotspot Hack Revealed!Unlock Your Laptop's WiFi Hotspot: Windows 7 Tethering Trick!
Hey everyone! Ever been in a situation where you desperately needed internet access, but your Wi-Fi was playing hide-and-seek? Or maybe you wanted to share your laptop's internet connection with a friend or device that didn’t have access? Well, buckle up, because we’re about to dive headfirst into a super useful, albeit slightly vintage, Windows 7 trick: turning your laptop into a Wi-Fi hotspot. Trust me, it's like having a personal Wi-Fi genie in a bottle – ready to grant your internet wishes whenever you need it!
1. The Nostalgia Trip: Why Windows 7 Still Matters
Okay, I know, Windows 7 is technically "old school." But let's be real, there are still a ton of us out there rocking this faithful operating system. Maybe you’ve got an older laptop that’s still chugging along like a reliable workhorse. Perhaps you prefer the simplicity and familiarity of Windows 7. Whatever the reason, we’re here to say: you're not alone! And luckily, this neat little trick works wonders on it. We're essentially resurrecting a tech superpower! Think of it as rekindling a digital flame!
2. What's Tethering Anyway? Decoding the Tech Jargon
Before we get started, let's decode the buzzwords. Tethering, in this context, is essentially creating a Wi-Fi hotspot from your laptop. Imagine your laptop as a Wi-Fi router, broadcasting an internet signal for other devices to connect to. It's like your laptop morphing into a Wi-Fi hero! This is different from simply connecting to a Wi-Fi network; you're providing one. Simple, right?
3. The Prerequisites: What You'll Need Before We Begin
Before we fire up our Wi-Fi genies, let’s make sure we have everything in place. You'll need:
- A Windows 7 laptop: Obviously!
- An active internet connection: Preferably via Ethernet (wired) or through a functional Wi-Fi connection. Your laptop needs an initial internet source to share.
- A bit of patience: The setup isn’t rocket science, but a tiny bit of fiddling might be involved.
- A device to connect: Your smartphone, tablet, another laptop – anything that can connect to Wi-Fi.
4. The Magic Spell: Step-by-Step Setup of Your Windows 7 Hotspot
Alright, here comes the fun part! We're going to create a virtual Wi-Fi router. Think of it like casting a digital spell! Here’s how:
Step 1: Open the Network and Sharing Center: Click on the network icon (the little computer screen) in your system tray (bottom right corner of your screen). Then, select "Open Network and Sharing Center."
Step 2: Set Up a New Connection or Network: In the Network and Sharing Center, click on "Set up a new connection or network."
Step 3: Choose "Set up a wireless ad hoc network": From the available options, select this. Don't worry, "ad hoc" isn't as scary as it sounds! It’s just a type of temporary network.
Step 4: Name Your Network and Set Security: A new window will pop up. Give your hotspot a name (something memorable, like "MyLaptopWiFi" or whatever sparks your interest!). Choose a security type (WPA2-Personal is usually a good choice) and create a strong password. This is crucial for keeping your connection secure. Consider it as the secret handshake that keeps your Wi-Fi party safe.
Step 5: Turn on Internet Connection Sharing (Important!): This is the key to sharing your internet. Go back to the Network and Sharing Center. Click on "Change adapter settings." Right-click on your active internet connection (the one your laptop uses to connect to the internet). Go to “Properties.” Click on the “Sharing” tab. Check the box that says “Allow other network users to connect through this computer’s Internet connection.” Select your newly created ad-hoc network from the drop-down list. Click "OK."
Step 6: Start Your Hotspot: Go back to the Network and Sharing Center. Your ad-hoc network should appear there, usually with an "Waiting for users to connect" message. You can start the network here.
5. Troubleshooting Time: Common Hiccups and Solutions
Sometimes things don't go perfectly the first time. Don't fret! Here are a few common issues and how to fix them:
- "Unable to start hosted network": This could be due to outdated network drivers. Go to your Device Manager, find your network adapter, and update the drivers.
- Devices can't connect: Double-check your password. Make sure your firewall isn’t blocking the connection (temporarily disable it for testing purposes, but re-enable it afterward!).
- Slow internet speed: Wi-Fi hotspots share bandwidth. Expect slower speeds than a direct connection. The more connected devices, the slower it will be.
6. Connecting Your Devices: Joining the Wi-Fi Party
Alright, your hotspot is up and running! Now it’s time to get your other devices connected. Simply:
- Scan for Wi-Fi networks: On your smartphone, tablet, or other device, scan for available Wi-Fi networks.
- Select your hotspot: Find the network name you created in Section 4 (e.g., "MyLaptopWiFi").
- Enter the password: Type in the password you set up.
- Enjoy the internet! You’re connected!
7. Securing Your Hotspot: Protect Your Digital Castle
Security is paramount. Never underestimate the importance of a strong password! Also, be cautious about what you're doing online when using a public hotspot—avoid sensitive transactions like online banking.
8. When to Use This Trick: Real-World Scenarios
Think of the possibilities! Here are a few situations where this trick comes in handy:
- Travel: Stuck without Wi-Fi in a hotel room? Your laptop can save the day.
- Emergency Situations: Need to connect to the internet when your primary network is down? Your laptop to the rescue again!
- Sharing Internet with Friends: When you’re with friends and they need a quick internet fix.
9. The Limitations: Understanding the Fine Print
It's not all sunshine and rainbows. Here are a few things to keep in mind:
- Battery Life: Running a hotspot drains your laptop's battery faster. Plug in your laptop whenever possible.
- Range: The Wi-Fi signal’s range is limited. It will not reach across the whole house.
- Alternatives: Modern phones often have built-in hotspot features that may be easier to use.
10. Alternatives to Windows 7 Hotspot: Modern Options
While this trick is cool, it’s worth knowing about other options:
- Mobile Hotspot: Most smartphones have built-in hotspot features. Simple and convenient!
- Dedicated Wi-Fi Routers: For a more robust solution, consider a dedicated portable router.
11. Beyond the Basics: Advanced Tweaks and Customization
Feel free to explore advanced settings in the Network and Sharing Center. You can configure bandwidth settings, manage connected devices, and customize various other aspects of your hotspot.
12. Future-Proofing Your Knowledge: Staying Relevant
Technology evolves quickly, but understanding the fundamentals—like how networks work—will always be valuable. Keep learning and stay curious!
13. The Evolution of Tethering: From Then to Now
Tethering has evolved over time. It shows how we adapt and innovate to stay connected in an ever-changing digital landscape. Windows 7's method is a testament to early DIY networking ingenuity.
14. Lessons Learned: Reflections on the Windows 7 Hotspot Experience
Creating a Windows 7 hotspot is more than just a tech trick; it's a lesson in resourcefulness, adaptation, and the enduring power of older technology.
15. The Grand Finale: Embrace the Power of Your Laptop
You did it! You’ve unlocked your laptop's Wi-Fi hotspot capabilities, and now you’re ready to share your internet connection with the world (or at least your friends and family!). This Windows 7 tethering trick is a fantastic example of how you can leverage your existing technology to solve everyday problems. Embrace the power of your laptop and stay connected, wherever you go!
Conclusion: Your Portable Wi-Fi Powerhouse
So, there you have it! Turning your Windows 7 laptop into a Wi-Fi hotspot is a straightforward process that can be incredibly useful in a pinch. It takes a little bit of configuration and troubleshooting, but it is achievable. It's a testament to the enduring power of technology and the satisfaction of making your devices work for you. Go forth, create hotspots, and spread the internet love! This is a useful skill to have in your arsenal.
FAQs
1. Is this Windows 7 hotspot trick secure?
Yes, it can be secure if you use a strong password (WPA2-Personal) for your Wi-Fi
Is Your WiFi Killing Your Laptop's Speed? (Shocking Truth Inside!)How to Create a WiFi Hotspot with Windows 7

By 1stepatatime How to Create a WiFi Hotspot with Windows 7 by 1stepatatime
How to enable your network connection in Windows 7

By MHELP2U How to enable your network connection in Windows 7 by MHELP2U
How to Enable Internet Connection Sharing in Windows 7
By HOWTECH How to Enable Internet Connection Sharing in Windows 7 by HOWTECH

Title: Solved Not Connected No Connections Are Available Windows 7 Fix internet not connected windows 7
Channel: Dynamic Techno
Solved Not Connected No Connections Are Available Windows 7 Fix internet not connected windows 7 by Dynamic Techno
Wifi On Laptop Phone
Unlock Your Laptop's WiFi Hotspot: Windows 7 Tethering Trick!
In today's interconnected world, the need for constant access to the internet is paramount. Whether you're a student researching for a crucial project, a professional communicating with clients, or simply someone wanting to stay connected on the go, having a reliable internet connection is essential. But what happens when your primary source of internet, like your home network, isn't available, or you're far from a stable Wi-Fi hotspot? The answer, for many Windows 7 users, lies in the ingenious ability to transform your laptop into a mobile Wi-Fi hotspot. This capability, though often overlooked, is a powerful tool that provides a convenient and cost-effective solution to staying connected. We'll delve into the secrets of setting up a Wi-Fi hotspot on your Windows 7 laptop, ensuring you can create a secure, shareable internet connection whenever and wherever you need it.
Understanding the Power of Windows 7's Ad-hoc Network
Before the widespread adoption of smartphones that create their own hotspots, Windows 7 offered a hidden, yet remarkably effective, method to share your internet connection: the ad-hoc network. This technology enables your laptop to act as a virtual wireless router, broadcasting a Wi-Fi signal that other devices can connect to. This is different from a traditional router, which you plug into a broadband connection for wider area Wi-Fi access. Think of it as a temporary, on-the-fly Wi-Fi signal originating directly from your laptop. This ad-hoc capability is crucial for scenarios where a physical router isn't available, and you need to share your internet connection from a wired Ethernet, another Wi-Fi connection, or even a mobile broadband device.
Prerequisites for a Successful Hotspot
To successfully create a Wi-Fi hotspot using your Windows 7 laptop, you need a couple of critical ingredients. First and foremost, you'll need a laptop equipped with a working Wi-Fi adapter. This is the wireless network card that allows your laptop to connect to existing Wi-Fi networks. Confirm your computer has this by checking the Device Manager. Secondly, you need an internet connection. This could be a connection via an Ethernet cable, a USB dongle with mobile broadband, or a pre-existing Wi-Fi connection. The internet source will be the data your laptop shares. Thirdly, make sure you have administrative rights on your Windows 7 laptop to adjust network settings.
Crafting Your Virtual Router: Step-by-Step Guide
We'll now walk through the practical steps needed to set up your Wi-Fi hotspot. This process involves going into Network and Sharing Center, changing the network adapter settings, and then finally, enabling the shared connection.
Step 1: Accessing the Network and Sharing Center
Begin by navigating to the Network and Sharing Center. You can find it easily by clicking on the network icon (usually displayed in the system tray on the lower right side of your screen). This icon represents your current network connection. Right-click on this icon and select "Open Network and Sharing Center". This will open the central hub for managing your network connections.
Step 2: Configuring the Wireless Hosted Network (Command Line)
Windows 7’s built-in support for creating a Wi-Fi hotspot isn’t always immediately visible to most users. That's because it's accessed using the Command Prompt. You'll need to open the command prompt as an administrator, which means running it with elevated privileges. To do this, type “cmd” into the Start Menu search bar, right-click on “cmd.exe,” and select "Run as administrator." Then, type the following commands, entering each command and pressing Enter:
netsh wlan set hostednetwork mode=allow ssid="YourHotspotName" key="YourPassword"(where "YourHotspotName" will be the name other devices see when searching for Wi-Fi and "YourPassword" is the password you wish to use, choose a strong password.)netsh wlan start hostednetwork(this starts the hotspot you configured in the previous command.)
Step 3: Enabling Internet Connection Sharing
Now that the hosted network is activated, you will need to share your current active internet connection to it. Go back to Network and Sharing Center and click on "Change adapter settings." Locate the connection you’re actively using to access the internet. This could be your wired Ethernet connection or your pre-existing Wi-Fi connection. Right-click on the connection and select "Properties."
Step 4: Sharing Your Internet Connection
In the Properties window, navigate to the "Sharing" tab. Check the box that says "Allow other network users to connect through this computer's Internet connection."
Under the "Home networking connection" drop-down, select the wireless network adapter associated with your hosted network. This is the virtual adapter you just created. Usually, it will be labeled something like "Microsoft Virtual WiFi Miniport Adapter" or something similar. Finally, click "OK".
Step 5: Testing Your Newly Created Hotspot
With the above steps complete, your Wi-Fi hotspot is ready. Now, grab your phone, tablet, or another device and scan for available Wi-Fi networks. You should see the hotspot name ("YourHotspotName" that you set earlier) listed. Select the network, enter the password you set, and connect. If all went well, you should have internet access on your device.
Troubleshooting Common Issues
Sometimes, the process isn't perfectly smooth. Here are a few solutions for frequent problems:
- Hotspot Not Showing Up: Double-check that you entered the correct hotspot name and password when setting it up. Make sure the hotspot is running in the Command Prompt using the second command from the setup instructions. Verify your current Wi-Fi adapter driver is updated.
- Devices Connecting But No Internet: The most frequent cause of this is not sharing your connection. Double-check that you correctly enabled internet connection sharing on the “Sharing” tab of your active internet connection’s properties.
- Firewall Interference: Your Windows Firewall, or a third-party firewall, might be blocking traffic. Temporarily disable your firewall to see if that resolves the issue. If it does, you'll need to create an exception for the hotspot to function correctly.
Enhancing Your Hotspot Experience: Security and Performance
Once your hotspot is up and running, it's important to optimize it for both security and performance.
- Protect with a Strong Password: Never use a simple or easily guessed password. A strong, unique password is your first line of defense against unauthorized access. Go into the properties of your wireless hotspot and then make changes to your password under the Security tab.
- Monitor Connected Devices: Regularly monitor the devices connected to your hotspot. If you see any unfamiliar devices, disconnect them immediately.
- Consider Connection Limiting: Many routers allow you to put limits on the bandwidth, limiting the download and upload speed. If necessary, you can limit the available bandwidth of the connection your laptop is sharing to prevent slowdowns.
Beyond the Basics: Advanced Configurations
For the technically inclined, several advanced configurations can enhance the experience.
- Changing the Ad-Hoc Channel: If you have interference from other Wi-Fi networks, you can alter the Wi-Fi channel used by your laptop’s hotspot. This setting can often reduce congestion.
- Using Third-Party Software: Several third-party applications offer more user-friendly interfaces for hotspot creation, often with advanced features like bandwidth monitoring and connection management.
The Enduring Value of Windows 7 Hotspot Capabilities
Even in an era dominated by smartphones and built-in tethering, the Windows 7 hotspot feature remains incredibly valuable. It's a useful option for many scenarios. Consider a scenario where your smartphone's battery is low, or you need a stable connection for a longer period without draining your phone's battery. Or perhaps you need to connect devices that don't have their own mobile data plans, such as older tablets or game consoles.
Conclusion: Empowering Your Connectivity
Creating a Wi-Fi hotspot on your Windows 7 laptop is a practical and empowering skill. By following the straightforward steps outlined, and understanding the fundamentals, you can transform your laptop into a mobile internet hub. So, the next time you find yourself without a readily available Wi-Fi connection, remember the power of this hidden feature and unlock the potential of your Windows 7 laptop to become a portable, shareable internet lifeline. Stay connected, stay productive, and embrace the freedom of on-the-go internet access!
