how to turn on wifi in hp laptop windows 8.1

Title: Connecting Manually to a Wireless Network in Windows 8 HP Computers HP Support
Channel: HP Support
Connecting Manually to a Wireless Network in Windows 8 HP Computers HP Support by HP Support
how to turn on wifi on hp laptop windows 8, how to enable wifi on hp laptop windows 8
HP Windows 8.1 WiFi: The SHOCKINGLY Easy Fix!
HP Windows 8.1 WiFi: Conquer Connectivity Chaos!
Ever felt the frustration of a dropped Wi-Fi signal? It's enough to make you want to chuck your laptop out the window, isn’t it? Especially when you're staring at your HP Windows 8.1 machine. But before you resort to such drastic measures, take a deep breath. Believe me, the solution is far simpler than you might think. It can be a shockingly easy fix, indeed!
The Dreaded Disconnect: Recognizing the Symptoms
First, let's identify the enemy. What are the telltale signs your HP Windows 8.1 WiFi is playing up? Are you experiencing constant dropouts? Perhaps your connection is sluggish, bordering on unusable. Maybe, the WiFi icon stubbornly displays a red "X," indicating no internet access. Furthermore, can you see available networks but fail to connect? You are not alone if you are dealing with these issues. Many HP Windows 8.1 users have faced similar woes.
Restart, Reboot, Reconnect: The Usual Suspects
Before we delve into the more intricate solutions, let's cover the basics. We can troubleshoot in some easy steps. Have you tried the classic "turn it off and on again" approach? Restarting your computer might do the trick. Simultaneously, check your router. Unplug your router for a minute, then plug it back in. Wait a few minutes for it to completely boot up. After all of that, try connecting to your Wi-Fi again. If it still doesn’t work, move on! Sometimes, the simplest solutions are the most effective.
Driver Dilemmas: Identifying the Culprit
If a simple reboot didn't work, we’ll consider more specific issues. WiFi problems often stem from outdated or corrupted drivers. Therefore, you should check your network adapter drivers. Here’s how:
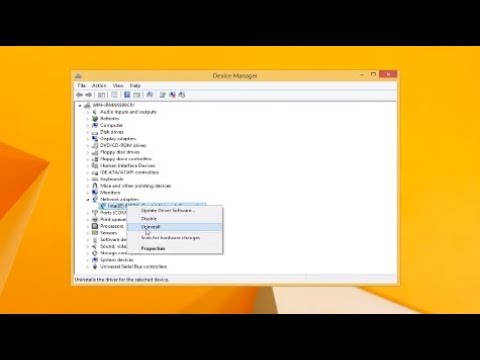
- Step 1: Access Device Manager. Right-click the Start button (or press Windows key + X). Then, select "Device Manager" from the menu.
- Step 2: Locate Network Adapters. Expand the "Network adapters" section. You should see your Wi-Fi adapter listed here.
- Step 3: Update the Driver. Right-click your Wi-Fi adapter. Select "Update driver." Choose "Search automatically for updated driver software." Windows will search for and install the latest drivers.
- Step 4: Reinstall (If Necessary). If updating doesn’t work, try uninstalling the driver. Then, restart your computer, and Windows should automatically reinstall it.
In essence, outdated drivers are a common cause of connectivity issues.
Power Saving Predicaments: A Hidden Menace
Windows 8.1 has power-saving features that can sometimes interfere with your Wi-Fi. So, we need to check if this is the case:
- Step 1: Back to Device Manager. Navigate back to the "Network adapters" in Device Manager (as described above).
- Step 2: Adapter Properties. Right-click your Wi-Fi adapter. Choose "Properties."
- Step 3: Power Management Tab. Go to the "Power Management" tab.
- Step 4: Uncheck the Box. Uncheck the box labeled "Allow the computer to turn off this device to save power." Then, click "OK."
By disabling power-saving, you ensure your Wi-Fi card remains active.
Registry Repair: A More Advanced Tactic
If we still haven't cracked the code, consider delving into the Windows Registry. This can sometimes be a bit tricky, so proceed with caution. Always back up your registry before making any changes:
- Step 1: Open the Registry Editor. Press Windows key + R. Type "regedit" and hit Enter.
- Step 2: Navigate to the Key. Go to the following key:
HKEY_LOCAL_MACHINE\SYSTEM\CurrentControlSet\services\WlanSvc\Parameters\Interfaces. - Step 3: Find Your Adapter. Look for a folder within "Interfaces." This folder's name is a long string of letters and numbers. It corresponds to your Wi-Fi adapter.
- Step 4: Edit the Value. Right-click on your adapter’s folder and select "New > DWORD (32-bit) Value." Name it "Dword" and set Value data to 2. Reboot your PC.
This approach can sometimes resolve conflicts related to the Wi-Fi service.
Troubleshooting Further: Additional Steps
Beyond these primary solutions, other factors might play a role. Therefore, you should check the following:
- Firewall Interference. Ensure your firewall isn't blocking your connection. Try temporarily disabling your firewall to test.
- Antivirus Software. Some antivirus programs can also interfere. So, temporarily disable your antivirus and see if it helps.
- Wireless Signal Strength. Move closer to your router. Obstructions and distance can weaken your signal.
- Check for Hardware Issues. If none of the above work, there might be a hardware issue within your WiFi adapter.
The Unveiling:
In conclusion, fixing your HP Windows 8.1 WiFi doesn't have to be a daunting task. Indeed, by methodically working through these steps, you can swiftly diagnose and resolve most connectivity problems. Moreover, with a little patience and these straightforward solutions, you can get back online in no time. Remember, a strong Wi-Fi connection is just a few troubleshooting steps away. Hopefully, this guide has saved you from throwing your laptop. Now, go forth and enjoy seamless browsing!
Laptop WiFi MIA? Find Your Network NOW!HP Windows 8.1 WiFi: The SHOCKINGLY Easy Fix!
Hey tech adventurers! Ever felt like your HP laptop was playing hide-and-seek with your Wi-Fi signal in Windows 8.1? You're not alone! We’ve all been there, staring at those blinking bars, desperately trying to connect to the digital world. But fear not, because the solution to your HP Windows 8.1 Wi-Fi woes is probably a lot easier than you think. We're diving headfirst into how to fix those frustrating connection issues, and let me tell you, it's not rocket science. It’s more like… well, fixing a leaky faucet - simple, straightforward, and so satisfying when you finally get it right.
The Problem: Why Is My HP Windows 8.1 Wi-Fi Giving Me the Cold Shoulder?
First things first, let's diagnose the issue. Think of your Wi-Fi connection like a nervous friend. Sometimes, it’s just shy. Other times, it has a legitimate reason for being unavailable. The usual suspects include:
- Driver Issues: Imagine the driver as the interpreter between your laptop and your Wi-Fi card. If the driver is outdated, corrupt, or missing, your laptop won't understand the language of Wi-Fi.
- Hardware Troubles: Sometimes, the problem is physical. Your Wi-Fi card might be loose, or the antenna could be having a bad day.
- Software Glitches: Windows 8.1, bless its heart, isn't always perfect. Bugs and glitches can occasionally interfere with your Wi-Fi connectivity.
- Router Woes: Let's not forget the router! It’s the gateway to your internet paradise, and sometimes, it needs a little TLC (or a good ol’ reboot).
Step 1: The Reboot Ritual (And Why It Actually Works!)
Okay, before we get into anything fancy, let's start with the tried-and-true remedy: the reboot. I know, I know, it sounds basic. But trust me, it's often the digital equivalent of a good night's sleep. Restart your HP Windows 8.1 laptop and your router. Let them both take a breather for a minute or two, then bring them back to life. It’s like hitting the “reset” button, clearing out temporary files and refreshing the connection. Think of it as giving both your laptop and your router a digital spa day.
Step 2: Checking the Obvious: Is Wi-Fi Actually Turned On?
This might sound silly, but you wouldn't believe how many times I've spent ages troubleshooting only to realize the Wi-Fi switch was off. On many HP laptops running Windows 8.1, there’s a physical switch, often on the side or front of the laptop, that controls the Wi-Fi radio. Make sure it's flipped to the "on" position. Also, check the system tray (that little area in the bottom-right corner of your screen with the icons). You should see a Wi-Fi icon (it looks like a set of curved lines). If it's grayed out or has an "X" on it, Wi-Fi is disabled. Right-click on the icon and make sure "Enable Wi-Fi" is selected.
Step 3: Digging Deeper: The Device Manager Detective
Now, let's get a bit more techy. We're going to check if your Wi-Fi adapter is being recognized by Windows.
- Open the Device Manager: Press the Windows key + X and select "Device Manager" from the menu.
- Look for Network Adapters: Expand the "Network adapters" section. You should see an entry for your Wi-Fi adapter (it might be called something like "Wireless Network Adapter" or "Intel(R) Wireless-AC 7260").
- Check for Errors:
- A Yellow Exclamation Mark: Indicates a driver problem. You’ll likely need to update or reinstall the driver.
- A Red "X": Means the device is disabled. Right-click on the adapter and select "Enable device."
- No Wi-Fi Adapter Listed: This suggests a major problem. You may need to reinstall your Wi-Fi card drivers.
Step 4: Driver Detective Work: Updating Your Wi-Fi Driver
If you found a yellow exclamation mark, the driver is likely the culprit. Here’s how to update it:
- Right-Click on the Wi-Fi Adapter: In Device Manager, right-click on your wireless adapter.
- Select "Update driver": Choose "Update driver" from the menu.
- Choose How to Update:
- Search Automatically for Drivers: Windows will try to find the latest driver online.
- Browse My Computer for Driver Software: If you've downloaded the driver from HP's website (recommended), you can browse to the file.
Pro Tip: Always download the latest drivers directly from the HP support website for your specific laptop model. This ensures you get the correct driver tailored to your hardware.
Step 5: Reinstalling Drivers – The Nuclear Option
If updating doesn’t work, it's time to try reinstalling the driver:
- Uninstall the Driver: Right-click on your Wi-Fi adapter in Device Manager and select "Uninstall device."
- Restart Your Laptop: Windows will attempt to reinstall the driver automatically. If not:
- Install the Driver Manually: Download the driver from HP's website (again, crucial!). Run the installation file and follow the on-screen instructions.
Step 6: The Router Shuffle: Rebooting and Reconfiguring
Sometimes, the problem isn't your laptop; it's your router. A simple reboot can work wonders:
- Unplug Your Router: Unplug your router from the power outlet.
- Wait: Give it a good 30 seconds.
- Plug It Back In: Plug the router back in.
- Wait for It to Boot Up: Wait for the router to fully restart (usually a few minutes).
- Check Router Settings: Make sure your router is broadcasting a Wi-Fi signal, and that the security settings haven't changed.
Step 7: Firewall Follies: Checking Your Firewall Settings
Your firewall might be blocking your Wi-Fi connection.
- Open the Windows Firewall: Search for "Windows Firewall" in the Start screen and open it.
- Allow a Program Through the Firewall: If you suspect your Wi-Fi adapter is being blocked, go to "Allow an app or feature through Windows Firewall."
- Make Exceptions: Find your Wi-Fi adapter in the list and make sure both "Private" and "Public" boxes are checked.
Step 8: Running the Network Troubleshooter: Your Built-in Fix-It Guy
Windows 8.1 has a built-in network troubleshooter. Think of it as a digital detective that tries to find and fix common network problems.
- Right-Click on the Wi-Fi Icon: In the system tray (the bottom right of your screen).
- Select "Troubleshoot problems": Windows will run a diagnostic and attempt to resolve any issues.
Step 9: Advanced Troubleshooting: Checking IP Address Settings
In very rare circumstances, manually configured IP address settings may be causing issues.
- Open Network and Sharing Center: Right-click on the Wi-Fi icon and select "Open Network and Sharing Center."
- Change Adapter Settings: Click on “Change adapter settings” on the left-hand side.
- Right-Click on Your Wi-Fi Adapter: Click on “Properties.”
- Double-click on Internet Protocol Version 4 (TCP/IPv4): Make sure that your computer is configured to obtain an IP address automatically, rather than having a static IP address set. Select Obtain an IP address automatically, and Obtain DNS server address automatically.
Step 10: The Physical Inspection: Checking Your Hardware
While less common, hardware problems can sometimes be to blame.
- Check the Wi-Fi card connector on your HP laptop hardware.
- If you're feeling brave (and comfortable with opening up your laptop), you could check the physical components, such as the connection to the Wi-Fi card.
Important Note: Opening up your laptop can void your warranty. If you're not comfortable, it's best to consult a professional.
Step 11: The "Hidden Network" Gambit (If You're Feeling Adventurous)
Sometimes, a hidden network setting can cause problems.
- On the Windows 8.1 desktop, click on the Wi-Fi icon from the system tray.
- Click Network and Sharing Center
- Choose “Set up a new connection or network”
- Click “Manually connect to a wireless network”
- Fill in the network name, security type, and security key.
Step 12: Resetting Network Settings (Use with Caution!)
This is a more advanced option, but it can sometimes resolve stubborn network problems.
How to Connect to WiFi on Windows 8

By HOWTECH How to Connect to WiFi on Windows 8 by HOWTECH
Windows 8.1 - No Internet Connection Available
By MDTechVideos Windows 8.1 - No Internet Connection Available by MDTechVideos
Windows 8 - How to turn on WiFi

By HowTo Windows 8 - How to turn on WiFi by HowTo

Title: Fix HP Laptop Wi-Fi is Not Working Problem in Windows 1087
Channel: FIXsage
Fix HP Laptop Wi-Fi is Not Working Problem in Windows 1087 by FIXsage
Laptop Wifi Connect
HP Windows 8.1 WiFi: The Effortless Solution You've Been Searching For!
Have you found yourself wrestling with a recalcitrant WiFi connection on your HP Windows 8.1 machine? The frustration is palpable; the inability to access the internet, a cornerstone of modern life, grinds productivity to a halt and stifles communication. We understand. We’ve all been there. But fret no more! This isn’t merely another troubleshooting guide; this is a meticulously crafted roadmap to a seamless, stable, and surprisingly easy WiFi experience on your HP Windows 8.1 laptop or desktop. Prepare to bid adieu to those dreaded connectivity issues and embrace the digital world with renewed confidence.
Diagnosing the WiFi Dilemma: Pinpointing the Root Cause
Before launching into solutions, let’s perform a brief but crucial diagnostic. Knowing why your WiFi isn’t cooperating will significantly streamline the fix.
- Is Your WiFi Adapter Enabled? This might sound elementary, but it’s the first and often overlooked step. Locate the WiFi icon in your system tray (usually a series of bars radiating outwards). The icon should be illuminated. If not, right-click on the icon and select "Open Network and Sharing Center." On the left-hand side, click "Change adapter settings." In this window, find your WiFi adapter (it will likely be labeled as "Wireless Network Connection"). If it's disabled, it will be grayed out. Right-click on the adapter and select "Enable."
- Confirm the Router’s Signal Strength: Can other devices, like your smartphone or another laptop, connect to your WiFi network? If not, the problem might lie with your router, not your HP Windows 8.1. Check that the router is powered on, has a stable internet connection (check the lights on the router itself), and that you are within range. Try restarting the router.
- Driver Corruption? Outdated, corrupted, or incompatible drivers are notorious culprits. Windows 8.1 drivers can sometimes become problematic. We'll address driver-related issues shortly.
- Interference: Physical obstructions (walls, metal objects) and other electronic devices (microwaves, cordless phones) can interfere with your WiFi signal. Position your laptop as close to your router as possible, and eliminate any potential sources of interference.
- Network Name (SSID) Issues: Sometimes, the "forgetting" of network credentials can occur. Double-check that your HP Windows 8.1 has the correct network name selected, and the correct password entered.
The Foolproof Path: Step-by-Step Solutions for Your HP Windows 8.1 WiFi
Now, let’s dive into the practical solutions, each meticulously designed to resolve your WiFi woes.
1. The Driver Download and Re-installation - Your First Line of Defense
Driver issues are, sadly, ubiquitous. They cause the most frequent WiFi problems in Windows 8.1. A driver acts as the translator between your Windows operating system and your WiFi adapter. Let's ensure the translator speaks the right language.
- Identify Your WiFi Adapter: The first step is to ascertain the exact model of your WiFi adapter. To do this, press the Windows key + X simultaneously. A menu will appear. Select "Device Manager." Within Device Manager, expand the "Network adapters" category. You'll see a list of network adapters installed on your system. Your WiFi adapter will be listed there, often with "Wireless" or "WiFi" in the name (e.g., "Intel Centrino Wireless-N 2230"). Write down the exact model name.
- Navigate to the HP Support Website: Open your web browser, and go to the official HP Support website.
- Enter Your Laptop Model Number: You’ll need your specific HP laptop model number. This is usually found on a sticker on the bottom of your laptop or along the battery compartment. It's a string of letters and numbers (e.g., "HP Pavilion g6-1234ca"). Input the model number into the search bar on the HP website.
- Find the Driver Downloads: Once you have entered your model number, find the “Drivers” or “Software & Drivers” section for your specific model.
- Select the Appropriate Operating System: Make sure to select the correct Windows 8.1 operating system from the available options.
- Locate the Wireless Adapter Driver: Browse the list of drivers and locate the driver specifically for your WiFi adapter. Download the latest driver version.
- Uninstall the Existing Driver: Back in Device Manager (press Windows key + X, then select "Device Manager"), locate your WiFi adapter under "Network adapters." Right-click on the adapter and select "Uninstall device." Check the box that says "Delete the driver software for this device" (this is important). Follow the prompts.
- Install the Downloaded Driver: Once the old driver is uninstalled, run the driver installation file you downloaded from the HP website. Follow the on-screen instructions. Restart your laptop.
2. Troubleshoot the Troubleshooter: Leverage the Built-In Tools
Windows 8.1 features a built-in network troubleshooter, an often-overlooked resource that can be incredibly effective.
- Access the Troubleshooter: Right-click on the WiFi icon in the system tray (the signal bars). Select "Troubleshoot problems."
- Follow the Prompts: The troubleshooter will automatically diagnose potential problems and attempt to fix them. It might suggest resetting your network adapter, restarting your router, or other solutions.
- Apply the suggested fixes: Be patient, as it may take a few moments to do the assessment. Follow the advice the troubleshooter suggests.
3. Manual IP Configuration: A Targeted Approach
In some cases, automatically obtaining an IP address from your router fails. A manual IP configuration might fix the problem.
- Open Network and Sharing Center: Right-click the WiFi icon in your system tray, and select "Open Network and Sharing Center."
- Change Adapter Settings: On the left-hand side, click "Change adapter settings."
- Properties of Your WiFi Connection: Right-click on your WiFi adapter (Wireless Network Connection) and select "Properties."
- Internet Protocol Version 4 (TCP/IPv4): In the list of items, select "Internet Protocol Version 4 (TCP/IPv4)" and click the "Properties" button.
- Use the Following IP Address: Select the "Use the following IP address" radio button. You'll need to obtain IP address information from your router. The simplest is to use the default Gateway address as the third portion in your IP address, and then select a number at the end that is not already in use. For example, if the router (Gateway) address is 192.168.1.1, you might use an IP address like 192.168.1.100.
- IP address: 192.168.1.100 (example)
- Subnet mask: 255.255.255.0 (this is usually default)
- Default gateway: 192.168.1.1 (your router’s IP address)
- Use the Following DNS Server Addresses: Select the "Use the following DNS server addresses" radio button.
- Preferred DNS server: 8.8.8.8 (Google's public DNS server)
- Alternate DNS server: 8.8.4.4 (Google's public DNS server)
- Click OK: Save the settings by clicking "OK" on both the TCP/IPv4 Properties window and the WiFi adapter Properties window.
4. Firewall Interference: Ensuring Open Communication
Your Windows Firewall (or any third-party firewall you might be using) can block internet access for specific applications or services, including WiFi.
- Open Windows Firewall: Type "Firewall" into the Windows search bar (accessible by pressing the Windows key). Select "Windows Firewall."
- Allow an App or Feature: In the Firewall window, click "Allow an app or feature through Windows Firewall."
- Check for WiFi-Related Entries: Ensure that the "Wireless Network Connection" and any related network services are enabled for “Private” and “Public” networks. If they are disabled, click the "Change settings" button (you may need administrator privileges) and check the boxes to enable them.
5. Power Management Settings: Preventing Sleep Mode Disruptions
Sometimes, Windows power management settings can inadvertently disconnect your WiFi adapter to conserve power.
- Open Device Manager: Press the Windows key + X, and select "Device Manager."
- Expand Network Adapters: Expand the "Network adapters" category.
- Properties of Your WiFi Adapter: Right-click on your WiFi adapter and select "Properties."
- Power Management Tab: Click on the "Power Management" tab.
- Uncheck the box: Uncheck the box that says "Allow the computer to turn off this device to save power." Click "OK."
6. Router Firmware Updates: Keeping Your Gateway Current
Your router's firmware (its operating system) can become outdated, leading to compatibility issues with your HP Windows 8.1.
- Access Your Router's Configuration Page: Open your web browser and enter your router's IP
