laptop wifi ipv4 no network access
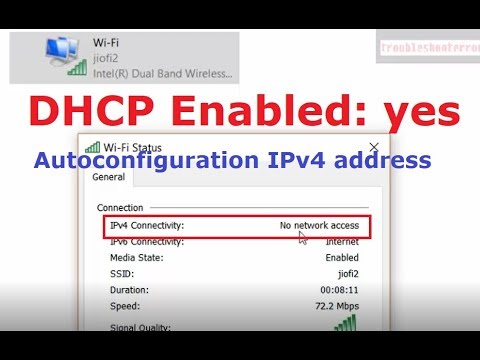
Title: Wi-Fi status IPv4 Connectivity No network access. DHCP Enabled but Autoconfiguration IPv4 address
Channel: troubleshooterrors
Wi-Fi status IPv4 Connectivity No network access. DHCP Enabled but Autoconfiguration IPv4 address by troubleshooterrors
laptop ipv4 no internet access, wifi no network access, laptop wifi not detecting networks, laptop wifi not showing available networks
Laptop WiFi Nightmare? Fix IPv4 No Network Access NOW!
Laptop WiFi Woes? Vanquishing the "IPv4 No Network Access" Phantom!
Ever found yourself staring blankly at your laptop screen, yearning for the boundless expanse of the internet, only to be met with the dreaded "No Network Access" message? It’s a digital heartbreaker, isn't it? That tiny, infuriating notification often signals a deeper, more nuanced problem than just a flaky connection. Indeed, the root of the issue might very well be lurking within your IPv4 settings. However, fear not, intrepid internet explorer! We’re about to journey into the troubleshooting abyss and emerge victorious.
Decoding the IPv4 Enigma: A Quick Primer
Before we dive headfirst into solutions, however, let us first establish a foundation. IPv4, or Internet Protocol version 4, is the foundational protocol that governs how your laptop communicates with the internet. Think of it as the language your computer uses to shout across the digital ocean, requesting websites, emails, and cat videos. Simply put, proper IPv4 configuration is absolutely crucial for connectivity. In fact, a misconfigured IPv4 setting can effectively render your machine mute, unable to participate in the global conversation. Therefore, understanding the basics is an advantage when it comes to troubleshooting.
Troubleshooting Tango: Step-by-Step to a Connected World
So, your WiFi connection is stubbornly refusing to cooperate. Where do we begin? Firstly, take a deep breath. Remaining calm is often the first step. Secondly, consider these tried-and-true fixes.
1. The Reboot Ritual: Your First Digital Confession
It sounds cliché, granted, but often the simplest solutions hold the most power. Restarting your laptop is akin to hitting the reset button on your digital life. Subsequently, this simple act can often resolve minor glitches that are blocking access. Furthermore, you should also restart your router and modem. Allow everything to fully reboot; give the networks time to reestablish their bonds. Consequently, check your connection. Did it work? Wonderful. If not, proceed.
2. IP Address Acquisition: Automatic or Bust
In the modern age of DHCP (Dynamic Host Configuration Protocol), your laptop should ideally grab an IP address automatically. Therefore, let's verify this. Here's how:
Windows: Navigate to your Network Connections (search for "View network connections" in the Search bar). Right-click on your WiFi adapter and select "Properties." Select "Internet Protocol Version 4 (TCP/IPv4)" and click "Properties." Ensure "Obtain an IP address automatically" and "Obtain DNS server address automatically" are selected.
macOS: Go to System Preferences > Network. Select your WiFi connection. Click "Advanced…" and then the "TCP/IP" tab. Confirm that "Configure IPv4" is set to "Using DHCP."
Following this, if automatic acquisition wasn't enabled, enable it and save your changes. After that, retest your connection.
3. Manual IP Configuration: The Fine-Tuning Option
Sometimes, automatic configuration fails, especially within complex networks. In that case, a manual setting may be what you need. However, proceed with caution, as incorrect settings might further complicate matters. First, gather your network information. You'll need:
- Your IP address.
- Subnet mask.
- Default gateway.
- DNS server addresses.
You may find these details in your router's settings (usually accessible through your web browser by typing your router's IP address) or by contacting your internet service provider. Afterward, return to the TCP/IPv4 properties as described above. Select "Use the following IP address." Enter the required information, being extremely careful to type everything correctly. Once filled, save the changes and test your connection. Similarly, for macOS, you'll find these settings under the "TCP/IP" tab in Network Preferences.
4. DNS Delights: Guiding Your Digital Way
DNS, or Domain Name System, translates human-readable website addresses (like google.com) into computer-friendly IP addresses. If your DNS settings are incorrect, you'll struggle to reach the internet. Therefore, configuring your DNS servers correctly is paramount. You may use your ISP's DNS servers or, alternatively, public DNS servers like Google's (8.8.8.8 and 8.8.4.4) or Cloudflare's (1.1.1.1 and 1.0.0.1). Enter these addresses in the DNS server fields within your TCP/IPv4 settings. Indeed this is a common fix!
5. Network Adapter Troubles: Drivers and Diagnostics
Outdated or corrupted network adapter drivers can also be the culprit. Begin by updating them.
Windows: Search Device Manager and find "Network adapters." Right-click on your WiFi adapter and select "Update driver." Select "Search automatically for drivers."
macOS: Updates are usually integrated into system updates. However, consider checking for specific driver updates from your adapter manufacturer’s website if you encounter issues.
After that, consider running built-in network diagnostics. Often, these tools can detect and, in some cases, fix common connection problems.
6. Router Reboot Revisited: Unleashing the Power Cycle
If you've tried everything else, and are still facing problems, consider the nuclear option: a hard reset of your router. Press and hold the reset button (usually located on the back) for about 30 seconds. This resets the router to its factory settings. However, be aware that you might need to reconfigure your router after this process.
The Final Farewell: Reclaiming Your Digital Freedom
Dealing with "IPv4 No Network Access" can certainly be frustrating. However, by meticulously following these troubleshooting steps, you should be well on your way to reconnecting swiftly. Remember, patience is a virtue in the digital realm. And when all else fails, don't hesitate to call your internet service provider. More often than not, they have insights beyond your scope. Because, ultimately, a little tech savvy goes a long way towards reclaiming your digital freedom! Enjoy your newfound online access!
Toshiba Satellite WiFi: The SHOCKINGLY Easy On/Off Switch!Laptop WiFi Nightmare? Fix IPv4 No Network Access NOW!
Ever felt like your laptop's WiFi has become a grumpy, unreliable housemate? One minute it's happily streaming cat videos, the next, it's stubbornly refusing to connect, throwing up that dreaded "IPv4 No Network Access" error. We've all been there! It's like being stranded on a digital island, cut off from the world of memes, emails, and crucial Zoom calls. But fear not, fellow internet explorers! We’re here to navigate this treacherous digital terrain, and in the end, restore your laptop’s WiFi superpowers.
1. The Dreaded IPv4 No Network Access: What's the Fuss About?
Think of your internet connection as a complex highway system. IPv4 (Internet Protocol version 4) is the old, tried-and-true set of traffic rules that your laptop uses to "talk" to the internet. When it says "No Network Access," it's basically shouting, "I can't find a road to the internet!" It's like trying to drive to the beach but finding all the roads blocked. This blockage can stem from a multitude of issues, ranging from simple glitches to more complex configuration problems. Let's get those road crews working, shall we?
2. First Things First: The Obvious (But Often Overlooked) Checks
Before we dive into the deep end, let's perform some basic sanity checks. Sometimes, the simplest solutions are the best. It's like forgetting where you put your keys – often, they're right under your nose!
- Restart everything: This is the classic IT crowd advice, but it genuinely works most of the time. Restart your laptop, your modem, and your router. Think of it as a digital reset button.
- Airplane Mode: Ensure Airplane Mode is off. It sounds silly, but it’s caught me more than once! It's the internet's equivalent of "Do Not Disturb."
- Physical Connections: Are all the cables plugged in securely? Check the Ethernet cable (if you're using one) from your laptop to the router, and also the cable connecting your internet modem to your router.
- WiFi Switch: Make sure your physical WiFi switch on your laptop is turned on. Some older laptops have a physical switch.
3. Troubleshooting Your Router: Is It The Culprit?
Sometimes, the problem isn't your laptop, but the unsung hero of your internet: your router. It's like the overworked gatekeeper of your digital realm. Let's give it a pat on the digital back.
- Router's Status Lights: Take a peek at the lights on your router. Are they blinking erratically or solid? Do you see an internet light? These can offer clues to the problem. Refer to your router's manual (yes, that dusty booklet you probably threw away) for light interpretation.
- Router Reboot: We already mentioned restarting everything, but if that didn't work, give your router another reboot. Unplug it for a good 30 seconds and plug it back in. Patience is key here! Let it fully boot up before trying again.
- Check Other Devices: If multiple devices in your home are experiencing the same issue, the problem likely lies with your router or internet service provider (ISP).
4. Diving into the Windows Network Troubleshooter: Your Built-In Helper
Windows has a built-in network troubleshooter. Think of it as a tech-savvy sidekick ready to lend a hand. To access it:
- Right-click on the WiFi icon in the system tray (bottom right of your screen).
- Select "Troubleshoot problems."
- Follow the on-screen instructions. The troubleshooter often identifies and fixes common problems, such as network adapters not being configured correctly. It's a quick and easy first step.
5. Renewing Your IP Address: A Fresh Start for Your Connection
Sometimes, your laptop's IP address (the digital address on the internet) gets stuck or corrupted. Renewing it is like giving it a fresh coat of digital paint. Here's how:
- Open the Command Prompt as an administrator (search for "cmd" in the Windows search bar, right-click, and select "Run as administrator").
- Type
ipconfig /releaseand press Enter. This releases your current IP address. - Type
ipconfig /renewand press Enter. This requests a new IP address from your router. - Type
ipconfig /flushdnsand press Enter. This clears the DNS cache. - Restart your laptop.
6. Updating Your Network Adapter Drivers: Keeping Things Up-to-Date
Outdated drivers can cause all sorts of network headaches. Think of drivers like the mechanics that let your network adapter do its job.
- Press the Windows key + X and select "Device Manager."
- Expand "Network Adapters."
- Right-click on your WiFi adapter (e.g., "Intel Wireless-AC 9260") and select "Update driver."
- Choose "Search automatically for drivers." Windows will try to find and install updated drivers.
7. Checking the TCP/IP Settings: Ensuring the Right Protocol
TCP/IP (Transmission Control Protocol/Internet Protocol) are the core protocols that make the internet tick. Making sure they're configured correctly is like making sure the engine is running smoothly.
- Right-click on the WiFi icon in the system tray and select "Open Network & Internet settings."
- Click on "Change adapter options."
- Right-click on your WiFi adapter and select "Properties."
- Double-click on "Internet Protocol Version 4 (TCP/IPv4)."
- Make sure "Obtain an IP address automatically" and "Obtain DNS server address automatically" are selected. If they aren't, select them and click "OK."
8. Examining Your Firewall: Is It Blocking You?
Your firewall is like a security guard at your digital gate. Sometimes, it can get a little too overzealous.
- Temporarily Disable: For testing purposes only, temporarily disable your firewall (Windows Defender Firewall is the default). If this fixes the problem, you'll need to adjust your firewall settings to allow network traffic.
- Check Firewall Rules: If disabling the firewall fixes the issue, investigate the firewall rules. You might need to create an exception for your WiFi adapter or specific applications.
9. Reinstalling Your Network Adapter: A Fresh Installation
If all else fails, consider reinstalling your network adapter. This is a more drastic measure, but it can often clear up persistent problems.
- Open Device Manager (see step 6).
- Expand "Network Adapters."
- Right-click on your WiFi adapter and select "Uninstall device."
- Restart your computer. Windows will attempt to reinstall the driver automatically.
10. Network Reset: The Nuclear Option (Use with Caution!)
A network reset will reset all your network settings to their default. This means you'll need to re-enter your WiFi password and reconfigure any custom network settings. This can be a good option when all else fails, but it wipes the slate clean.
- Go to Settings > Network & Internet > Status.
- Scroll down and click on "Network reset."
- Click "Reset now."
- Your computer will restart.
11. Consider Your ISP: Is It the Root Cause?
Sometimes, the problem isn’t your laptop, but your internet service provider (ISP). They're tasked with delivering the internet to your doorstep.
- Check for Outages: Visit your ISP's website or contact their support to see if there are known outages in your area.
- Contact Technical Support: If there are no outages, reach out to your ISP's technical support. They might be able to identify and fix issues with your internet connection.
12. The Wireless Interference Factor: Clearing the Airwaves
WiFi signals are susceptible to interference, like a radio station trying to broadcast in the middle of a construction site.
- Distance and Obstacles: Make sure you're close enough to the router and that there aren't too many physical obstacles (walls, appliances) between your laptop and the router.
- Other Devices: Other devices (microwaves, Bluetooth devices) can interfere with WiFi signals. Try to move your laptop away from these potential sources of interference.
- Router Location: Place your router in a central, open location, away from walls and other electronics.
13. Addressing Wireless Security: WPA2 vs. WPA3
Using a secure WiFi network is essential for your online safety. Make sure your router uses a strong security protocol like WPA2 or WPA3. Avoid using older, less secure protocols.
14. The DNS Dilemma: Unblocking the Website Roads
DNS (Domain Name System) is the phonebook of the internet, translating website addresses into IP addresses. Sometimes, your DNS settings can be the issue.
- Try Google's DNS: In your TCP/IPv4 settings (see step 7), manually set the DNS server addresses to Google's public DNS servers:
- Preferred DNS server: 8
Cara Mengatasi Wifi Connected Tapi No Internet Access

By Sobat OPS Cara Mengatasi Wifi Connected Tapi No Internet Access by Sobat OPS
Tidak ada akses internet Fix unidentified network No internet access on windows 11 10

By Victor Explains Tidak ada akses internet Fix unidentified network No internet access on windows 11 10 by Victor Explains
Cara Setting IP Address Komputer agar Dapat Terhubung dengan Internet

By DSID Cara Setting IP Address Komputer agar Dapat Terhubung dengan Internet by DSID

Title: Cara atasi wifi no internet secured , no internet access
Channel: ijal tutorial
Cara atasi wifi no internet secured , no internet access by ijal tutorial
Laptop Wifi Hotspot
Laptop WiFi Nightmare? Fix IPv4 ‘No Network Access’ NOW!
The crimson glow of the WiFi icon, typically a beacon of connectivity, has devolved into a menacing ember, a grim reminder of the digital prison your laptop has become. You stare at the screen, the dreaded "No Network Access" notification taunting you. You attempt to refresh, to reboot, to plead with the digital deities, but the status remains unchanged. Your meticulously crafted presentation, due in mere hours, remains trapped within the confines of your offline device. The urgent emails, the video calls, the vital research – all inaccessible. Let's banish this technological tempest and resurrect your WiFi connection. This is not just about fixing a problem; it's about reclaiming your digital life.
Understanding the Culprit: Tracing the IPv4 'No Network Access' Error
The root of your woes most likely lies with your Internet Protocol version 4 (IPv4) configuration. Think of IPv4 as your laptop’s postal address on the internet. Without a valid address, your device can't send or receive data. The "No Network Access" error signifies that your laptop is not obtaining a valid IPv4 address from your router, or that it is getting an address, but it's not able to communicate with the outside world. This disconnection can stem from a variety of sources, from the mundane to the more intricate. We will walk through probable causes and corresponding solutions to achieve rapid rectification of your laptop's predicament.
Troubleshooting Step 1: Re-establish the Basics – Router and Laptop Synergy
Before delving into complex configurations, let's ensure the fundamental building blocks of your internet connection are functioning harmoniously.
Router Reboot Ritual: The first port of call is your router. Unplug its power cord. Wait a full 60 seconds. Plug it back in. This simple act often resolves temporary glitches and clears temporary network issues. Allow the router ample time to fully restart – usually indicated by a steady, non-blinking status light.
Laptop Restart Revival: Once the router has fully restarted, restart your laptop. This ensures that your device refreshes its connection attempts, potentially prompting it to acquire a valid IPv4 address after your router’s reboot.
Physical Connection Verification: If your laptop is connected through an Ethernet cable, inspect the cable for any damage. Disconnect and reconnect both ends, ensuring a firm connection. Try a different Ethernet cable if possible to rule out cable malfunction.
Multiple Device Diagnosis: Test your internet connection on other devices, like your smartphone or a tablet. If other devices are also experiencing connectivity issues, the problem resides with your internet service provider or the router itself. Contact your ISP or consult your router's manual for further troubleshooting.
Troubleshooting Step 2: The IP Address Liberation – Automatic Configuration
We need to ascertain your laptop is configured to automatically acquire an IPv4 address from your router. This ensures your device is correctly seeking an address rather than being manually assigned an incorrect one that can lead to this error.
Windows – The IP Address Detective:
- Press the Windows key and type "network connections." Select "View network connections."
- Right-click on your active network adapter (e.g., Wi-Fi or Ethernet) and choose "Properties."
- In the "Networking" tab, double-click "Internet Protocol Version 4 (TCP/IPv4)."
- Ensure both "Obtain an IP address automatically" and "Obtain DNS server address automatically" are selected. If these are already selected, switch them to use the following addresses with the suggested Google DNS (8.8.8.8 and 8.8.4.4) and then switch back to obtain automatically after rebooting. This can reset the current IP configuration.
- Click "OK" on all windows, and restart your laptop.
macOS – The IP Address Alchemist:
- Click the Apple menu, then "System Preferences," and then "Network."
- Select your active network connection (e.g., Wi-Fi or Ethernet) in the left-hand pane.
- Click the "Advanced" button.
- Click the "TCP/IP" tab. Ensure "Configure IPv4" is set to "Using DHCP."
- Click "OK" and then "Apply" to save the changes. Restart your laptop.
Troubleshooting Step 3: DNS Disruption – Repairing Domain Name System Queries
The Domain Name System (DNS) servers translate website names (like google.com) into their corresponding IP addresses. Improper DNS settings can severely interrupt your internet connectivity. A DNS server issue can be a frequent cause of no network access.
Changing DNS Servers (Windows & macOS): In the "Internet Protocol Version 4 (TCP/IPv4)" properties (Windows - as above), or in the "DNS" tab (macOS - under the Advanced network settings), manually change your Preferred DNS server to "8.8.8.8" (Google's Public DNS) and the Alternate DNS server to "8.8.4.4." This bypasses your ISP's potentially problematic DNS servers.
- Windows: Follow directions in Step 2 for Windows but manually enter the IP addresses for the DNS server.
- macOS: Follow direction in Step 2 for macOS but select the DNS tab and manually enter the IP addresses for the DNS server.
Troubleshooting Step 4: Flush and Renew – Rejuvenating Your IP Address
Sometimes, your laptop retains an outdated or corrupted IP configuration. Clearing this cache and renewing your IP address can remedy the “No Network Access” error.
Command Prompt (Windows):
- Search for "cmd" or "Command Prompt" in the Windows search bar. Right-click and select "Run as administrator."
- Type the following commands, pressing Enter after each:
ipconfig /flushdnsipconfig /releaseipconfig /renewnetsh winsock reset(This command has the potential to reset your network configuration. It's a more aggressive troubleshooting step. You may need to restart your computer after executing this command.)
- Restart your laptop.
Terminal (macOS):
- Open the "Terminal" application (found in /Applications/Utilities/).
- Type the following commands, pressing Enter after each:
sudo killall -HUP mDNSResponder(This command flushes the DNS cache.)sudo ipconfig set en0 DHCP(Replace "en0" with the correct network interface name if necessary, as found in Network Preferences.)sudo ipconfig renew en0(Replace "en0" with the correct network interface name if necessary, as found in Network Preferences.)
- Restart your laptop.
(Note: The
sudocommand requires you to enter your administrator password.)
Troubleshooting Step 5: Router Configuration – The Gateway Guardian
Your router also has settings that can cause this problem. Often, these are overlooked, but are extremely important.
Check the router's DHCP Server: DHCP (Dynamic Host Configuration Protocol) is the protocol your router uses to assign IP addresses. Make sure DHCP is enabled on your router. Access your router's settings by typing its IP address into your web browser (often 192.168.1.1 or 192.168.0.1, check your router's manual). Navigate to the DHCP settings and confirm it's enabled.
MAC address filtering: Some routers employ MAC address filtering, which restricts devices that can connect by checking their ‘Media Access Control’ address. Your laptop’s MAC address may not be authorized. Locate the "MAC address" setting on your laptop (it can be found in the network adapter properties in both Windows and macOS). Go to your router's settings and check if MAC address filtering is enabled. If so, confirm that your laptop's MAC address is permitted.
Channel Interference: Wi-Fi channels can become congested, especially in areas with many wireless networks. Access the router's settings to change the Wi-Fi channel. Experiment with different channels (1, 6, and 11 are often recommended as they are least likely to overlap) to identify the clearest one.
Troubleshooting Step 6: Network Adapter Investigation – Drivers and Disabling/Enabling
Your network adapter drivers, the software that allows your laptop to interact with the network, can become corrupted. Try the methods below.
Driver Reinstallation (Windows):
- Right-click the Windows Start button and select "Device Manager."
- Expand "Network adapters."
- Right-click on your network adapter (e.g., Wi-Fi adapter) and select "Uninstall device."
- Restart your laptop. Windows will automatically attempt to reinstall the driver.
- If Windows doesn't automatically reinstall the driver, download and install the latest driver from the laptop manufacturer's website.
Driver Reinstallation (macOS):
- Open “About this Mac” from the Apple menu.
- Click on “System Report.”
- In the left-
