how to connect wifi to laptop windows 7

Title: How To Enable WiFi Internet Connection In Windows 7
Channel: MDTechVideos International
How To Enable WiFi Internet Connection In Windows 7 by MDTechVideos International
how to connect wifi to laptop windows 7, how to connect internet to laptop windows 7, how to add wifi to laptop windows 7, how to connect wifi to lenovo laptop windows 7, how to connect wifi to dell laptop windows 7, how to connect mobile wifi to laptop windows 7, how to connect wifi to acer laptop windows 7, how to connect wifi printer to laptop windows 7, how to connect wifi router to laptop windows 7, how to connect wifi to sony vaio laptop windows 7
Windows 7 WiFi Nightmare? Solved! (Easy Fix Inside!)
Windows 7 WiFi Woes Vanquished! (Finally!)
Ever feel like your trusty Windows 7 machine is staging a rebellion against your WiFi? You're not alone. Many users have wrestled with connectivity gremlins. However, don't despair! Getting your Windows 7 WiFi back on track is achievable. Let's dive in and banish those frustrating connection issues.
The Phantom WiFi: Identifying the Culprit
Firstly, let's diagnose the problem. Is your WiFi completely gone? Maybe it's just intermittent. Perhaps slow speeds are the issue. Determine what's happening before proceeding. Sometimes, it's a simple fix. Other times, it involves a little detective work.
Consider these common culprits. Start with the obvious: Have you restarted your computer? A quick reboot often solves temporary glitches. Next, check your physical connections. Ensure your modem and router are switched on. Verify that the Ethernet cable (if applicable) is securely plugged in. Then, examine your network adapter settings. Sometimes, these settings get changed unintentionally.
Troubleshooting: Your WiFi Rescue Plan
Assuming the basics check out, let's explore some troubleshooting techniques. These steps might be the key to victory.
Driver Dilemmas: Outdated or corrupted network drivers can wreak havoc. Access your Device Manager. Locate your network adapter. Right-click and choose "Update driver software." Let Windows search automatically. Alternatively, download the latest drivers from the manufacturer's website.
Network Adapter Reset: Sometimes a reset is necessary. In Device Manager, right-click your network adapter. Select "Uninstall." Then, restart your computer. Windows should automatically reinstall the driver.
Wireless Mode Mayhem: Your router's wireless mode could be causing problems. Access your router's settings. Look for the wireless settings. Try changing the mode to a different standard (e.g., 802.11g or 802.11n). Experiment to find the best compatibility.
Power Management Problems: Windows power settings can sometimes interfere. Go to Control Panel. Navigate to "Power Options." Change your power plan. Explore advanced power settings. Ensure your network adapter isn't being shut down to save power.
Firewall Frustrations: Your firewall might be blocking the connection. Temporarily disable your firewall. See if this allows you to connect. If so, you need to configure your firewall to allow network traffic. Add the necessary exceptions.
Digging Deeper: Advanced Solutions
If the basic steps fail, consider these advanced solutions. These might be the answer you seek.
Network Reset: If you have tried everything, consider a network reset. This will reset all network settings. Go to Control Panel and find "Network and Sharing Center." Click "Change adapter settings." Right-click your network connection. Select "Diagnose". Follow the prompts. It will guide you through the process.
Static IP Configuration: Instead of automatically obtaining an IP address, you can manually assign a static IP address. This can sometimes resolve conflicts. Access your network adapter properties. Select "Internet Protocol Version 4 (TCP/IPv4)." Click "Properties." Choose "Use the following IP address." Enter the appropriate IP address, subnet mask, and gateway information.
Check for Malware: Malware can often cause network connectivity problems. Run a full system scan with your antivirus software. Ensure your security software is up-to-date.
Router Firmware Update: Outdated router firmware can also cause problems. Access your router's settings. Check for firmware updates. Update your router's firmware, if necessary.
The Final Word: Victory is Within Reach
Remember, solving WiFi issues can be a process of elimination. Be patient and persistent. Try each suggested solution methodically. In most cases, you'll find a solution.
Therefore, don't let WiFi woes defeat you. Armed with the knowledge above, you are well-equipped. Enjoy a speedy and stable internet connection. Your Windows 7 machine should now play nice. You have earned the right to reclaim control. Your WiFi problems are mostly solved, hopefully once and for all.
ASUS WiFi Nightmare? Fix Your Connection NOW!Windows 7 WiFi Nightmare? Solved! (Easy Fix Inside!)
Alright, fellow tech travelers! Let's be honest, Windows 7, bless its heart, is a digital dinosaur. But sometimes, even a seasoned pro gets a bad rep. And one of the most common gripes? The infamous Windows 7 WiFi nightmare. That frustrating moment when your internet connection decides to take a permanent vacation, right when you need it most. We've all been there – the frantic clicking, the endless reboots, the silent screams into the void. Fear not! Because today, we're diving headfirst into the trenches to rescue your Wi-Fi and get you back online, faster than you can say "Ctrl+Alt+Delete."
1. The WiFi Woes of Windows 7: A Tale of Troubles
First things first, let's acknowledge the pain. Windows 7, while a workhorse in its day, can be a bit… well, particular about its wireless connections. Drivers get cranky, settings get lost in the digital ether, and suddenly, you're staring at that dreaded "No Internet Access" message, wondering where your afternoon went. It's like your computer is a picky eater refusing to touch its broccoli.
2. Common Culprits: Why Your WiFi's Acting Up
Before you start throwing your mouse across the room (we've all been tempted!), let's identify the usual suspects behind the Windows 7 WiFi woes. Think of it like a detective gathering clues:
Driver Drama: Outdated, corrupted, or simply wrong drivers are the number one enemy. They're like the wrong key for the lock – no entry.
Network Settings Shenanigans: Incorrect configurations, rogue firewall settings, or a stubborn IP address can all throw a wrench in the works. This is where the inner workings of the internet can feel like a confusing maze.
Router Rampages: Your router, the unsung hero of your home network, might be the culprit. It could be overloaded, need a reboot, or be suffering from a digital existential crisis.
Hidden Hardware Hurdles: Sometimes, the problem lies within your actual Wi-Fi adapter, the physical components. It's always good to consider the basics.
3. The First Line of Defense: Restarting Everything (Yes, Really!)
Okay, I know it sounds cliché, but rebooting is the digital equivalent of a good night's sleep. Restart your computer and your router. Often, this simple act of digital renewal can solve a surprising number of problems. Think of it like hitting the reset button on your brain after a particularly stressful day.
4. Driver Dilemmas: The Key to Connectivity
Drivers are the lifeblood of your hardware. They allow your computer to "talk" to your Wi-Fi adapter. If they're out of date, it’s like speaking two different languages. Here’s how to update them:
- Device Manager: Right-click the "Computer" icon on your desktop and choose "Properties." Click "Device Manager." Expand "Network adapters." Your Wi-Fi adapter will be listed here. Right-click on your adapter and select "Update driver."
- Manufacturer's Website: Visit the website of your Wi-Fi adapter's manufacturer (like Intel, Realtek, etc.). Download the latest driver for Windows 7.
5. Network Troubleshooter: Your Digital Doctor
Windows 7 has a built-in network troubleshooter. It's like having a doctor on call. If you've tried the above steps and are still struggling, this is your next stop.
- Accessing the Troubleshooter: Right-click on the network icon in your system tray (the little computer screen icon near the clock). Select "Troubleshoot problems". Follow the prompts. It will likely run a series of tests to try and identify any issues it can diagnose.
6. IP Address Investigation: Static vs. Dynamic
Your IP address is like your home address on the internet. We need to make sure it's set up correctly.
- Dynamic IP (Automatic): This is usually the default setting. If you're using a dynamic IP, your router automatically assigns an IP address.
- Static IP (Manual): A static IP is only used if you know what you're doing and have it set on your router.
To check, go to "Network and Sharing Center" (search in the Start menu). Click "Change adapter settings". Right-click your Wi-Fi adapter, select "Properties," double-click "Internet Protocol Version 4 (TCP/IPv4)." Make sure "Obtain an IP address automatically" and "Obtain DNS server address automatically" are selected.
7. Firewall Fixes: Letting the Good Guys In
Sometimes, your firewall, designed to protect you, can block your internet access. You might need to temporarily disable it to test.
- Disable Firewall (Temporary): Go to Control Panel > System and Security > Windows Firewall. On the left, click “Turn Windows Firewall on or off.” Turn it off temporarily to test your connection. If that fixes it, you might need to adjust the firewall settings and not disable it entirely.
8. Router Reboot Revisited: The Periodic Reset
Your router has a little brain, too. It can get overloaded with information. Rebooting it regularly can work wonders. Unplug it, wait 30 seconds, and plug it back in. Much like the computer restart, but for your router.
9. Channel Surfing: Finding the Right WiFi Wave
Routers broadcast on specific channels. Sometimes, a channel is crowded with other Wi-Fi signals, causing interference. You can change your router's channel settings. Check your router's manual for how to do this.
10. Security Settings Secrets: WEP, WPA, and WPA2
Make sure your WiFi security is correctly configured. Older encryption methods, like WEP, are easily hackable. The best is WPA2 or WPA3. Double-check your router settings.
11. The Missing Adapter Myth: Is Your Hardware Alive?
Open Device Manager, as introduced in Section 4. Look for any yellow exclamation marks next to your Wi-Fi adapter. This indicates a hardware problem. If there's a problem, it's time to consider replacing or upgrading the adapter, or seek professional help.
12. Clean Boot Clues: Eliminating Interference
Sometimes, other software on your computer can interfere with your internet connection.
- Performing a Clean Boot: A clean boot can help you rule out software conflicts. Search for "msconfig" in the Start menu, go to the "Services" tab, check "Hide all Microsoft services," and click "Disable all." Then, go to the "Startup" tab and disable all startup items. Restart your computer.
13. Network Reset: The Nuclear Option (Use with Caution!)
This is the digital equivalent of nuking your system from orbit – it's the only way to be sure. Network reset. Be warned, you will lose your saved WiFi networks so it's best at the very end.
- Resetting Network Settings: This can be done in the Registry Editor (type “regedit” in the start menu to open). Back up your registry before editing. Under HKEYLOCALMACHINE\SYSTEM\CurrentControlSet\Services, delete the following: Dhcp, DnsCache, NetBT, Tcpip, Tcpip6. Restart your computer after rebooting.
14. Seek Expert Help: When to Call for Backup
If you've tried everything, it's time to consider help. A local computer repair shop can diagnose and fix more complex issues. You could also ask a friend or a family member who is more tech-savvy.
15. The Ultimate Test: The Eternal Internet Connection (Maybe)
After all of these steps, is your WiFi working? If so, congratulations! You’ve wrestled the beast and come out victorious (or at least connected). If not, don’t give up. Troubleshooting can be a process of elimination. Eventually, you will see your connection working again.
Closing Thoughts: Staying Connected in a Digital World
So there you have it, folks. A toolkit to conquer the Windows 7 WiFi nightmare. Remember, technology is a journey, not a destination. There is always a next step. It's a blend of patience, persistence, and a little bit of digital detective work. Don't be afraid to experiment, research, and learn. And most importantly, keep your sense of humor because, let's face it, we’re all in this together! Now go forth and reconnect with the digital world!
Principal Keywords: Windows 7 WiFi Fix
SEO Headline: Windows 7 WiFi Not Working? Easy Fixes Revealed!
Pathway: Windows 7 WiFi
Meta Summary: Solve your Windows 7 WiFi problems! Get easy troubleshooting steps and fixes to ensure a stable internet connection. Fix it now!
Image Alt Text: frustrated person looking at a computer with the No Internet Access error message displayed on the screen, with a cartoonish wrench in the background
Image Caption: Say goodbye to the WiFi woes!
FAQs:
1. My Wi-Fi was working fine yesterday. What could have changed?
Often, the culprit is a driver update gone wrong, a router glitch or settings you may have changed! It's also possible your internet provider is having issues that affect your connection
Dell Laptop WiFi DEAD? 😱 Fix This NOW!How to enable your network connection in Windows 7

By MHELP2U How to enable your network connection in Windows 7 by MHELP2U
Not connected no connections are available windows 7 laptop

By IT Magics Not connected no connections are available windows 7 laptop by IT Magics
Windows was unable to connect wifi windows 7 Laptop and Desktop

By IT Magics Windows was unable to connect wifi windows 7 Laptop and Desktop by IT Magics
Title: Connecting your Windows 7 Computer to the Wi-fi Network.
Channel: Academic Algonquin
Connecting your Windows 7 Computer to the Wi-fi Network. by Academic Algonquin
Change Wifi Settings
Windows 7 WiFi Nightmare? Solved! (Easy Fix Inside!)
Navigating the digital landscape, a stable and reliable WiFi connection is no longer a luxury; it's an absolute necessity. For Windows 7 users, however, the path to seamless wireless connectivity can occasionally become fraught with frustrating hiccups. We understand the exasperation of dropped connections, sluggish speeds, and the general feeling of WiFi woes. If you're experiencing a "WiFi nightmare" on your Windows 7 machine, rest assured, a solution awaits. Together, we'll diagnose common culprits and implement straightforward fixes to banish those connectivity demons.
Identifying the Root of Your WiFi Woes: The Diagnostic Journey
Before launching into solutions, it’s paramount to understand the nature of the problem. Is it a sudden onset of issues, or has slow WiFi always plagued your Windows 7 experience? Are all devices in your home struggling with the same connectivity issues, or is it isolated to your specific computer? A few preliminary checks can help narrow the scope of the problem.
First, check the physical connection. Ensure the WiFi adapter switch (if applicable) on your laptop is enabled. Look at the WiFi indicator on your device, usually found in the system tray (bottom right corner of your screen), and verify that you are connected to your preferred wireless network. The signal strength should be visibly strong, indicated by a full or near-full bar display. If the bars are missing or very low, your device is either too far from the router or the router’s signal isn't reaching your device effectively.
Next, determine the devices affected. If your smartphone, tablet, and other laptops also experience slow speeds or dropped connections, the issue likely stems from your internet service provider (ISP) or the router itself. If, however, only your Windows 7 machine is struggling, the problem lies within the computer.
Finally, a quick restart can often work wonders. Reboot your Windows 7 computer and, if necessary, your router and modem. This simple step can resolve transient issues caused by temporary software glitches or conflicts. If these initial steps fail to improve things, it's time to delve deeper, examining specific areas that regularly cause WiFi issues in Windows 7.
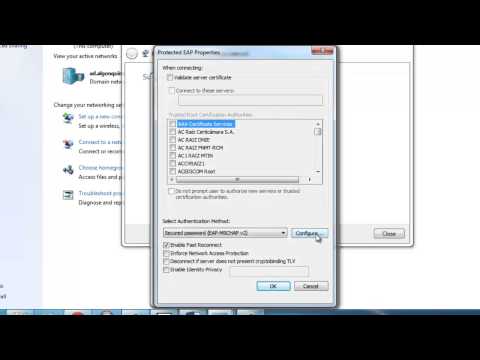
The Driver Dilemma: Ensuring Compatibility and Optimal Performance
Drivers are software components that act as a translator between your operating system and your hardware, in this case, your WiFi adapter. Outdated, corrupted, or incompatible drivers can often be the primary cause of WiFi connectivity issues in Windows 7.
Accessing the Device Manager: The device manager is your central control panel for hardware management. Launch the device manager by clicking the "Start" button, then right-clicking on "Computer," selecting "Properties," and clicking on "Device Manager" in the left-hand menu. Alternatively, type “Device Manager” into the Start menu search and select it from the results.
Locating the Network Adapter: Within the Device Manager, expand the "Network adapters" section. This will display a list of all network adapters installed on your system, including your WiFi adapter (often labeled with terms like "Wireless Network Adapter," "WiFi Adapter," or similar).
Updating the Driver: Right-click on your WiFi adapter and select "Update driver software." Choose either "Search automatically for updated driver software" (recommended) or "Browse my computer for driver software." The first option prompts Windows to search online for the latest drivers. The second allows you to manually install drivers from a downloaded file, typically obtained from the adapter manufacturer’s website.
Rolling Back to a Previous Driver: If the recent driver update causes WiFi issues, consider rolling back to a previous version that worked correctly. In the Device Manager, right-click the WiFi adapter, select "Properties," navigate to the "Driver" tab, and click "Roll Back Driver." This automatically reverts to the previous driver version, potentially resolving compatibility problems.
Uninstalling and Reinstalling the Driver: As a final resort, you can uninstall the device and then reinstall it. Right-click on the WiFi adapter and click "Uninstall." Restart your computer, and Windows should automatically reinstall the correct drivers upon booting. If the automatic installation fails, visit the manufacturer's website for the latest drivers.
Router Configuration: Optimizing Your Wireless Network
While your Windows 7 PC plays a significant role in WiFi connectivity, the router also has a massive influence on your speeds. Router settings, such as channel selection and encryption protocols, can significantly affect the performance of your wireless network.
Channel Selection: Wireless routers broadcast signals on different channels within the 2.4 GHz or 5 GHz frequency bands. Overlapping channels and interference from other wireless devices (neighboring routers, microwaves, etc.) can lead to slow speeds and dropped connections. To optimize your WiFi, consider changing your router's channel configuration. Access your router's settings by typing its IP address in a web browser (the default address is often 192.168.1.1 or 192.168.0.1, but may vary). Consult your router's manual for specific instructions on accessing its settings. Navigate to the wireless settings and manually select a less congested channel or choose “Auto” to let your router automatically select the best channel.
Wireless Security Protocols: Ensure your wireless network is secure. Open or weakly encrypted networks are vulnerable to unauthorized access and potential network performance issues. Set your wireless security to WPA2-PSK (AES) which is a strong, modern encryption standard which provides a very robust level of security. WPA3 is even more secure, but it may not be supported by older devices. Never use WEP which is outdated and easily breached.
Router Firmware Updates: Outdated router firmware can be a common source of network problems. Check your router manufacturer's website for firmware updates. Locate the "Firmware" section in your router's settings and follow the manufacturer's instructions to update the firmware. This fixes security vulnerabilities and improves performance.
Power Management: Fine-Tuning Your WiFi Adapter
Windows automatically manages the power consumed by various hardware components, including your WiFi adapter. Optimize your power settings to ensure your WiFi adapter has sufficient power to operate.
Accessing Power Options: Open the "Control Panel" and select "Hardware and Sound," followed by "Power Options."
Changing Power Plan Settings: Select your preferred power plan (e.g., "Balanced," "Power saver," or "High performance"). Then, click "Change plan settings" to customize the selected plan.
Advanced Power Settings: Click "Change advanced power settings."
Wireless Adapter Settings: In the "Advanced settings" window, locate the "Wireless Adapter Settings" section. Expand this and set the "Power Saving Mode" to "Maximum Performance." Disabling power savings allows the WiFi adapter to always perform at its full potential, which is often the difference! Click "Apply" and then "OK" to save your settings. You should also set the "Minimum processor state" to 100%.
Resolving Network Conflicts: Troubleshooting Connectivity Jams
Network conflicts can arise from a variety of sources, including conflicting IP addresses and issues with the network adapter's settings. Resolving these conflicts is essential for ensuring smooth WiFi connectivity.
IP Address Conflicts: Two devices on the same network should not have the same IP address. This conflict will disrupt the network connection. To prevent IP address conflicts, configure your Windows 7 machine to obtain its IP address automatically. Right-click on the WiFi connection icon in the system tray, select "Open Network and Sharing Center," click "Change adapter settings," right-click your wireless network adapter, and select "Properties." Select "Internet Protocol Version 4 (TCP/IPv4)" and click "Properties." Ensure "Obtain an IP address automatically" and "Obtain DNS server address automatically" are selected. Click “OK” to save these settings. Should these settings already be applied, try renewing the IP address by opening the command prompt (type "cmd" into the Start menu search and select "Command Prompt") and typing the following commands, pressing Enter after each one:
ipconfig /release
ipconfig /renew
DNS Server Issues: The Domain Name System (DNS) translates domain names into IP addresses. Problems with your DNS settings can cause slow browsing and connectivity issues. You can manually specify public DNS servers like Google DNS (8.8.8.8 and 8.8.4.4) or Cloudflare DNS (1.1.1.1 and 1.0.0.1). Follow the same steps as above to access the "Internet Protocol Version 4 (TCP/IPv4)" properties of your wireless network adapter. Instead of “Obtain DNS server address automatically” choose "Use the following DNS server addresses." Then, enter your preferred DNS server addresses in the designated fields.
Network Reset: A Final Resort for Stubborn Issues
If all the preceding steps have not resolved your WiFi problems, consider resetting your network settings to their default configurations. This essentially "cleans slate" your network configuration and is sometimes the optimal way forward.
Backing Up Network Settings: Before performing the reset, consider backing up your network settings. This can involve creating a system restore point (if network configuration is causing a system issue) or simply creating a record of your router's security settings (SSID and password, etc.)
Network Reset via the Command Prompt:
- Open the Command Prompt as an administrator (right-click "Command Prompt" in the Start menu and select "Run as administrator").
- Type the following command and press Enter:
netsh winsock reset - Type the following command and press Enter:
netsh int ip reset reset.log
