download wifi hotspot for laptop windows xp

Title: How to Setup Wifi in Windows XP
Channel: Etechlic
How to Setup Wifi in Windows XP by Etechlic
Download WiFi Hotspot for Windows XP: The ULTIMATE Guide (Free & Easy!)
Unlocking the Digital Frontier: Your Windows XP WiFi Hotspot Adventure (Free & Seamless!)
Remember those days? Windows XP ruled the computing world. It was a simpler time. Smartphones were emerging, and the craving for mobile connectivity was real. You might still have a device humming away, perhaps a legacy laptop. You're here because you want to share its internet. You want to create a WiFi hotspot. That's fantastic–let's make it happen!
The Nostalgic Quest: Why a Windows XP Hotspot Still Matters
Why bother with Windows XP today? Because technology persists. Some of us have older systems. Others are fascinated by retro computing. Or maybe it's a niche project. Whatever the reason, it's a worthy endeavor. It’s still useful for basic tasks. For instance, a Windows XP machine can be a dedicated media server. Furthermore, it can be used for older software. So, enabling a Wi-Fi hotspot can revitalize this platform. It provides an extra layer of access.
Your Arsenal: What You'll Need Before You Begin
First, what do you need? You’ll need your Windows XP machine, obviously. Ensure it’s connected to the internet. It's likely through an Ethernet cable. Next, you'll require a compatible WiFi adapter. This is the device that broadcasts the wireless signal. These are frequently built-in, particularly on laptops. If not, consider a USB WiFi adapter. They're relatively inexpensive. Ensure the adapter has drivers ready for Windows XP. Finally, patience. You'll need a touch of that!
The Software Sidekick: Choosing the Perfect Hotspot Tool
Several options are available for creating a WiFi hotspot. These are simple to use. Consider these programs. Some are free, while others have premium features.
- Connectify Hotspot: Connectify is a well-known option. It boasts a user-friendly interface. It is designed for both beginners and advanced users. It offers features like internet sharing. But you might need to pay for advanced options.
- Virtual Router Manager: This is also a good option. It's open-source. It’s a lightweight and straightforward choice. It's perfect for those seeking a no-frills solution.
- Other Options: Explore various other tools. Search online. Read reviews. Try a few options. Find one that feels right for your needs.
Setting Up Your Digital Gateway: Step-by-Step Instructions
You've got your software. Let’s set it up! Because we don’t know which software you'll choose, this is a general guideline. The steps are similar across providers.
- Install the Software: Download your chosen program. Run the installer. Follow the on-screen prompts.
- Launch the Application: Open the program. You'll likely see a setup screen.
- Configure Your Hotspot: Give your hotspot a name (SSID). Choose a strong password. Select the internet connection you want to share.
- Start the Hotspot: Click the "Start" or "Enable" button. The software will begin broadcasting the wireless signal.
- Connect Your Devices: Grab your phone, tablet, or other devices. Search for the Wi-Fi network you just created. Enter your password. Then, you're connected!
Troubleshooting: Navigating the Murky Waters
Encountering snags? Don't worry; it's common. Here’s how to address some frequent issues.
- No Internet Connection: Ensure your host computer is connected to the internet. Verify your firewall settings. They might be blocking the connection.
- Unable to Connect: Double-check your password. Confirm the SSID is correct. Restart your host machine. Sometimes, that’s all it takes.
- Slow Speed: Distance and interference affect speed. Try moving closer to the host computer. Also, consider changing the Wi-Fi channel within the software settings.
Security First: Protecting Your Digital Realm
Securing your hotspot is crucial. You don't want unauthorized access.
- Strong Passwords: Use a strong, unique password. Don't use your pet's name!
- WPA2 Encryption: Select WPA2 encryption in your hotspot software. It's a more secure option than older standards.
- Monitor Connected Devices: Regularly review the devices connected to your network. Remove any suspicious ones.
Beyond the Basics: Advanced Customization
Feeling adventurous? Experiment with advanced settings.
- Channel Selection: Manually choose a Wi-Fi channel. This can improve speed.
- MAC Address Filtering: Restrict access. Only allow specific devices to connect.
- Bandwidth Limiting: Set limits on internet usage. You could also restrict certain websites.
The Grand Finale: Embracing Your Newly Minted Hotspot
Congratulations! You’ve done it! You have successfully set up a WiFi hotspot on your Windows XP machine. You're now sharing the internet with your other devices. Moreover, it’s a testament to the lifespan of technology. It's proof that even outdated systems can remain useful. Now, go forth and enjoy the fruits of your labor. Share the internet, and relish your digital freedom!
Unlock Your Phone's Hotspot: The Secret Laptop WiFi Trick!Download WiFi Hotspot for Windows XP: The ULTIMATE Guide (Free & Easy!)
Hey there, tech adventurers! Ever been in a pinch, desperately needing internet on an old Windows XP machine, but no Wi-Fi handy? We've all been there, right? Picture this: you're stuck at a friend's place, they have no internet, and you've got a crucial presentation to finish. Or maybe you're on a long trip, the hotel Wi-Fi is worse than dial-up, and you're yearning for a decent connection. The good news? You can turn that ancient laptop into a Wi-Fi hotspot, sharing your internet connection with other devices. And the even better news? We’re going to show you how, completely free and ridiculously easy. So buckle up, because we’re about to dive deep into the world of setting up a WiFi hotspot on your Windows XP device.
1. Why Bother with a Wi-Fi Hotspot on Windows XP in 2024? (Seriously, Why?)
Okay, I get it. Windows XP is older than some of your younger siblings. But old doesn't necessarily mean useless, does it? Think of it like that classic car in your garage. It might not have all the bells and whistles of a Tesla, but it still runs, right? And in the digital world, an XP laptop can still serve a purpose. Maybe you have some legacy software that only runs on XP. Perhaps you want to keep that old machine around as a dedicated music server or a retro gaming station. Or maybe, just maybe, you're a tech-savvy minimalist who appreciates the simplicity of older technology. Whatever the reason, turning your XP machine into a Wi-Fi hotspot gives it a new lease on life. Consider it like giving your old friend a new job. It allows it to connect to the internet and share a connection with other devices, like your phone, tablet, or other computers. It's a bit like being the bridge between your devices and the world wide web.
2. The Prerequisites: What You'll Need Before We Begin
Before we jump into the deep end, let's make sure we have all the tools we'll need. It’s like preparing your ingredients before baking a cake. First, you need a Windows XP laptop or desktop with a working internet connection. This could be an Ethernet cable plugged into your router, or a USB Wi-Fi adapter if your XP machine doesn't have built-in Wi-Fi. Second, you’ll need a bit of patience (we'll guide you) and, if you are using a phone to connect to the internet, ensure you have lots of data left. We don’t want you to run out of data as you’re trying to get started! Finally, and this is crucial, you'll need a program or software made for this specific task. This is where we venture into the world of some cool free options.
3. Choosing Your Weapon: The Best Free Software for Windows XP (And Why)
There are a few free programs that can help you transform your XP machine into a Wi-Fi hotspot. Our favorite here is Connectify Hotspot, though it is not compatible with Windows XP anymore, and other software options are out there. We will provide a general overview of how these applications work, but we strongly suggest you explore if there are any more suitable options today. The main advantage of these programs is their user-friendliness. They're designed to make the whole process as easy as possible, even for those who aren’t tech wizards. They often have a simple interface, allowing you to set up your hotspot in a matter of clicks.
4. Download and Installation: Your First Steps to Connectivity
Once you've chosen your weapon, it’s time to download and install the software. Head to the website of the software and download the Windows XP compatible version. Then, follow the on-screen instructions to install it. Most software is pretty straightforward, walking you through the installation process step-by-step, just like a friend leading you home. Be sure to check for any recommended "add-ons" or "additional features" that might come bundled with the software. You can usually opt out of these if you don't need them.
5. Setting Up Your Hotspot: The Simple Steps to Sharing Your Internet
Now for the fun part! After installing the software, open it up. You'll likely see an interface that lets you configure your hotspot. This is where you can give your hotspot a name (SSID) and choose a password. Think of the SSID as the name of your Wi-Fi network, and the password as the key to unlock it. Choose a strong password to keep your connection secure. Then, you'll usually select the internet connection you want to share. This is the connection your XP machine is currently using (Ethernet or Wi-Fi). Finally, click a "Start" or "Activate" button, and voila! Your hotspot is ready to go.
6. Troubleshooting Common Issues: When Things Go Wrong
Remember, technology isn't always smooth sailing. Sometimes, things don’t work as planned. If your hotspot isn't working, don't panic. Check the basics first. Is your internet connection active on your XP machine? Is the Wi-Fi adapter enabled? Are you sure you entered the correct password on your other devices? Check those details. If that doesn’t fix it, try restarting the software, or even the XP machine itself. Sometimes, a simple reboot is all it takes. If you're still stuck, check the software's help section or online forums, where you might find answers to common problems or user troubleshooting tips.
7. Security Matters: Protecting Your New Hotspot
Security is, naturally, very important. Since your Wi-Fi hotspot is sharing your internet connection, you want to make sure it's secure. This is where that strong password comes in handy. Avoid using easily guessable passwords like your birthday or your pet's name. Also, consider using WPA2 or WPA3 encryption for your hotspot, which is the most secure. Think of it like having a secure vault instead of a flimsy lock on your door. Additionally, keep your XP machine's operating system and any hotspot software updated with the latest patches to protect against potential vulnerabilities.
8. Performance Considerations: Speed and Bandwidth
When setting up a Wi-Fi hotspot, remember that it will impact the speed and bandwidth of your internet connection. Your XP machine is essentially acting as a middleman. The speed of your hotspot will depend on the speed of your original internet connection. If you have a slower connection, the speed will be shared among all the devices connected to the hotspot. Heavy usage, such as streaming videos or downloading large files, can slow things down. It's the digital equivalent of a traffic jam on rush hour.
9. Sharing Isn't Always Caring: Limiting Data Usage for Peace of Mind
If you’re on a data plan, it’s worth considering the amount of data your hotspot is consuming. You can limit the data usage of your devices connected to the hotspot. We tend to use more data than we think! Also, monitor the data usage on your XP machine to ensure you don't exceed your data allowance.
10. Optimizing Your Hotspot Signals: Location, Location, Location!
The location of your XP machine affects the range and quality of your Wi-Fi signal. Try to place your XP machine in a central location, away from walls and obstructions. This will help extend the coverage of your hotspot. It’s like positioning your radio antenna to receive the best signal possible.
11. Beyond the Basics: Advanced Settings and Customization
Many software solutions offer advanced settings and customization options. You can adjust settings such as the Wi-Fi channel and the power transmission level. This can help you optimize your hotspot's performance and compatibility. It’s like fine-tuning your car engine for the perfect ride.
12. The Future of Hotspots: Will Windows XP Hold Up?
Here’s a thought: what does the future hold for Windows XP hotspots? While the operating system is very old, it continues to be used by some people. As long as you can find compatible software and keep your machine running smoothly, you can keep your XP machine working. So, your old machine can still connect you to the internet.
13. Free Alternatives: Other Ways to Share Your Internet (No, Really!)
Well, in case you are not really sure about the software we mentioned, there are some alternatives. If you have access to a mobile phone with a Wi-Fi hotspot feature, for example, you can use it to share your internet. Or, if you have a separate Wi-Fi router, you can connect it to your XP machine via an Ethernet cable and use the router to create a hotspot. Consider it like having different tools in your toolbox.
14. The Human Touch: My Own XP Hotspot Story
I remember the time my internet went out. I had a ton of work to do and I needed a connection. I remembered I had an old XP machine, so I fired it up and set it. It was like magic! And, as if by fate, it worked great. It’s amazing how these old machines can still surprise us with their usefulness.
15. Keeping Your XP Machine Secure: Safety First!
Remember, when using your XP machine as a hotspot, it’s important to keep it secure. Ensure you have a strong password for your Wi-Fi hotspot. Be sure to keep
Acer Laptop WiFi Nightmare? This FIX Will Shock You!Bagaimana menghubungkan Windows XP ke jaringan nirkabel Anda
By NetComm Bagaimana menghubungkan Windows XP ke jaringan nirkabel Anda by NetComm
Cara Download & Install Driver WIFI & ETHERNET Manual untuk Windows 781011

By inprez id Cara Download & Install Driver WIFI & ETHERNET Manual untuk Windows 781011 by inprez id
Cara Internetan di Windows XP Yang Lancar - Top Web Browser For Windows XP

By AsepDroid Cara Internetan di Windows XP Yang Lancar - Top Web Browser For Windows XP by AsepDroid
Title: Dasar Instalasi wireless adapter - winxp
Channel: TP-Link Indonesia
Dasar Instalasi wireless adapter - winxp by TP-Link Indonesia
Laptop Wifi Connect
Download WiFi Hotspot for Windows XP: Your Comprehensive Guide (Absolutely Free!)
We understand. You're clinging to Windows XP. Maybe it's nostalgia, maybe it's legacy software, or perhaps it's a familiar friend that just won't quit. Whatever the reason, you need to connect to the internet, and you need it now. Creating a WiFi hotspot on your Windows XP machine is entirely possible, and we're here to guide you through the process with clarity and precision. Forget complicated jargon and outdated tutorials. This is the definitive guide, designed for ease and effectiveness. We'll get you connected in no time.
Why You Need a WiFi Hotspot on Windows XP
The need is often multifaceted. Perhaps you're traveling, relying on a single ethernet connection in a hotel and needing to share the internet with other devices. Or maybe your home network has a weak WiFi signal, and you want to extend its reach by creating a secondary access point. The possibilities are numerous. Think of it as your personal, portable internet hub, available whenever and wherever needed. It offers unrivaled flexibility.
Understanding the Prerequisites: What You Absolutely Need
Before we dive in, let's ensure you’ve got the fundamentals covered. First and foremost, you need a Windows XP computer. That seems obvious, but it's the cornerstone. Next, you'll need a reliable network adapter. This is the hardware responsible for both receiving and transmitting the WiFi signal. Most modern laptops and desktops already have integrated WiFi adapters; if your computer doesn't, you’ll need to purchase a compatible USB WiFi adapter. Ensure this adapter is functional and has drivers installed correctly. Having a stable internet connection on your primary source is also a must. This connection will be the foundation of your hotspot. You need an internet connection to share.
Method 1: Leveraging the Power of Virtual Router Plus (The Easiest Route)
This simple tool is where we will start to establish a wireless access point. We will delve into the setup of this powerful tool.
Download and Installation: Navigate to the official Virtual Router Plus website (search "Virtual Router Plus download" and look for a source like SourceForge). Download the installer. Once downloaded, run the setup file, following the straightforward instructions. Accept the license agreement, choose your installation location, and select the convenient desktop shortcut option for easy access.
Launching and Configuration: After installation completes, locate the Virtual Router Plus icon, typically on your desktop. Double-click it to launch the application. The interface will be clean and intuitive.
Setting Up Your Hotspot: Within the Virtual Router Plus window, you'll notice several fields that need your attention.
- Network Name (SSID): Here, you'll define the name of your WiFi hotspot. Choose something memorable and easy to identify.
- Password: This is critical for security. Create a strong password. Use a combination of uppercase and lowercase letters, numbers, and symbols.
- Shared Connection: Select the network connection you want to use to share internet access. This is typically your Ethernet connection if you're plugged in, or your existing WiFi connection if you are connected to a separate WiFi network.
Initiating the Hotspot: After configuring these settings, carefully click the "Start Virtual Router" button. Virtual Router Plus will then create your WiFi hotspot, enabling other devices to connect.
Connecting Your Devices: Now, on your other devices (phones, tablets, laptops), search for available WiFi networks. Your newly created hotspot (identified by the SSID you selected) will be visible in the list. Select your hotspot and enter the password you created. Voila! You're connected, and your device can now access the internet through your Windows XP computer.
Method 2: Utilizing the Command Prompt (A More Advanced Approach)
For those who enjoy a bit of technical flair, running the command line interface is an option and offers slightly more control over the hotspot’s settings.
Open the Command Prompt (Admin Mode): Click the "Start" button, then navigate to "All Programs" -> "Accessories". Right-click on "Command Prompt" and select "Run as administrator". This is essential for the commands to work correctly.
Setting Up a Hosted Network: In the Command Prompt window, enter the following command and press Enter:
netsh wlan set hostednetwork mode=allow ssid="YourHotspotName" key="YourPassword"- Replace
"YourHotspotName"with the desired name of your WiFi hotspot (SSID). Use something short and easy to remember. - Replace
"YourPassword"with a strong, secure password for the hotspot. This protects your connection from unauthorized access.
- Replace
Starting the Hosted Network: Now, start the hosted network by entering this command and hitting Enter:
netsh wlan start hostednetworkSharing Your Internet Connection:
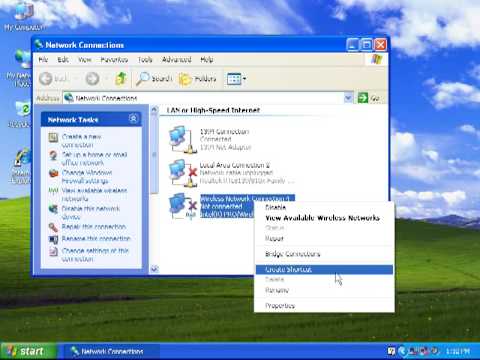
- Open "Network Connections" (Right-click the network icon in your system tray and select "Open Network and Sharing Center", then click "Change adapter settings").
- Identify the network connection that has your internet access (e.g., Ethernet or the WiFi you're currently connected to).
- Right-click the connection and choose "Properties".
- Click the "Sharing" tab.
- Check the box that says "Allow other network users to connect through this computer's Internet connection".
- In the "Home networking connection" dropdown, select "Wireless Network Connection" (this will be the hosted network you just created). If it isn't listed, restart your computer and try the steps again.
- Click "OK" to save the settings.
Connecting Your Devices: As with Virtual Router Plus, your hotspot (with the SSID you chose) will now appear on your other devices. Connect to it by entering the password you set.
Troubleshooting Common Issues
No setup is ever completely foolproof. Consider common road bumps and how to overcome them.
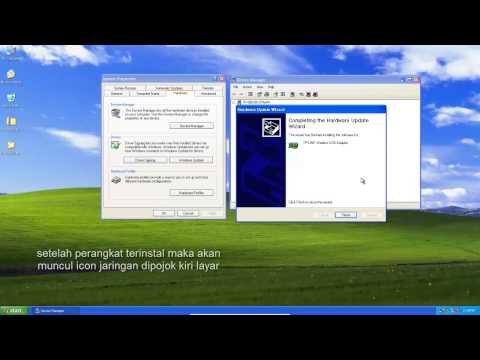
- Network Adapter Issues: Ensure your WiFi adapter is working correctly. Check device manager (search for "Device Manager" in the Start menu) for any yellow exclamation points or error messages. If you find any, you may need to reinstall or update your adapter's drivers.
- Connection Sharing Problems: If devices can't connect or access the internet, double-check the internet connection sharing settings in the "Network Connections" window (see Method 2, step 4). Confirm that the correct network connection is being shared, and that the "Allow other network users…" box is checked.
- Firewall Interference: Your Windows XP firewall or any third-party firewall software could be blocking the hotspot. Temporarily disable your firewall (proceed with caution!) and test. If this resolves the issue, you'll need to configure your firewall to allow traffic from the hotspot.
- Driver Conflicts: Sometimes, conflicting drivers can cause problems. Make sure you have the latest drivers for your network adapter installed. You can often find updated drivers on the manufacturer's website.
- Security Software: Similarly, antivirus and other security software occasionally interfere. Temporarily disabling these programs can help isolate this issue.
- Restart Everything: The classic fix: Restart your Windows XP computer and any devices that are trying to connect to the hotspot. This often resolves minor glitches.
Enhancing Security: Protecting Your Hotspot
Security is paramount. You are opening yourself up to potential threats if you skip security precautions.
- Strong Passwords: Use a strong, complex password for your hotspot. It should be at least 12 characters long and include a mix of upper and lowercase letters, numbers, and symbols.
- WPA2-PSK Encryption: Ensure your hotspot is using WPA2-PSK encryption. This is a more secure encryption protocol that protects your data in transit. Both Virtual Router Plus and the Command Prompt method utilize WPA2-PSK by default.
- Regular Password Changes: Change your password periodically, especially if you're using your hotspot in public places.
- MAC Address Filtering (Optional): For an added layer of security, you can configure MAC address filtering. MAC addresses are unique identifiers for each device. You can allow only specific devices with known MAC addresses to connect to your hotspot, but this is more advanced and can be time-consuming to manage.
- Monitor Connected Devices: Keep an eye on connected devices to ensure no unauthorized devices are using your hotspot. You can often see connected devices in Virtual Router Plus, or you can use network monitoring tools.
Alternative Software Solutions (If You Run into Problems)
While Virtual Router Plus is generally the simplest solution, other software options are available:
- Connectify Hotspot: A popular commercial option with a free version that provides similar functionality. It offers a user-friendly interface and advanced features, but it's not entirely free. It is a premium solution.
- MaryFi: Another free alternative. MaryFi is designed to be simple-to-use. This software is straightforward.
- mHotspot: This software is another option. It provides an easy-to-use interface for creating a WiFi hotspot.
Optimizing Performance: Getting the Most Out of Your Hotspot
Here are a few tips to improve the performance of your hotspot:
- Location, Location, Location: Position your Windows XP computer in a central location to maximize WiFi coverage. Avoid placing it near walls
