how to access wifi camera on laptop
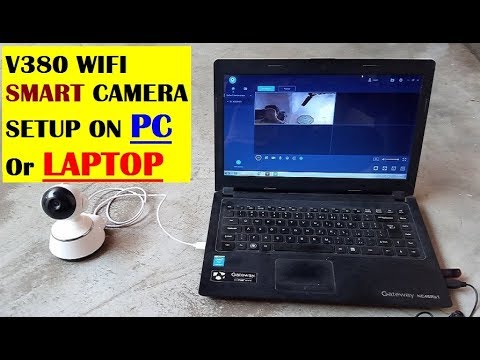
Title: V380 wifi Camera software installation & Setup & remote viewing on Laptop or PC Over Wifi Local
Channel: Dev Tech Help
V380 wifi Camera software installation & Setup & remote viewing on Laptop or PC Over Wifi Local by Dev Tech Help
how to access ip camera on laptop, how to configure ip camera on laptop, how to connect ip camera on laptop, how to use ip camera on laptop, how to connect wifi camera to laptop, how to connect wireless camera to laptop, how to view wifi camera on pc, how to access camera on laptop
Unlock Your WiFi Camera's Secrets: Laptop Access Revealed!
Unveiling Your WiFi Camera: Your Laptop's New Best Friend
Ever wondered what secrets your WiFi camera holds? It's time to unlock them! You might be surprised at what you discover. Accessing your camera on your laptop isn't some high-tech mystery. It’s generally easier than you imagine. Let's explore how to make your laptop and camera buddies.
Peeking Behind the Lens: Understanding Your Camera's Language
First, you need to grasp the basics. Your WiFi camera speaks a digital language. This is how it communicates over your network. Consequently, your laptop needs a translator. This "translator" is usually software or a web interface. These provide access to its visual data. Think of it as your camera's private hotline. Once you get connected, you can start to enjoy the real benefits. You can also see every image and video captured. Moreover, you can control certain camera features.
Decoding the Network: Finding Your Camera's Address
Next, you'll need your camera's IP address. This is its unique digital fingerprint in your network. Generally, you can find this in several ways. Look for it in your camera's settings. Check your router's admin panel. Many routers list connected devices with their IP addresses. Furthermore, some cameras have apps. These apps can help you find this vital information.
Once you have the IP address, write it down. You’ll need it to access the camera. Keep it handy. It’s your key to the camera's content.
Software Solutions: The Helpful Applications
Many WiFi cameras come with proprietary software. This software is designed for easy laptop access. Indeed, this is often the simplest approach. Download and install the software from the manufacturer's website. Follow the provided instructions.
Alternatively, you can use third-party software. These applications often work across different camera brands. Search online for "WiFi camera viewing software." Then, download a reliable program. Install it on your laptop.
Furthermore, you may also be able to view your camera with these applications.
Web Browser Wonders: Accessing Through the Back Door
Some WiFi cameras have a built-in web interface. They can be accessed via a web browser. Enter your camera's IP address into your browser's address bar. Hit “Enter,” and you might be greeted with a login screen. Enter your username and password. If you have this available, you can see the live feed. You can also change camera settings.
In essence, this method can be quick and effective. Consider checking your camera's manual. It will tell you if it offers web access.
Setting Up for Success: A Step-by-Step Guide
Here’s a basic setup routine for most WiFi cameras. First, connect your camera to your WiFi network. Make sure your laptop is on the same network. Find your camera's IP address. As mentioned before, your router or the camera software usually has this.
Then, open your camera software or web browser. Enter the IP address in the correct field. Log in using your credentials. You should now see your camera's live feed.
Fine-Tuning Your View: Optimizing the Experience
Adjust your camera settings. Many cameras let you change video quality. You can also adjust brightness. This will enhance viewing conditions. Configure your camera's recording settings. Decide whether you want continuous recording or motion detection.
Additionally, familiarize yourself with any advanced features. Your camera might offer pan and tilt control. Moreover, it could have night vision capabilities.
Troubleshooting Troubles: When Things Go Wrong
Sometimes, things don't go as planned. If you cannot access your camera, there are a few common solutions. First, double-check your WiFi connection. Make sure both your camera and laptop are connected. Confirm you’ve entered the correct IP address.
Then, try restarting both your camera and laptop. If the problem persists, check your firewall settings. Your firewall might be blocking access to the camera. Finally, consult your camera's user manual. It contains specific troubleshooting tips for your model.
Seizing Security: Keeping Your Footage Safe
Protecting your camera's feed is very important. Change the default username and password. Use a strong, unique password. Keep your camera's firmware updated. This will fix many security issues.
Consider using encryption. This safeguards the data during transmission. Regularly review your camera's settings. Ensure that only authorized people can access it.
Beyond the Basics: Exploring Advanced Applications
Once you master the fundamentals, the possibilities open up. Use your camera for home security. Monitor your pets while you are away. This can provide peace of mind.
Connect your camera to smart home systems. Then, you can control it using voice commands. Explore different camera functions. See what capabilities it has.
The Final Verdict: Embracing the Power of Connection
Accessing your WiFi camera on your laptop is easy. It’s simple to set up and operate. The benefits are enormous. Enhance home security. Furthermore, monitor your loved ones at home.
Now, go forth and explore. Enjoy the newfound knowledge. You are now equipped to unlock your camera. See what you can do with it!
Acer E5 WiFi Nightmare? This FIX Will SHOCK You!Unlock Your WiFi Camera's Secrets: Laptop Access Revealed!
Ever felt like your WiFi camera, that little sentinel watching over your home or office, is holding out on you? Like it's got a secret stash of data, a hidden library of images and videos you can't quite access? Trust me, we've all been there. And the good news is, getting your laptop connected to your WiFi camera is often easier than you think. We're talking about unveiling the full potential of your security system, your pet cam, or whatever clever contraption you've got set up. So, grab your favorite beverage, settle in, and let's unlock those secrets together!
1. Why Bother Connecting Your WiFi Camera to Your Laptop?
Think of your WiFi camera as a digital window. It's capturing the world, but if you're only viewing it through your phone or a clunky app, you're missing out on a bigger, brighter picture. Connecting it to your laptop opens up a universe of possibilities:
- Larger Screen: See everything in glorious detail. No more squinting at a tiny screen. Imagine watching your dog's antics on a big desktop monitor – pure entertainment!
- Enhanced Control: Many laptop interfaces offer more control options than mobile apps. You can adjust settings, pan, tilt, and zoom with greater precision. This is like upgrading from a basic telescope to a high-powered observatory.
- Advanced Features: Some software allows for more advanced features like continuous recording, motion detection alerts, or even facial recognition.
- Easy Archiving and Sharing: Saving recordings and sharing them with others becomes much simpler. Want to show your grandkids their first steps? Easy peasy!
- Increased Security: A laptop can act as a central hub, storing footage locally, offering an additional layer of security in case of app or cloud issues.
2. Understanding Your Camera's Inner Workings: A Quick Primer
Before we dive in, a quick reality check: not all WiFi cameras are created equal. Some are designed for ease of use, while others offer more customization. Think of it like cars: a basic model gets you from point A to B, while a luxury one has all the bells and whistles.
- IP Address: This is your camera's unique digital address on your network. Finding this is key to accessing it.
- Web Interface: Many cameras have a web interface you can access through a web browser on your laptop. This is the control center.
- Mobile App: Your camera likely has a companion mobile app. This is your initial entry point for setup.
- Software: Some cameras require specific software to run on your laptop. This is the brains of the operation.
3. Finding Your WiFi Camera's IP Address: The Digital Treasure Map
This is the first, crucial step. Think of the IP address as the key to unlocking the "treasure," your camera's footage. There are several ways to find it:
- Check Your Router's Interface: Almost all routers have a web-based interface where you can see all connected devices, including their IP addresses. Check the router's manual for instructions. This is your secret agent headquarters.
- Use a Network Scanner: Several free network scanner apps (like Angry IP Scanner) can scan your network and identify connected devices and their IP addresses. Think of this as the detective's magnifying glass.
- Check Your Camera's App: Some camera apps display the IP address within the settings menu.
- Consult Your Camera's Manual: The manual should detail the process and potentially provide the default IP address. This is your instruction manual.
4. Gaining Access: Connecting Through the Web Interface
If your camera has a web interface, this is often the easiest method.
- Open Your Web Browser: Chrome, Firefox, Safari – whatever you prefer.
- Type the IP Address: In the address bar, type your camera's IP address and press Enter.
- Log In: You'll likely be prompted for a username and password. Use the credentials you set up during the camera's initial configuration. If you haven't changed them, try the default username and password provided in the manual (e.g., "admin" and "password").
- Explore the Interface: Once logged in, you should see a live feed, along with options to adjust settings, record, and control the camera. This is your virtual control room.
5. The Mobile App's Role: Acting as a Control Center
Many cameras can also be accessed through their companion app on your laptop (often via an emulator like BlueStacks or Nox). The process is similar to your phone:
- Download an Android Emulator: Choose an emulator like BlueStacks or Nox – it’s essentially a virtual Android phone on your laptop.
- Install the Camera App: Download and install your camera's app through the emulator.
- Log In: Use your existing camera account credentials.
- Control and View: You should now be able to see the live feed and control the camera.
6. Software Solutions: Harnessing the Power of Dedicated Programs
Some cameras require dedicated software on your laptop. This software offers more features and a more tailored experience.
- Download the Software: Visit the manufacturer's website to download the software specifically designed for your camera model.
- Install and Configure: Follow the installation instructions. You may need to enter your camera's IP address during setup.
- Dive In: Explore the software's features, which typically include live viewing, recording, and advanced settings. This is like getting a tailored cockpit for your camera.
7. Troubleshooting: Conquering Common Connectivity Challenges
Sometimes, things don't go according to plan. Don't worry; here's how to tackle some common issues:
- Can't Find the IP Address?: Double-check your router's settings, network scanner, and the camera's app.
- Incorrect Login Credentials: Verify the username and password in your camera's manual or settings. If you've forgotten them, you might need to reset the camera.
- Firewall Issues: Your laptop's firewall or antivirus software might be blocking access. Temporarily disable them and see if that solves the problem (remember to re-enable them afterward).
- Network Connectivity Issues: Ensure your laptop and camera are on the same WiFi network (or connected to the same router).
- Software Compatibility: Ensure that the software you've downloaded supports your specific camera model.
8. Security Considerations: Keeping Your Footage Safe
Protecting your camera's footage is paramount. Think of it as safeguarding your digital treasure.
- Strong Passwords: Use a strong, complex, unique password on your camera.
- Two-Factor Authentication (2FA): If available, enable 2FA to provide an extra layer of security.
- Keep Software Updated: Regularly update your camera's firmware and any associated software.
- Secure Your Network: Use a strong password for your WiFi network and consider a guest network for your camera.
- Regularly Review Footage: This is a great way to ensure your camera is functioning as intended and identify potential security breaches.
9. Selecting the Right Software: Tailoring Your Tools
Numerous software options are available. Some popular choices include:
- Blue Iris: A powerful, paid software with numerous features.
- iSpy: A free, open-source option with basic functionality.
- SecuritySpy (Mac): A Mac-specific option.
Choose the software that best suits your needs and budget.
10. Setting Up Continuous Recording: Always On Guard
Continuous recording ensures you never miss a moment. Look for settings in your camera's web interface or software that allow you to enable continuous recording to your laptop's hard drive.
11. Motion Detection Alerts: Instant Notifications
Most cameras offer motion detection. Set up email or push notifications to be alerted whenever the camera detects movement. This is like having a personal security guard on duty.
12. Remote Access: Monitoring From Anywhere
Many cameras support remote access, allowing you to view footage from anywhere with an internet connection. This frequently involves port forwarding (which can be complex), or using the camera's cloud service or a VPN.
13. Optimizing Image Quality: Fine-Tuning Your View
Adjust the camera's settings for optimal image quality. Experiment with resolution, frame rate, and brightness.
14. Organizing and Archiving Footage: Maintaining Your Digital Library
Create a system for organizing and archiving your footage. This could involve creating folders by date or event, and backing up your recordings to an external hard drive. This is akin to a well-organized filing system.
15. Advanced Features: Exploring the Possibilities
Some cameras offer advanced features like facial recognition, which can trigger alerts or identify specific individuals. Investigate the features your camera offers.
Conclusion
Unlocking your WiFi camera's secrets and accessing it via your laptop is an exciting journey. We've explored various methods, from the straightforward web interface to advanced software
Laptop WiFi Nightmare Solved! (Amilo Fix Inside)OLD - How to View an IP Camera Using a Web Browser

By CCTV Camera World OLD - How to View an IP Camera Using a Web Browser by CCTV Camera World
Cp plus-C21 Wifi Laptop PC surveillancecamera wifi

By Deshi Gyan Tech Cp plus-C21 Wifi Laptop PC surveillancecamera wifi by Deshi Gyan Tech
EZVIZ Camera Advanced Settings

By TURBOHD X EZVIZ Camera Advanced Settings by TURBOHD X

Title: HIKVISION How to set up IP Camera NETVN
Channel: NETVN82
HIKVISION How to set up IP Camera NETVN by NETVN82
Laptop Working
Unlock Your WiFi Camera's Secrets: Laptop Access Revealed!
Ever felt a pang of curiosity, a whisper of wanting to see what your WiFi camera sees, right from the familiar screen of your laptop? You’re in the right place. We're about to embark on a journey, a step-by-step exploration, that will transform you from a passive observer into an active participant in your own private security system, or simply allow you to check on the cat while you're out. No complicated jargon, just clear instructions and a touch of tech wizardry.
Understanding Your WiFi Camera: The Gateway to Knowledge
First, let's acknowledge the power in your hands. Your WiFi camera isn't just a passive recording device; it’s a digital sentinel, tirelessly watching over your home, your office, or whatever space you choose to monitor. By gaining laptop access, you're effectively turning your laptop into a command center. Think of it as having a sophisticated eyes-on-the-ground perspective whenever and wherever you need it.
Essential Prerequisites: Before We Begin
Before diving in, ensure a few fundamental elements are in place. These prerequisites are critical for a smooth and successful connection:
- Active WiFi Camera: Your WiFi camera must be powered on and connected to your home or office network. Verify this by checking its status lights or reviewing its mobile app if applicable.
- Laptop's Network Connection: Your laptop needs to be connected to the same network as your WiFi camera. Ensuring both devices share the same network is essential for them to communicate effectively. This connection can be established either via WiFi or, in some cases, an Ethernet cable directly connected to your router.
- Your Laptop's Operating System: These instructions are applicable to many different operating systems, but specific technical steps may vary slightly. Most consumer WiFi cameras these days work well with both Windows and macOS.
- Camera's IP Address: The IP (Internet Protocol) address serves as the digital address of your camera on your network. We'll discover how to find this later. This is the most crucial piece of the puzzle for direct access.
- Camera's Login Credentials: You'll require the username and password associated with your WiFi camera to access its live feed or settings. The default credentials are often printed on the camera itself or provided in the user manual. If you've changed them, be sure you remember the new credentials. This is to protect your security.
Discovering Your Camera's IP Address: The Digital Compass
The IP address is akin to your camera's home address on your network. Without it, you can't find your way to its digital front door. Here are several methods to uncover this critical information:
- Router's Admin Page: This is often the most reliable method. You will need your router's IP address to access its admin page. This IP is usually 192.168.1.1, 192.168.0.1, or 10.0.0.1. Consult your router's documentation if you're unsure. After logging in with your router's credentials, navigate to the “Attached Devices,” “DHCP Client List,” or similar section. You should see a list of all devices connected to your network, along with their IP addresses. Your WiFi camera should be listed here; typically, it's identified by its manufacturer or model name.
- Camera's Mobile App: Most WiFi cameras come with a mobile application. Within the app's settings or device information, you should find your camera's IP address listed. This is usually labelled as “Device IP” or something similar.
- Using a Network Scanner (Advanced Users): If you are more technically inclined, you can use a network scanner application on your laptop (e.g., Angry IP Scanner). These tools scan your network and identify all connected devices, including their IP addresses and MAC addresses. Download and install a network scanner that's compatible with your operating system. Run the scanner, and it will display a list of devices with their IP addresses. Review the results to locate your WiFi camera.
- Camera's Physical Label: Some cameras have the IP address printed directly on the device or in its accessories box.
Accessing Your Camera via Web Browser: Your Digital Window
Once you have your camera's IP address, you can use it to access the camera feed through your laptop's web browser. Here's how:
- Open Your Web Browser: Launch your preferred web browser (Chrome, Firefox, Safari, Edge, etc.).
- Enter the IP Address: In the address bar, type your camera's IP address, followed by a colon and the port number. Port numbers for web access of WiFi cameras can vary, but common ones are 80, 8080, or 8000. For example, if your camera’s IP address is 192.168.1.100, and it uses port 80, enter
192.168.1.100:80into the address bar. If you are unsure of the port number, try the most common ones (80, 8080) or consult your camera's documentation. - Enter Login Credentials: The browser will prompt you for your camera's username and password. Input the correct credentials and click "Login" or "Submit."
- View the Live Feed: If you’ve entered the correct information, you should now see your camera's live view within the browser window. Some cameras have settings to control pan, tilt, and zoom directly from the web interface.
Utilizing Dedicated Camera Software: Enhanced Control and Features
Many WiFi camera manufacturers provide dedicated software for laptops, which offers a more feature-rich experience. These software applications often include:
- Multiple Camera Management: Control and view feeds from several cameras from a single interface.
- Recording and Playback: Schedule recordings, review past footage, and save clips to your laptop's hard drive.
- Motion Detection and Alerts: Configure motion detection zones and receive email or push notifications when movement is detected.
- Advanced Settings: Adjust video quality, audio settings, and network configurations.
To use this software:
- Download and Install: Visit the camera manufacturer's website and download the software compatible with your laptop's operating system.
- Follow Installation Instructions: Run the installer and follow the on-screen prompts to install the software.
- Add Your Camera: Open the software. It will usually require you to add your camera by entering its IP address and login credentials.
- Explore Features: Once your camera is added, you can access the full range of features offered by the software.
Troubleshooting Common Issues: Navigating the Digital Maze
Encountering a roadblock? Don't worry; it's all part of the process:
- Can't Connect: Double-check the IP address and port number. Ensure your laptop and camera are on the same network. Reboot both devices and the router. Ensure the camera is powered on and functioning correctly.
- Incorrect Login Credentials: Confirm that you are using the correct username and password. If you've forgotten your credentials, you may need to reset your camera and start over. Consult your camera's manual for guidance on resetting.
- Firewall Issues: Your laptop's firewall may be blocking access to your camera. Disable the firewall temporarily to test access, but exercise caution and enable it again once you’ve verified functionality. You can also configure your firewall to allow connections from your camera's IP address.
- Network Congestion: If multiple devices are using your network, it can affect the camera's performance. If possible, limit the bandwidth used by other devices, especially during peak access times for your camera.
- Outdated Firmware: Ensure your camera's firmware is up to date. Check for firmware updates through the camera's mobile app or the manufacturer's website. Outdated firmware can cause connectivity issues or security vulnerabilities.
Enhancing Security: Safeguarding Your Digital Eyes
Protecting your WiFi camera’s feed is paramount. Here are important security considerations:
- Strong Passwords: Always use a strong, unique password for your camera. Avoid easily guessable information like your name, date of birth, or common passwords. Employ a combination of upper and lowercase letters, numbers, and symbols.
- Two-Factor Authentication (if available): Enable two-factor authentication if your camera or its software supports it. This adds an extra layer of security.
- Regular Firmware Updates: Keep your camera's firmware up to date to patch security vulnerabilities.
- Network Security: Use a strong password for your WiFi network. Consider using WPA3 encryption for better security.
- Guest Network: If possible, place your camera on a guest network separated from your main network. This will limit the potential for someone accessing your camera to also access your personal data.
- Monitor Activity: Regularly review your camera's activity logs (if available) to identify any suspicious login attempts or unauthorized access.
- Physical Security: Secure the camera itself. Make sure it's not easy to access and tamper with physically.
Beyond Basic Viewing: Unlocking Further Possibilities
Once you’ve mastered laptop access, explore the potential of your WiFi camera:
