ho to prevent your laptop from sharing on wifi

Title: 5 EASY Ways to Secure Your Home WiFi Network & protect your devices
Channel: All Things Secured
5 EASY Ways to Secure Your Home WiFi Network & protect your devices by All Things Secured
Laptop WiFi Sharing Nightmare? STOP It NOW!
Taming the WiFi Beast: Rescue Your Sanity from Sharing Chaos!
Have you ever wrestled with your laptop's WiFi sharing feature? It can morph into a frustrating labyrinth. You're not alone; it's a common digital struggle. We're going to conquer this beast together. Ready to banish the WiFi sharing headache? Let’s dive in!
The Phantom WiFi Connection: Unmasking the Culprits
Firstly, imagine this scenario. You invite friends over. They need WiFi access. You attempt to share your laptop's internet connection. Suddenly, the connection dissolves! Sound familiar? It's a frustrating experience. This usually unveils the first set of problems.
Sometimes, the issue stems from the laptop itself. Other times, your settings are playing tricks. Antivirus software might be blocking access. Firewall configurations, too, can be the silent saboteurs. It is very important to identify the real culprit.
Decoding the WiFi Sharing Puzzle: Your Step-by-Step Guide
Now, let's unravel the mysteries. Troubleshooting this can feel like rocket science. However, we'll break it down into manageable steps. Following this helps to regain control over the situation.
Start by checking your network adapter settings. Make sure you've enabled internet connection sharing. Verify the shared connection appears in your list. Next, inspect your firewall settings. Temporarily disable it. Does it work? If so, you pinpointed the source.
Another great thing is to check your antivirus. Whitelist the intended shared connection. Restart your laptop after making changes. Restarting can fix many problems. This often solves shared connection issues.
Beyond the Basics: Advanced WiFi Sharing Strategies
Perhaps you've tried the fundamental fixes. Maybe you're still encountering WiFi woes. So, consider more advanced strategies. These tips can transform you into a WiFi sharing warrior.
Firstly, understand your laptop's capabilities. Some laptops have built-in WiFi hotspots. Others require third-party software. Research the appropriate process for your device. It is very important to know this.
Explore different sharing methods. Consider the "Mobile Hotspot" feature. It offers simpler sharing options. Use the command prompt to troubleshoot. It can provide more insight. Always keep your drivers updated. Outdated drivers cause connection problems. Regularly update your operating system too. Updates often include relevant bug fixes. Regularly maintaining your system helps prevent problems.
Troubleshooting Common Pitfalls: The Digital Minefield
Even the most tech-savvy users face challenges. Sharing WiFi can be tricky. We’ll navigate some typical pitfalls. Learn to avoid these common mistakes efficiently.
The most frequent issue is incorrect settings. Double-check all configurations. Another challenge involves password setup. Create a strong, easily remembered password. Test the connection from another device. This helps verify functionality. Identify the source of the problem using that technique.
Another problem is signal strength. Ensure your laptop is in range of the WiFi source. Also, confirm your device hasn't reached its connection limit. Too many connections can cause issues. Try limiting the number of devices connected. Sometimes, the problem is caused by other factors.
Achieving WiFi Serenity: Your Ultimate Triumph
Congratulations, you’re on your way! You know how to fix the common issues. You can overcome any WiFi sharing challenge. You understand the underlying issues.
Embrace these strategies to achieve WiFi serenity. Enjoy seamless connections without stress. With a little practice, you will master this skill. Share your newfound knowledge with others. Help friends and family banish their WiFi frustrations.
Always remember these key points. Keep your drivers updated. Also, stay secure with strong passwords. Regularly restart your devices for a fresh start. Now, go forth and conquer the WiFi sharing nightmare! Your digital peace awaits.
Asus Laptop WiFi Nightmare? Fix Your Internet NOW!Laptop WiFi Sharing Nightmare? STOP It NOW!
We've all been there. You're huddled around a single Wi-Fi hotspot on your laptop like a bunch of penguins seeking warmth in the Antarctic blizzard. Trying to share your laptop's Wi-Fi connection, perhaps to get your phone, tablet, or even another laptop online, only to be met with a buffering circle of doom and frustration. It's a modern-day digital slow-motion car crash, a complete Laptop WiFi Sharing Nightmare. But fear not, fellow internet travelers! We're going to dismantle this technological Gordian knot and get you back online, sharing your Wi-Fi connection with grace and efficiency.
1. The Silent Scream: Understanding the Laptop WiFi Sharing Struggle
Let's be honest, the inherent problem with sharing Wi-Fi from your laptop isn’t just about the connection speed. It's about the experience. It's like trying to pour from a tiny teacup: you’re constantly worrying about spills, and ultimately, everyone at the table will feel shortchanged. We're talking about dropped connections, agonizingly slow downloads, and the constant feeling that your digital life is being held hostage by a rogue Wi-Fi router, which quite frankly, is your laptop.
2. Why is My Laptop WiFi Sharing Such a Sluggish Mess?
Think of your laptop as a digital juggler trying to keep too many balls in the air at once. It's got to manage:
- The incoming Wi-Fi: Receiving the internet signal from your router.
- The outgoing Wi-Fi (if using hotspot): Broadcasting that signal to other devices.
- Your own online activities: Browsing, streaming, downloading… the works!
This multitasking act, especially using your laptop as a hotspot, can quickly overload your laptop’s resources. It's like asking a single person to bake a cake, answer the phone, and host a dinner party all at once. It's not impossible, but the quality is bound to suffer.
3. Unveiling the Culprits: Common WiFi Sharing Obstacles
Several factors can conspire to make your laptop's Wi-Fi sharing a real headache. Let's get to the bottom of this:
- Network Congestion: The more devices connected, the slower things become. It's like trying to squeeze through a crowded concert venue – the bottleneck is real.
- Distance and Obstacles: Walls, furniture, and the distance between your laptop and the connected devices can weaken the signal. Imagine trying to shout across a stadium versus whispering at tea.
- Outdated Drivers: Yes, your laptop’s Wi-Fi adapter needs regular checkups, just like your car! Outdated drivers can lead to performance issues.
- Laptop Specifications: Let's face it, an ancient laptop with limited processing power will struggle to share Wi-Fi effectively. It's like expecting a tiny scooter to haul a trailer.
4. The Secret Weapon: Laptop WiFi Sharing – The Right Way
Alright, enough about what goes wrong. Let's get into some practical ways to improve your laptop's Wi-Fi sharing.
5. Method 1: Using Your Laptop's Built-in "Mobile Hotspot" Feature
Most modern laptops, running Windows or macOS, have a built-in feature to create a mobile hotspot. Here's how it generally works:
- Windows: Go to Settings > Network & Internet > Mobile Hotspot. Turn it on, and you can customize the network name (SSID) and password.
- macOS: Click the Wi-Fi icon in the menu bar, select "Open Network Preferences," then choose "Internet Sharing." Select your Wi-Fi connection to share, then configure the settings, including the password.
Remember, this method uses your laptop’s resources, and performance may vary.
6. Method 2: Turning Your Laptop into a Wi-Fi Repeater (If Supported)
Some laptops have the ability to act as a Wi-Fi repeater, which extends the range of your existing Wi-Fi network rather than sharing a direct internet connection. This can be a better solution if your primary Wi-Fi signal is weak in certain areas of your home. This process often requires third-party software and depends on your computer's wireless adapter.
7. Troubleshooting Troubles: When Things Go Wrong
Even with the right setup, things can go sideways. Here's how to troubleshoot common issues:
- Check the Connection: Ensure your laptop is connected to the internet before trying to share it.
- Restart Everything: Sometimes, a simple reboot of your laptop and connected devices can work wonders. A digital reset button!
- Update Drivers: Go to your device manager (in Windows) or check for software updates (in macOS) to update your Wi-Fi drivers.
- Change Wi-Fi Channel: In your router's settings, try switching to a different Wi-Fi channel to avoid interference from other wireless networks.
8. Optimizing Performance: Make the Most of Your Shared Wi-Fi
Even if you're limited by your laptop's hardware, there are things you can do to optimize the shared Wi-Fi experience:
- Limit Connected Devices: The fewer devices, the faster the connection.
- Prioritize Bandwidth: Use quality of service (QoS) settings, if available on your router, to give priority to certain devices or applications.
- Reduce Bandwidth Usage: Minimize streaming, downloading, and other bandwidth-intensive activities on your laptop while sharing.
9. Securing Your Shared Wi-Fi: Protecting Your Data
Sharing your Wi-Fi also means sharing a potential doorway to your digital life. Ensure your shared Wi-Fi network (hotspot) is secure:
- Strong Password: Use a long, unique password with a combination of letters, numbers, and symbols.
- Encryption: Ensure your hotspot uses WPA2 or WPA3 encryption.
- Monitor Connected Devices: Regularly check the devices connected to your shared network to identify any unauthorized users.
10. Beyond the Basics: Advanced Techniques for Power Users
Ready to level up your Wi-Fi sharing game?
- Third-party software: Several apps can help manage and enhance Wi-Fi hotspots, offering more control over bandwidth allocation, security, and device management.
- USB Wi-Fi Adapters: Consider using a dedicated USB Wi-Fi adapter to boost your laptop's hotspot capabilities.
- Explore Your Router's Features: Your router might have advanced features that can improve the performance of your shared Wi-Fi.
11. The Hardware Factor: Is It Time for an Upgrade?
If your laptop is several years old, it may be struggling to meet modern Wi-Fi demands. Consider:
- RAM: Insufficient memory can slow down everything, including Wi-Fi sharing.
- Processor: A faster processor handles multitasking more efficiently.
- Wi-Fi standards: Newer laptops support faster Wi-Fi standards like 802.11ac or Wi-Fi 6 (802.11ax), which can significantly improve speeds and range.
12. Laptop WiFi Sharing: A Guide to Modern Solutions
Consider the following solutions:
- Extend a Wi-Fi network: If your primary signal is weak in one spot, use a Wi-Fi extender for better coverage.
- Use ethernet: If possible connect directly to your devices.
- Create a dedicated hotspot: Use a router set up with sim as a dedicated hotspot rather than sharing via your laptop.
13. The Portable Powerhouse: Laptop WiFi Sharing for Travelers
Traveling? Sharing Wi-Fi from your laptop can be a lifesaver. Remember:
- Check local regulations: Some hotels or countries might restrict Wi-Fi sharing.
- Use a VPN: A Virtual Private Network encrypts your internet traffic.
- Battery life: Be mindful of your laptop's battery consumption when sharing Wi-Fi.
14. The Future of Sharing: Innovations on the Horizon
Wi-Fi technology is constantly evolving. Expect:
- Wi-Fi 7 (802.11be): Even faster speeds and lower latency.
- Mesh Wi-Fi: Systems that create a seamless wireless network across a large area.
- More integrated hotspot features: Manufacturers will likely add more powerful and user-friendly Wi-Fi sharing options.
15. The Bottom Line: Liberate Your Wi-Fi
Sharing Wi-Fi from your laptop no longer has to be a struggle. With a bit of understanding and the right techniques, you can enjoy a smoother, faster, and more secure internet sharing experience. You've got this!
Closing Section
We hope this deep dive has armed you with the knowledge and tools needed to escape that frustrating Laptop WiFi Sharing Nightmare. Remember, the internet is a vast and wondrous place, and you shouldn’t be restricted by a slow, unreliable connection. So, embrace your inner Wi-Fi guru, implement these tips, and start enjoying a seamless and shareable internet experience. Now go forth, and share your Wi-Fi with confidence! If you have any questions, don’t hesitate to ask. We're always here to help. Happy sharing!
FAQs
**1. My laptop's hotspot isn't showing up on other devices. What should I do
Is Your Laptop MISSING This WiFi Speed Boost? (5GHz Check!)How to Secure Wi-Fi Network from Neighbors

By MalwareFox How to Secure Wi-Fi Network from Neighbors by MalwareFox
How to stop sharing the laptop's Internet connection hotspot - Windows 10

By Solutionbay How to stop sharing the laptop's Internet connection hotspot - Windows 10 by Solutionbay
How to Enable or Disable Network Sharing Discovery in Windows 108.17
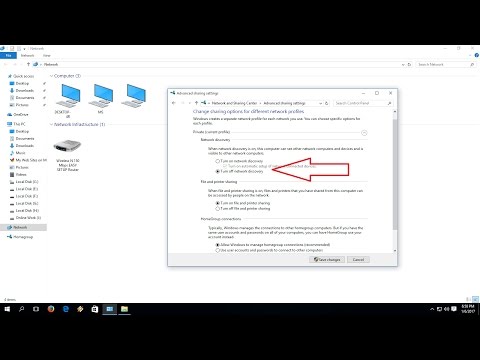
By MJ Tube How to Enable or Disable Network Sharing Discovery in Windows 108.17 by MJ Tube

Title: Fix any Internet and Network Issues with this simple trick
Channel: HowtoInsider
Fix any Internet and Network Issues with this simple trick by HowtoInsider
Wifi On Laptop Phone
Laptop WiFi Sharing Nightmare? STOP It NOW!
We've all been there. The frantic search for a reliable internet connection when we're on the go or in a pinch. That feeling of utter frustration when your laptop's WiFi sharing feature decides to stage a revolt, leaving you staring at a spinning wheel of doom instead of the website you desperately need. It's a modern-day tragedy, a digital headache, a laptop WiFi sharing nightmare. But fear not, because we are here to help you navigate these technical tides.
Understanding the Root of Your WiFi Sharing Woes
Before we dive into solutions, let's briefly examine the common culprits behind these WiFi sharing woes. Often, the source of the problem boils down to configuration errors, incompatible settings between devices, or outdated drivers that are causing the systems to communicate incorrectly. Sometimes, it's simply a matter of interference, either physical (thick walls, other electronic devices) or wireless (too many networks vying for attention). Other times, it's the network adapter itself, either on the sharing device or the receiving one, that's not up to the job. A poorly configured firewall can also block access to your shared internet or prevent the sharing from even starting. Finally, we often find that the problem isn't on the sharing laptop at all, but on the receiving end which is unable to connect to the newly created WiFi network.
Step-by-Step Solutions to Conquer WiFi Sharing Stumbles
Let’s get to the good stuff: how to troubleshoot and fix these problems, turning that frustration into a feeling of pure digital liberation.
1. The Foundation: Driver Verification and Updates
The first crucial step involves ensuring your network adapter drivers are up-to-date. Outdated drivers are a frequent source of connectivity issues. Here’s how to check and update them on Windows:
- Access Device Manager: Right-click the Start button and select "Device Manager".
- Locate Network Adapters: Expand the "Network adapters" section. You'll see a list of your network adapters (Wireless, Ethernet, etc.).
- Update Drivers: Right-click each adapter and select "Update driver". Choose "Search automatically for drivers". Windows will search for and install the latest drivers.
- Manual Update (If Needed): If Windows can't find updates, visit your laptop manufacturer's website (Dell, HP, Lenovo, etc.) and download the latest drivers for your specific model. Install them manually.
- Restart: After updating drivers, restart your laptop.
On a Mac, driver updates are usually handled automatically through the system updates, check by going to "System Preferences" > "Software Update".
2. Masterful Configuration: Creating a Mobile Hotspot (Windows)
Windows offers a built-in mobile hotspot feature, offering a straightforward method for sharing your internet connection. Here's how to set it up:
- Access Mobile Hotspot Settings: Go to "Settings" > "Network & Internet" > "Mobile hotspot".
- Choose Internet Source: In the "Share my internet connection from" drop-down, select the source of your internet (Wi-Fi, Ethernet, etc.).
- Network Name and Password: Click "Edit" and configure your network name (SSID) and password. Choose a strong password.
- Toggle On: Turn the "Mobile hotspot" toggle to "On".
- Connect Devices: On your other devices, search for and connect to the newly created Wi-Fi network, using the password you set.
3. Mastering the Art of the Command Prompt: Advanced Sharing (Windows)
For more advanced control and troubleshooting, we can use the Command Prompt (or PowerShell) with specific commands. This is particularly helpful if the built-in hotspot isn’t working correctly.
Open Command Prompt (Admin): Search for "cmd" in the Start menu, right-click "Command Prompt", and select "Run as administrator".
Check Network Adapter: Type
netsh wlan show driversand press Enter. Look for "Hosted network supported: Yes" and “Driver” information.Enable Hosted Network: If supported, type the following commands, pressing Enter after each one:
netsh wlan set hostednetwork mode=allow ssid=YourNetworkName key=YourPasswordnetsh wlan start hostednetwork
Share the Internet: Go to "Network Connections" (search in the Start menu). Right-click your internet connection (Wi-Fi or Ethernet), select "Properties". Go to the "Sharing" tab, check "Allow other network users to connect through this computer's Internet connection", and select your hosted network from the "Home networking connection" dropdown.
Connecting on Other Devices: Search for the network name (SSID) you set and enter the password.
4. macOS Internet Sharing: A Streamlined Experience
macOS simplifies the process with its Internet Sharing feature:
- Open System Preferences: Click the Apple menu and select "System Preferences."
- Go to Sharing: Select "Sharing."
- Select Internet Sharing: In the left sidebar, click "Internet Sharing".
- Choose Share Connection From: Select how your Mac is getting its internet (Wi-Fi, Ethernet, etc.).
- Select “To computers using”: Check the box next to "Wi-Fi" and click "Wi-Fi Options…"
- Configure Wi-Fi: Give your network a name, choose a security type (WPA2 Personal is recommended), and create a password.
- Start Sharing: Check the "Internet Sharing" box to enable it.
- Connect on Other Devices: Connect the devices to the Wi-Fi network you just created.
5. Resolving Connection Issues: Firewall, Antivirus, and Interference
Sometimes, the problem isn't with the sharing itself, but external factors:
- Firewall Configuration: Your firewall might be blocking the connection. On Windows, check your firewall settings (search for "Windows Defender Firewall with Advanced Security"). Ensure that sharing rules are enabled within the firewall settings of either your Windows Firewall or any third party antivirus software that you may have installed.
- Antivirus Interference: Some antivirus programs can interfere with network sharing. Temporarily disable your antivirus (if possible) to test if it's the problem. If sharing works, you'll need to adjust your antivirus settings.
- Interference Mitigation: Move your laptop and the receiving devices away from other electronic devices (microwaves, Bluetooth speakers) which can cause signal interference. Try to establish a clear line of sight between your laptop and the devices that you’re trying to connect. Switch to a less congested channel in your wireless router settings (if applicable).
6. Troubleshooting on the Receiving End
Don’t just focus on the sharing laptop. The receiving device might be the problem.
- Check WiFi adapter on the receiving device: Make sure the WiFi adapter on the receiving device works
- Forget and Reconnect: On the receiving device, "forget" the network, then reconnect using the correct password.
- IP Address Issues: The receiving device might not be getting an IP address. Try manually configuring the IP address settings (DHCP).
- Update Drivers: Ensure that the network adapter drivers on the receiving device are also up to date.
Advanced Troubleshooting Techniques: Digging Deeper
Should the basic solutions fail, we can delve deeper.
1. Disabling and Re-enabling Network Adapters
A quick and effective method is to disable and re-enable your network adapters:
- Device Manager: Open Device Manager.
- Disable and Enable: Right-click on your WiFi or Ethernet adapter and select "Disable device". Then, right-click again and select "Enable device."
- Restart: Restart the laptop.
2. Network Reset (Windows)
Windows has a network reset function that can revert networking settings to their defaults:
- Network Settings: Go to "Settings" > "Network & Internet" > "Status".
- Network Reset: Scroll down and click "Network reset".
- Confirm: Click "Reset now" and confirm. After restarting, you'll need to re-enter your WiFi passwords.
3. Inspecting the IP Address Configuration
Incorrect IP address settings can prevent devices from connecting.
- Command Prompt (Windows): Open Command Prompt with administrator privileges.
- Release and Renew: Type
ipconfig /releaseand press Enter. Then, typeipconfig /renewand press Enter. - Check IP Configuration: Type
ipconfig /alland examine the IP address, subnet mask, gateway, and DNS server settings.
4. Resetting Network Settings on macOS
For macOS:
- System Preferences: Open System Preferences.
- Network Settings: Go to the Network settings.
- Removing and Re-adding: Select the Wi-Fi adapter on the left side, click the minus ("-") button, and then click Apply. After that, click the plus ("+") button again, select “Wi-Fi” from the interface menu, and then click Create. Connect to your Wi-Fi to test it out.
5. Examining the Windows Event Viewer
The Event Viewer is a goldmine of troubleshooting information.
- Open Event Viewer:
