ho wt make your wifi stronger on laptop

Title: Make Your Laptop's Wifi Signal Faster On Windows 1087 Tutorial
Channel: MDTechVideos
Make Your Laptop's Wifi Signal Faster On Windows 1087 Tutorial by MDTechVideos
Laptop WiFi So Weak? This Trick Makes It INSANE!
Boost Your Wi-Fi Signal: The Secret Weapon to Transform Your Laptop's Connectivity!
Have you ever experienced the frustration of a sluggish Wi-Fi connection on your laptop? It's a common predicament, isn't it? That buffering video, the delayed webpage loading, the agonizing lag during online gaming – we’ve all been there. But what if I told you there's a hidden power you can unleash to dramatically improve your laptop's Wi-Fi performance?
The Mystery of Weak Wi-Fi: Unveiling the Usual Suspects
Before we jump into the solution, let’s consider the usual sources of this digital despair. Your laptop's Wi-Fi antenna, often discreetly tucked away inside, might be weaker than you think. Distance from your router plays a huge role too. Walls, furniture, and even other electronic devices can also interfere with the signal. These are the typical culprits but resolving it can be surprisingly easy.
Introducing the Hidden Power: A Simple Yet Effective Tweak
Now, here comes the game-changer: a simple trick that can significantly amplify your Wi-Fi signal. It doesn't involve buying new hardware or complex configurations. Instead, it relies on understanding how Wi-Fi signals work and optimizing your laptop's existing capabilities. You should try this immediately.
The Magic of Positioning: Optimizing Your Laptop's Angle
The first key to unlocking a stronger signal is positioning. Your laptop's antenna is very likely sensitive to the angle it's at. Try different orientations. Experiment with tilting the screen back at various angles. It might seem strange, but the slightest adjustment can make a world of difference.
Step-by-Step Guide: The Art of the Wi-Fi Angle Dance
Here's how to perform this Wi-Fi "angle dance":
- Locate Your Router: Note where your router is positioned. This is because, in general, the closer you are to your router, the better.
- Start with the Basics: Open a webpage and make sure your laptop’s connected to your Wi-Fi. Now, open up a video.
- The Tilt Test: Start with your laptop screen at a standard angle. Notice the video's buffering.
- Experiment: Slowly change the tilt. Try different angles, tilting forward and back.
- Observe the results: Watch for any increase in upload speed. Similarly, notice how the buffering improves.
- Repeat and Refine: Keep changing the angles, and experiment until you find the sweet spot.
Beyond Positioning: Additional Boosters for Maximum Performance
While adjusting your laptop's angle is a great starting point, there are other steps too. It's also a good idea to make sure your router is in an open space. Less obstacles mean a better connection. Moreover, make sure your router's firmware is up-to-date, as this can often improve performance.
Troubleshooting Common Wi-Fi Issues: Quick Fixes
Sometimes, the problem isn't your laptop or its angle. There are other common Wi-Fi problems that may need a solution.
- Router Check: Ensure your router is functioning correctly. If you use a wired connection with your computer, test your connection.
- Restart Your Hardware: Restarting your router and laptop can resolve many temporary glitches.
- Other Devices: See if other devices connected to the Wi-Fi are experiencing similar problems.
- Software Updates: Make sure your laptop's network drivers are updated. This can address compatibility issues.
The Power of Patience: Sustaining a Strong Connection
Achieving a consistently strong Wi-Fi signal requires patience. You can't expect miracles immediately. So be patient and keep experimenting with different settings.
Reap the Rewards: Enjoying a Seamless Online Experience
By implementing these strategies, you’ll immediately notice a difference. You will enjoy faster loading times. Streamlined video streaming experience guaranteed! Online gaming will become more enjoyable. The days of frustrating lag will be behind you.
Embrace the Future of Connectivity: Stay Connected Like Never Before!
Remember, your laptop's Wi-Fi performance is not set in stone. You can optimize it. Take control of your wireless experience. Enjoy the benefits of a faster, more reliable online experience. Embrace the new world of connectivity today.
Laptop's WiFi 5 Upgrade: Blazing-Fast Speeds Await!Laptop WiFi So Weak? This Trick Makes It INSANE!
We've all been there, haven't we? You're trying to stream your favorite show, or maybe you’re in a crucial Zoom meeting, and your laptop's Wi-Fi decides to take a siesta. That agonizing buffering, that slow download… it’s enough to make you want to chuck your perfectly good laptop out the window. But before you resort to drastic measures, let's talk about a secret weapon, a little trick that can catapult your Wi-Fi speed from a snail's pace to something resembling a cheetah on Red Bull. And trust me, it's easier than you think. Buckle up, because we're about to turn your Wi-Fi woes into a distant memory!
1. The Wi-Fi Whisperer: Understanding Your Laptop's Wi-Fi Struggles
Before we unleash the Wi-Fi magic, let's get a handle on why your laptop's Wi-Fi might be acting up. Think of your Wi-Fi signal as a radio broadcast. Your laptop is the receiver, and your router is the transmitter. Several factors can interfere with this signal, like physical obstructions (walls, furniture), distance from the router, other electronic devices emitting radio waves, and even the channel your router is using. It’s like trying to hear a conversation at a noisy party; the more distractions, the harder it is to understand.
2. The Culprit: Common Causes of Weak Wi-Fi
Let's pinpoint some of the usual suspects behind your Wi-Fi blues.
- Distance: The further your laptop is from your router, the weaker the signal. Think of it like a flashlight; the further away you shine it, the dimmer the beam.
- Obstacles: Thick walls, metal objects, even water (yes, aquariums can interfere!) can block or weaken the signal.
- Interference: Microwaves, Bluetooth devices, and other routers in your neighborhood can compete for the same radio frequencies, causing congestion.
- Outdated Router: Older routers might not support the latest Wi-Fi standards, leading to slower speeds. It’s like trying to drive a horse and buggy on a highway.
- Channel Congestion: Your router transmits on a specific channel. If too many routers in your area are using the same channel, it’s like everyone trying to shout over each other.
3. The Simple Solution: A Tiny Tweaks, Massive Impact!
Now for the good stuff! This trick is simple, free, and requires no tech wizardry. It involves a simple adjustment to your laptop's network settings that can often work wonders. Ready? Here it is: Change your Wi-Fi Adapter Power Saving Mode!
4. Navigating Your Windows Laptop
For Windows users, this is how to tweak your Wi-Fi adapter settings:
- Open Device Manager: Type "Device Manager" in the Windows search bar and open it.
- Expand "Network Adapters": Click the arrow next to "Network Adapters" to view your Wi-Fi adapter (it might be named something like "Wi-Fi" or "Wireless Network Adapter").
- Right-Click and Select "Properties": Right-click on your Wi-Fi adapter and select "Properties."
- Go to "Power Management": Click on the "Power Management" tab.
- Uncheck "Allow the computer to turn off this device to save power": This is the key! Unchecking this box prevents Windows from throttling your Wi-Fi adapter to conserve battery, improving the signal strength.
- Click "OK" and Restart: Close the windows and restart your laptop.
5. Mac Magic: Optimizing Wi-Fi on Your MacBook
Mac users, don't worry; we haven't forgotten about you! Here's how to optimize your Wi-Fi settings:
- Open System Preferences: Click the Apple icon in the top-left corner of your screen and select "System Preferences."
- Select "Network": Click on "Network."
- Select your Wi-Fi Connection: Click on your Wi-Fi connection in the left-hand pane.
- Advanced Settings: Click "Advanced" at the bottom right.
- Check "Avoid Weak Networks": Ensure “Ask to join new networks” is enabled, and that “Avoid Weak Networks” is not selected. This helps your Mac choose the strongest available Wi-Fi signal.
- Click "OK" and "Apply": Close the windows and restart your Mac.
6. Why Does This Trick Work? The Science Behind the Magic
By disabling the power-saving mode, we're essentially giving your Wi-Fi adapter permission to operate at full power. It’s like taking the handbrake off your car; you'll notice immediately the difference in acceleration. Your laptop can now continuously search for a stronger signal and maintain a better connection, leading to those sweet, sweet download speeds you crave.
7. Check Your Router Settings
While we are at it, it is worth mentioning that the root of all this problem may be the router.
- Router Placement: Place your router in a central, elevated location, away from obstructions. Think of it as the control tower of your Wi-Fi, giving it maximum reach.
- Router Firmware: Ensure your router's firmware is up to date. Firmware updates often include performance enhancements and security fixes.
- Dual-Band Routers: If your router supports it, use the 5GHz band for better speeds and less congestion.
- Channel Optimization: Regularly check for channel congestion using Wi-Fi analyzer apps and switch to a less crowded channel.
8. Beyond the Basics, Boost It! Additional Tips for Speedy Wi-Fi
Here are some bonus tips to further enhance your Wi-Fi experience:
- Restart Everything: Sometimes, a simple restart of your router and your laptop can work wonders. Think of it as a digital reset button.
- Update Drivers: Make sure your Wi-Fi adapter drivers are up to date. Outdated drivers can cause performance issues.
- Use a Wi-Fi Analyzer App: These apps (available for both Android and iOS) can scan your network and identify the best Wi-Fi channel for your router.
- Consider a Wi-Fi Extender or Mesh Network: If you have a large house or have dead spots, a Wi-Fi extender or mesh network can significantly improve coverage.
9. Is Your Internet Provider the Problem?
Before you tear your hair out, consider whether your Wi-Fi woes are actually due to your internet service provider (ISP). Run a speed test to see if you're getting the speeds you're paying for. If your speed test results are significantly below your plan's advertised speeds, it might be time to contact your ISP.
10. The Ultimate Test: Speed & Stability Check
After applying these tweaks, it's time to put your Wi-Fi to the test. Run a speed test (there are many free online options like Speedtest.net) to check your download and upload speeds. Also, try streaming a video or downloading a large file. Is the buffering gone? Are downloads snappier? If so, congratulations! You've unleashed the power of your Wi-Fi!
11. Troubleshooting Common Issues
Still struggling? Here are some common troubleshooting steps:
- Restart Everything Again: Yes, I know we already said this but try power-cycling the entire network setup.
- Look for Router Flashing Lights: These indicate hardware problems. If the internet light is red, you have a problem.
- Check Hardware: Ensure the Wi-Fi adapter is plugged in or enabled.
- Reinstall Your Drivers: Corrupted drivers can cause conflicts.
12. Hardware Upgrades: Beyond the Software Fixes
Sometimes, a software fix isn't enough. Here are some hardware upgrades to consider:
- New Router: Investing in a newer router with the latest Wi-Fi standards can make a massive difference.
- External Wi-Fi Adapter: If your laptop's built-in Wi-Fi adapter is weak, an external USB adapter can provide a stronger signal.
- Ethernet Cable: For the most stable and fastest connection, connect your laptop directly to your router with an Ethernet cable.
13. Security First: Protecting Your Wi-Fi Network
Don't forget about security! Ensure your Wi-Fi network is secure:
- Use Strong Password: Use a complex password.
- Enable WPA3 Encryption: Modern Wi-Fi security standard.
- Keep Firmware Updated: Security updates often come with firmware updates.
14. Preventing Future Problems
Staying ahead of the curve is key to a smooth Wi-Fi experience:
- Regular Updates: Keep your drivers, firmware, and operating system updated.
- Monitor Your Network: Check your Wi-Fi speed regularly.
- Be Mindful of Interference: Be aware of potential sources of interference like other electronic devices.
15. From Frustration to Freedom: Take Control of Your Wi-Fi
We hope that you’ve absorbed the tips and tricks we have shared. Remember, weak Wi-Fi doesn't have to be your reality, and it certainly does NOT have to be annoying
Laptop WiFi Nightmare: No Connection, No Internet, HELP!How To Increase WiFi Speed On Windows 11 - Full Guide

By GuideRealm How To Increase WiFi Speed On Windows 11 - Full Guide by GuideRealm
How To Speed Up Any Internet Connection On Windows 1110 PC REALLY EASY

By EasyTechGeek How To Speed Up Any Internet Connection On Windows 1110 PC REALLY EASY by EasyTechGeek
How to Improve Wi-Fi Signals in Windows Laptop Speedup Wi-Fi

By MJ Tube How to Improve Wi-Fi Signals in Windows Laptop Speedup Wi-Fi by MJ Tube
Title: Best Way To Improve Wi-Fi Connection On PCLaptop 2022
Channel: EasyTechGeek
Best Way To Improve Wi-Fi Connection On PCLaptop 2022 by EasyTechGeek
Laptop Wifi Connect
Laptop WiFi Woes? Unleash Blazing Speeds with This Game-Changing Trick!
Are you wrestling with a chronically sluggish WiFi connection on your laptop? Does buffering become a constant companion during video calls? Are downloads crawling at a snail's pace, testing the limits of your patience? If so, you're in the right place. We've all experienced the frustration of a weak WiFi signal, a digital hurdle that can cripple productivity, entertainment, and even basic communication. But what if we told you there's a simple, often overlooked solution to dramatically enhance your laptop's WiFi performance? Forget expensive upgrades and complicated router configurations. This isn’t about changing your internet service provider; it's about unlocking the full potential of your existing hardware. Prepare to witness a metamorphosis.
Decoding the WiFi Weakness: Identifying the Culprits
Before we leap into the fix, let's briefly diagnose the usual suspects. WiFi signals, like delicate whispers, can be weakened by a multitude of factors. Physical obstructions are major offenders. Walls, especially those constructed with concrete or brick, can act as formidable barriers, absorbing and scattering radio waves. Metallic objects, such as appliances or even large furniture pieces, can reflect and interfere with the signal, creating dead zones. Distance plays its part as well. The further your laptop is from the router, the weaker the signal gets. Interference from other electronic devices is another contributing factor. Microwave ovens, cordless phones, and even neighboring WiFi networks can all jostle for bandwidth, causing congestion and slowing down your connection. Finally, the internal hardware of your laptop itself contributes to wireless performance. An outdated or inadequate WiFi adapter might struggle to capture and transmit a strong signal, no matter how powerful your router.
The Ultimate WiFi Power-Up: Optimizing Your Laptop's Hidden Settings
The solution lies within your laptop's operating system - specifically, within settings that control how your network adapter behaves. Most users are unaware of these settings, leaving their adapters operating in less-than-optimal configurations. This adjustment is often the single greatest improvement you can make. The specific steps described below are primarily based on Windows operating systems, but the underlying principles are generally applicable to other platforms as well. You will likely find similar or parallel options within the corresponding network settings of macOS, ChromeOS, and Linux distributions. Don't worry, even if you are not a tech guru, these steps are intuitive and easy to follow.
Step-by-Step Guide to Blazing-Fast WiFi
Accessing the Device Manager: Begin by finding and opening the "Device Manager." The easiest way to do this is by typing "Device Manager" into the Windows search bar (located in the lower-left corner of your screen) and selecting the corresponding result. This tool provides centralized access to all the hardware components connected to your computer.
Locating Your Network Adapter: Within the Device Manager, locate the "Network adapters" section. Click the small arrow next to it to expand the list. This will reveal a list of all the network adapters installed on your laptop, including your WiFi adapter (also referred to as a wireless adapter or network card). The name of your adapter will vary depending on your laptop's manufacturer and model, so look for entries that include "Wireless," "WiFi," or "802.11."
Accessing Adapter Properties: Right-click on your WiFi adapter's name and select "Properties" from the context menu. This will open a new window with several tabs.
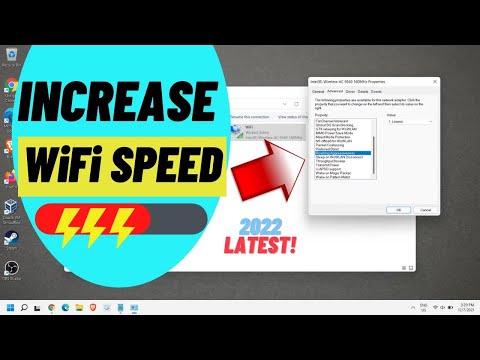
Navigating to Advanced Settings: In the Properties window, select the "Advanced" tab. This is where the magic happens. This tab exposes a long list of settings that fine-tune your adapter's behavior. The available options will vary depending on your specific adapter model, but we will focus on the most impactful ones.
Key Settings to Adjust:
- 802.11 Mode: This setting often controls the specific WiFi standards your adapter supports. Make sure to select the highest standard your router and laptop both support (e.g., 802.11ac or 802.11ax if available). 802.11ax, also known as WiFi 6, will generally provide the best performance. Choosing the best choice will generally maximize compatibility and data transfer speeds.
- Wireless Mode: Often, you'll find a setting called "Wireless Mode" or something similar. This determines how your adapter prioritizes its connection. Select the option that prioritizes the highest data rates. This tells the adapter to favor the fastest speeds possible, even at the cost of slightly reduced range.
- Roaming Aggressiveness (or Roaming Sensitivity): This setting controls how aggressively your laptop searches for the strongest WiFi signal. Setting this to "Highest" or "Aggressive" will cause your laptop to quickly connect to the best available access point, but it might lead to more frequent disconnections if your signal is unstable. Experiment with this setting to find the best balance for your environment.
- Transmit Power: If your laptop has a "Transmit Power" setting, set it to "Highest" or "Maximum." This tells your adapter to broadcast its signal with the maximum possible power, which can greatly improve range and stability.
- Preferred Band: On dual-band or tri-band adapters, you might find a "Preferred Band" setting. Set this to "Prefer 5 GHz band" if your router supports it. The 5 GHz band generally offers faster speeds and less interference than the older 2.4 GHz band.
- MTU Size: The MTU (Maximum Transmission Unit) size specifies the largest packet of data that can be transmitted. Under the Advanced tab, you might see an MTU setting. The optimal value can vary depending on your network configuration, but a manual adjustment isn't usually required. Most configurations work well with the default setting.
Applying and Testing Your Changes: After making changes to the settings, click "OK" to save them. Close the Device Manager. Now, it's time to test your improved WiFi connection. Reconnect to your WiFi network (if you were disconnected). Test your connection speed by doing a speed test at a site like Speedtest.net and notice the difference.
Beyond the Settings: Additional Considerations
While adjusting your adapter settings is the primary fix, there are other things you can also do to complement this fix.
- Router Placement: Place your router in a central location, elevated slightly above the ground, and away from physical obstructions.
- Router Updates: Ensure your router's firmware is up to date. Outdated firmware can lead to performance issues and security vulnerabilities. Check the manufacturer's website for updates.
- Channel Selection: Your router broadcasts on a specific channel. If multiple WiFi networks are using the same channel, it can lead to interference. Use a WiFi analyzer app (available for both smartphones and computers) to identify the least congested channel and set your router accordingly.
- Security: Ensure your WiFi network is secure with a strong password. Unsecured networks are vulnerable to intrusion, which can slow down your connection.
- Restart Your Devices: Reboot your laptop and router after making changes. This can help ensure that all the settings are properly applied.
- Proximity: Reduce the distance between your laptop and router. This simple step can often resolve many connectivity issues.
Troubleshooting Common Problems
- No WiFi signal: If the adapter settings don't fix your issue, consider if your WiFi adapter is enabled (often controlled by a physical switch on the laptop). Also, ensure your router is broadcasting a signal (check its lights).
- Intermittent Disconnections: Experiment with the "Roaming Aggressiveness" setting. Lowering it can help stabilize your connection in areas with weak or fluctuating signals.
- Slow Speeds: Troubleshoot the connection further by doing a speed test. Also, ensure that other devices on your network are not hogging the bandwidth, especially if you have bandwidth-intensive applications like streaming.
- Driver Issues: Check if your WiFi adapter drivers are up to date. Go to the Device Manager, right-click on your WiFi adapter, and select "Update driver."
- Hardware Issues: If all else fails, your WiFi adapter might be faulty. You might want to consider replacing it.
Conclusion: Reclaim Your Laptop's WiFi Potential
Say goodbye to the agonizing wait times and buffering woes. These simple setting tweaks and additional considerations have the potential to dramatically transform your laptop's WiFi performance, unlocking faster speeds, improved stability, and a more enjoyable online experience. By taking a few minutes to optimize your adapter settings, you can dramatically improve your WiFi performance and reclaim your productivity and entertainment. Embrace the power of proactive tweaking and watch your WiFi connection come alive! Ready to experience a WiFi revolution? The power is in your hands – or rather, in your laptop's settings.
