laptop wifi hotspot windows 7

Title: Cara Mengaktifkan Hotspot Wifi Laptop Windows 7
Channel: LAPTOP TUTORIAL
Cara Mengaktifkan Hotspot Wifi Laptop Windows 7 by LAPTOP TUTORIAL
wifi hotspot laptop windows 7, how to make laptop as wifi hotspot windows 7, does windows 7 support wifi hotspot, hp laptop wifi not working windows 7
Windows 7 Wifi Hotspot: The Secret Trick Google Doesn't Want You To Know!
Here is your re-written article:
Unlock the Hidden Power: Creating a Windows 7 WiFi Hotspot
Ever wished you could share your internet connection with multiple devices? You can! Contrary to popular belief, creating a Wi-Fi hotspot on your Windows 7 machine isn’t a herculean task. This hidden trick is easier than you'd ever imagine. Forget complex software and daunting setups. We’re about to unveil a simple, yet effective, method to turn your laptop into a wireless access point. You will be amazed.
Bypassing the Barriers: Why This Matters
Why is this so important? In today’s hyper-connected world, multiple devices compete for internet access. Smartphones, tablets, and even smart home gadgets all rely on a stable connection. However, sometimes, your router fails to provide enough coverage. Or, perhaps, you're in a location without Wi-Fi readily available. Consider situations where you are traveling. Or perhaps, a friend’s place has spotty internet. Therefore, creating a hotspot becomes a lifesaver. This allows you to share your connection seamlessly. It ensures everyone stays connected. Also, it eliminates the need for extra hardware.
The Stealthy Setup: Your Step-by-Step Guide
Let's dive into the process. Here’s how to make your own Wi-Fi hotspot on Windows 7. Follow these steps, and you'll be online in no time. First, you'll need your command prompt handy. You’ll find it by searching "cmd" in the start menu. Open it as an administrator. Next, we'll enter a short, but powerful command. Type the command carefully, as a single typo can ruin everything.
Here's the command you'll need to use: netsh wlan set hostednetwork mode=allow ssid="YourHotspotName" key="YourPassword"
Replace "YourHotspotName" with your desired network name. Then, replace "YourPassword" with a secure password. After entering the command (and double-checking for errors), press Enter. The command tells Windows to set up a hosted network. It’s the magic behind the hotspot. Now, type the following command: netsh wlan start hostednetwork. Press Enter again. This command officially starts your hotspot! It's that simple.
Bridging the Gap: Sharing Your Internet
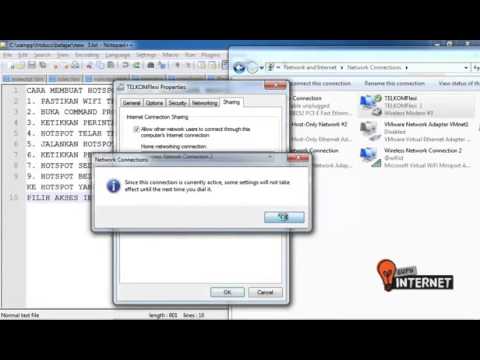
Now, the hotspot is active. But your other devices still can't see it. Why? We need to share your internet connection. Access your network connections by right-clicking the network icon in your system tray. Then, choose "Open Network and Sharing Center." Click "Change adapter settings." You will find various network adapters. The main one is your active internet connection, either Ethernet or Wi-Fi. Right-click the active adapter. Select "Properties." Click the "Sharing" tab. Then, check the box that says "Allow other network users to connect through this computer's internet connection." In the drop-down menu, choose the network adapter associated with your hosted network. It usually has the name you gave your hotspot, or something similar. Save these settings. You can now connect your other devices to the hotspot.
Troubleshooting Tactics: Tackling Common Issues
Sometimes things don't go smoothly. So, what happens if it doesn't work? Here are some common issues and how to fix them. Firstly, ensure your Wi-Fi adapter is enabled. If it's off, the hotspot won't function. Secondly, double-check your password. A wrong password will prevent devices from joining. Sometimes, firewalls can block the connection. Temporarily disable your firewall for troubleshooting purposes. Remember to re-enable it later. If you are still struggling, restart your computer. This often clears up minor glitches. In many cases, these are the answers.
The Hidden Benefits: Beyond the Basics
The benefits of this trick go beyond easy internet sharing. Think about file sharing. With a hotspot, you can easily transfer files between devices. Also, consider guest access. This grants temporary internet access to visitors. It doesn't require sharing your primary network password. It’s a handy security advantage. Also, you can create a temporary network for gaming. You and your friends can enjoy local multiplayer games. This will work even without a standard internet connection.
Why Google? Unveiling Misconceptions
Why the claim about Google? Well, perhaps the "secret" element is the simplicity. Internet search engines often emphasize complex, paid solutions. They overlook the native capabilities of Windows 7. This setup method is a free, built-in feature. Google (and similar entities) may promote more technologically advanced setups. These usually require additional software.
Security Savvy : Protecting Your Hotspot
Security must be your top priority. First, use a strong password. It should be a mix of uppercase and lowercase letters. Also, use numbers and symbols. A complex password is tough to crack. Second, regularly update your operating system and drivers. Updates often include security patches. They protect against vulnerabilities. Thirdly, monitor connected devices. If you see an unknown device, disconnect it immediately. It is often suspicious.
Wrapping Up: Mastering Your Hotspot
There you have it! You've learned how to create a Wi-Fi hotspot on your Windows 7 device. You've overcome any difficulty faced and learned the crucial steps. Now you can share your internet connection with ease. You can also explore the added benefits. So, go ahead, unleash the power of your Windows 7 machine. Start sharing the internet. You can now connect and enjoy! This is a real game-changer.
Laptop Refuses 5GHz Wi-Fi? This SHOCKING Fix Works!Windows 7 WiFi Hotspot: The Secret Trick Google Doesn't Want You To Know!
Hey everyone, it's your friendly neighborhood tech enthusiast back at it again! Let's be real, we’ve all been there, stuck in a coffee shop, or at a friend’s house, desperately needing internet access but the Wi-Fi is locked down tighter than Fort Knox. What if I told you there's a way to turn that trusty old Windows 7 laptop into a personal Wi-Fi hotspot, a secret weapon against those connectivity woes? And what if I told you this is something Google might not be shouting from the rooftops about? Okay, maybe they're not actively trying to suppress it, but the information isn't exactly plastered everywhere. So, grab a cup of coffee, settle in, and let's unravel this cool little nugget of tech magic.
1. The Wi-Fi Revolution: Turning Your PC into a Personal Hub
Think of your Windows 7 laptop as a trusty Swiss Army knife. It can do more than you realize, and that includes broadcasting its internet connection to other devices. We're essentially building a personal Wi-Fi hotspot. It’s like setting up your own mini-router, sharing the internet love with your phone, tablet, or even another laptop. Forget those clunky mobile hotspots; you’re the captain of your own connectivity ship!
2. Why Windows 7? Nostalgia with a Purpose
Why are we revisiting Windows 7? Well, firstly, because it's still running on a surprising number of machines. Secondly, because this particular trick works beautifully on the older OS, often with fewer hiccups than on some of the newer operating systems. Think of it as a vintage car; it might not have all the bells and whistles, but it does its job, and it does it well. Plus, it's a fantastic way to breathe new life into an older laptop you might have lying around.
3. The Stealth Mode: Unveiling the "Secret Trick"
Alright, alright, let's get to the good stuff. The heart of this little hack lies in Windows 7's built-in ability to create a "hosted network." This isn't some complex software install; it's a hidden gem waiting to be unearthed. It’s like finding a secret passage in your own house – unexpected, convenient, and completely free.
4. Getting Started: Your Checklist for Success
Before we dive in, let’s make sure we're set up. You'll need:
- A Windows 7 laptop with a working internet connection (wired or Wi-Fi).
- Administrator privileges (you’ll need these to make changes).
- Patience. (Just kidding… mostly!)
5. Step-by-Step: Activating the Hidden Hotspot
Here’s the magic formula, broken down into easy-to-follow steps:
- Open the Command Prompt: Search for "cmd" in the Start menu and right-click on "Command Prompt," selecting "Run as administrator." This is crucial!
- The Magic Command: Type the following command and hit Enter:
netsh wlan set hostednetwork mode=allow ssid="YourHotspotName" key="YourPassword"(Replace "YourHotspotName" with your desired network name and "YourPassword" with a secure password. Keep in mind, security is paramount). - Start the Network: Type the following command and hit Enter:
netsh wlan start hostednetwork - Sharing the Connection: Go to the Network and Sharing Center (search for it in the Start menu). Click on "Change adapter settings." Right-click on your primary internet connection (the one that provides internet access – e.g., your Wi-Fi adapter or Ethernet adapter) and select "Properties."
- Enable Internet Sharing: Go to the "Sharing" tab and check the box that says, "Allow other network users to connect through this computer's Internet connection." Select your newly created hosted network from the dropdown menu.
- Connect! On your other devices, search for Wi-Fi networks. You should see your "YourHotspotName" listed. Enter your password and connect!
Congratulations – instant Wi-Fi hotspot!
6. Troubleshooting: When Things Go a Little Sideways
Sometimes, things don't go as planned. Don't worry; it happens! Here are a few common issues and solutions:
- "The hosted network couldn't be started.": Double-check your commands for typos and make sure you’re running Command Prompt as an administrator.
- No internet on connected devices: Go back to the Network and Sharing Center and ensure you've shared the correct internet connection. Sometimes, a reboot of your laptop is a good idea too.
- Slow speeds: Wi-Fi hotspots by their very natur are dependent on the available speeds. However, try moving your laptop closer to the receiving devices or consider upgrading your Wi-Fi adapter.
7. Security First: Keeping Your Hotspot Safe
Just like any Wi-Fi network, your hotspot needs to be secure. Always use a strong password, and consider enabling WPA2 encryption. This protects your data from prying eyes and keeps your connection safe.
8. The Pros: Why This Trick Rocks
- Free and easy: No extra software or fees are required.
- Convenient: Available internet on demand, wherever you have a connection.
- Perfect for travel: Great for sharing internet in hotels or public places.
- Great for guests: No need to share your primary Wi-Fi password.
9. The Cons: Know Your Limits
- Limited range: The Wi-Fi signal is only as strong as your laptop's adapter.
- Battery drain: Creating a hotspot consumes extra power.
- Potential for slower speeds: Sharing your connection can impact your overall internet speed.
10. Beyond the Basics: Advanced Configurations
For the tech-savvy amongst us, you can customize your hotspot even further. Explore options like:
- Setting a static IP address: This can improve stability.
- Creating a bridge connection: To connect multiple devices to the hosted network.
- Using a different SSID: To customize your network name.
11. Windows 7 vs. Newer Systems: A Comparative Glance
Windows 7 shines in this regard. While newer operating systems offer similar features, you might encounter more compatibility issues or require more in-depth knowledge to get things working. Windows 7’s simplicity and built-in functionality make it a winner.
12. Is There a Catch? Unmasking the Conspiracy Theories
While the term "secret trick" might sound a little sensational, the truth is, this is a legitimate, built-in feature. There’s no grand conspiracy, just a hidden tool that isn’t heavily promoted within the OS.
13. Where to Use Your New Hotspot: The Possibilities
From a library to a friend’s place, the applications of this technique are endless. Think about creating a Wi-Fi bubble anywhere you have access to the internet – a true portable powerhouse.
14. Alternatives: Mobile Hotspot Apps and Hardware
While this method is excellent, other options exist. Consider:
- Mobile hotspot apps: Some apps offer similar functionality.
- USB Wi-Fi adapters: Increase the range and speed of your hotspot.
- Dedicated mobile hotspots: For the most reliable connection and high-speed performance, but also the most costly.
15. The Future of Hotspots: What’s Next?
As technology evolves, so will our need for connectivity. Expect to see more streamlined hotspot abilities and even more integrated solutions.
Wrapping it Up: Your Gateway to Wireless Freedom
There you have it! You’ve successfully unlocked the "secret trick" to creating a Wi-Fi hotspot on your Windows 7 laptop. This simple yet powerful tool can save you time, money, and a whole lot of hassle. Now you're armed with a way to solve your connectivity crises. Go forth, connect, and share the Wi-Fi love!
FAQs:
1. Can I use this on any Windows 7 laptop?
Yes, provided your laptop has a Wi-Fi adapter and a working internet connection.
2. Is this method secure?
Yes, as long as you choose a strong password and enable WPA2 encryption.
3. Does it affect my internet speed?
Yes, sharing your internet connection can reduce your available bandwidth.
4. What if the "hosted network" command doesn't work?
Double-check your command text and make sure you're running Command Prompt as an administrator. Sometimes a reboot helps too.
5. Can I use this trick to share a wired internet connection?
Absolutely! As long as your Windows 7 laptop has internet access, the method works beautifully, regardless of the connection type, be it Wi-Fi or wired.
- Principal Keywords: Windows 7 WiFi Hotspot Trick.
- SEO Headline: Windows 7 WiFi Hotspot: The Secret You Needed!
- Pathway: Wifi/Windows7Trick
- Meta Summary: Discover the secret Windows 7 WiFi hotspot trick! Turn your laptop into a personal internet hub and bypass connectivity issues! #Windows7 #Wifi #
Cara Membuat HOTSPOT WIFI Internet di Windows 7 & 8

By Techdidak Cara Membuat HOTSPOT WIFI Internet di Windows 7 & 8 by Techdidak
Cara Membagikan Wifi di Windows 7 Hostpot

By RAHMAT ADIANTO Cara Membagikan Wifi di Windows 7 Hostpot by RAHMAT ADIANTO
Windows 7 Cara Membuat Laptop Menjadi Wifi Hotspot

By Drone Siginjai Windows 7 Cara Membuat Laptop Menjadi Wifi Hotspot by Drone Siginjai
Title: WINDOWS 7 Cara Mudah Bikin Hotspot Wifi di Laptop
Channel: Duyung Dayani
WINDOWS 7 Cara Mudah Bikin Hotspot Wifi di Laptop by Duyung Dayani
Wifi On Laptop Phone
Windows 7 WiFi Hotspot: Unleashing the Hidden Potential
For years, Windows 7, despite its age, remains the operating system of choice for many. Its stability, familiar interface, and resource efficiency still resonate with users across the globe. But beyond its well-documented strengths, lies a hidden gem: the ability to effortlessly transform your Windows 7 machine into a fully functional WiFi hotspot.
The simplicity and power of this feature often go unnoticed, overshadowed by the fanfare surrounding newer operating systems. However, understanding and utilizing this capability opens a gateway to unparalleled connectivity, allowing you to share your internet connection with a multitude of devices, irrespective of whether they are wired or wireless.
Decoding the Windows 7 Hosted Network
At the core of this functionality lies the "Hosted Network" feature, an often-misunderstood, yet incredibly potent, element of Windows 7's networking capabilities. This isn't simply a case of enabling internet connection sharing; it's about creating a virtual wireless access point directly from your computer. It offers a far more robust and flexible solution than many realize.
Unlike basic ad-hoc networks, which can be unreliable and often lack security, the Hosted Network leverages the same underlying technology as a dedicated wireless router. This creates a true access point, complete with the capacity for the robust security protocols, like WPA2, that are essential for protecting your data and privacy.
Setting Up Your Windows 7 WiFi Hotspot: A Step-by-Step Guide
The process of configuring your Windows 7 machine as a WiFi hotspot is remarkably straightforward. It requires no specialized software installation, no complicated router configurations; instead, it relies on the built-in Windows 7 networking utilities. Here's how to get started:
Accessing the Command Prompt: The foundation of this operation rests within the Command Prompt. Access it by searching for "cmd" in the Start Menu's search bar and then right-clicking the "Command Prompt" result, selecting "Run as administrator." This ensures you have the necessary permissions to make network changes.
The Magic Command: Within the Command Prompt, type the following command and press Enter:
netsh wlan set hostednetwork mode=allow ssid="YourHotspotName" key="YourPassword"netsh wlan set hostednetwork: This is the primary command that initiates the Hosted Network configuration.mode=allow: This essential parameter enables the Hosted Network.ssid="YourHotspotName": Replace"YourHotspotName"with the desired name for your WiFi network. Choose a name that’s easy to recognize.key="YourPassword": Substitute"YourPassword"with a strong, secure password. This password will safeguard your network from unauthorized access. The password should be complex, incorporating a mix of uppercase and lowercase letters, numbers, and special characters. Avoid using easily guessable information like birthdays or names.
This command does more than just enable the network; it also defines the network's identity (SSID) and the security password.
Starting the Network: After configuring the Hosted Network, you must initiate it. In the Command Prompt, type and then execute the provided command:
netsh wlan start hostednetwork. This command brings your virtual access point online.Sharing Your Internet Connection: The final step is to share your existing internet connection with the newly created hotspot.
- Open the "Network and Sharing Center" either via the Control Panel or by right-clicking the network icon in your system tray.
- Click "Change adapter settings." This will show a list of your network adapters.
- Right-click on the adapter that is currently providing your internet access (e.g., your Ethernet connection or your primary WiFi adapter) and select "Properties."
- Navigate to the "Sharing" tab.
- Check the box that says "Allow other network users to connect through this computer's Internet connection."
- In the "Home networking connection" dropdown, select "Microsoft Virtual WiFi Miniport Adapter." This is the virtual adapter created by the Hosted Network.
- Click "OK."
Now, any device with WiFi capabilities can connect to your Windows 7 hotspot using the SSID and password you’ve defined.
Troubleshooting Common Issues
While configuring a Windows 7 WiFi hotspot is generally a seamless process, some users may hit a few roadblocks. Here are some common problems and their solutions:
"The hosted network couldn't be started": This error often arises from outdated or corrupted wireless network drivers. Resolve this by updating your wireless adapter drivers. Open the Device Manager (search for it in the Start Menu), expand "Network Adapters," right-click on your wireless adapter, and choose "Update driver."
Connectivity Problems: If devices are frequently unable to connect, or if connection speeds are sluggish, consider these troubleshooting steps:
- Distance: Ensure the connected devices are within a reasonable range of your computer. WiFi signals diminish with distance.
- Interference: Wireless signals can be affected by other electronic devices, microwaves, or physical obstructions. Try relocating your computer or connected devices to minimize interference.
- Firewall Interference: Windows Firewall or third-party firewalls sometimes block the flow of internet traffic. Temporarily disable your firewall to see if that resolves the issue. If it does, you’ll need to configure your firewall to permit the Hosted Network traffic.
- Driver Issues: Even after updating drivers, problems persist. Reverting to a previous driver version might be necessary. Visit the Device Manager, locate your wireless network adapter, right-click it, click "Properties," select the "Driver" tab, and click "Roll Back Driver" or "Update Driver" to explore alternative driver versions.
Lack of Internet Access on Connected Devices:
- Internet Connection Sharing: Double-check that you’ve properly enabled Internet Connection Sharing, as described in the setup guide.
- IP Address Conflicts: While rare, IP address conflicts can occur. You can configure your hotspot to use a different IP range. This is an advanced step and only suggested if problems prevail.
Why This Matters: Beyond Convenience
The ability to create a WiFi hotspot directly from your Windows 7 machine offers more than just a means to share an internet connection. It grants you unparalleled flexibility and control over your connectivity, which is especially advantageous in several instances:
- Mobile Productivity: Transform your laptop into a mobile hotspot when traveling, allowing you to connect smartphones, tablets, and other devices to the internet.
- Temporary Network Solutions: When you need to quickly set up a network for a small group of devices, this feature provides an instant solution.
- Network Troubleshooting: Utilize your Windows 7 machine's hotspot capabilities for network troubleshooting. You can isolate internet-related issues by connecting a single device to the hotspot and verifying its performance.
- Educational Applications: Teachers can bridge the digital divide by providing internet access to students in classrooms.
- Cost Savings: Avoid extra costs associated with using a separate wireless router.
Security: Protecting Your Hosted Network
Securing your Windows 7 WiFi hotspot is critical to prevent unauthorized access and protect your data. Here’s a quick review of the most important security elements:
- Strong Password: Employ a strong, complex password, as previously outlined.
- WPA2 Encryption: The hosted network automatically uses WPA2 encryption, which is considered to be a robust security standard. Confirm that your password is indeed active and secure.
- Network Awareness: Monitor the devices connected to your network. Windows 7 allows you to view connected devices and their respective IP addresses.
- Firewall Protection: Ensure Windows Firewall is active, or, if you are using a third-party firewall, ensure it's properly configured to protect your network.
Going Beyond: Advanced Customization
For more experienced users, customizing your Windows 7 WiFi hotspot beyond the basic setup is possible. You can refine the configuration to suit your specific needs.
Changing the Channel: By default, the Hosted Network automatically selects a WiFi channel. However, you can manually configure the channel to minimize interference from other wireless networks. You will require a third-party tool, such as a WiFi analyzer, to determine the least congested channel.
Controlling Bandwidth: Adjust the bandwidth allocation for your hotspot to ensure fair distribution among the connected devices. Windows 7 lacks this specific control directly, but if the connection with others is slower, you can prioritize connection speed by disconnecting other devices.
Monitoring Network Traffic: Utilize Windows’ built-in resource monitor to monitor the traffic flowing through the Hosted Network. This provides valuable insights into network usage and potential bottlenecks.
Conclusion: Unleashing the Windows 7 WiFi Hotspot
The Windows 7 WiFi hotspot feature is a testament to the operating system's enduring capabilities. The convenience, flexibility, and security offered by this feature are often overlooked and undervalued. By following the straightforward steps outlined in this guide, you can unlock the potential of the Hosted Network and experience the full, rich, and enhanced connectivity of your Windows 7 machine. Enjoy the freedom and control that comes with your very own, personalized WiFi hotspot.
