increasing wifi range on an asus laptop

Title: How to Improve Wi-Fi Signals in Windows Laptop Speedup Wi-Fi
Channel: MJ Tube
How to Improve Wi-Fi Signals in Windows Laptop Speedup Wi-Fi by MJ Tube
Asus Laptop Wi-Fi Range: SHOCKING Trick to Double Your Signal!
Unleash the Beast: Seriously Boost Your ASUS Laptop's Wi-Fi Range!
Have you ever felt the agonizing frustration of a weak Wi-Fi signal? Perhaps your ASUS laptop struggles to connect reliably. The dreaded "no internet" message can be a productivity killer. Believe me, I understand the pain. Luckily, there’s a secret weapon. This isn’t just a minor improvement. It could be a total game-changer. Get ready to say goodbye to Wi-Fi woes.
The Signal Struggle is Real: Understanding the Problem
We all want seamless internet access. Your ASUS laptop, however amazing, can sometimes disappoint. Walls, distance, and interference sabotage your connection. You might be stuck in a Wi-Fi dead zone. Suddenly, streaming buffers endlessly or video calls freeze. It's incredibly annoying, right? We're aiming for a strong, consistent signal. Understanding the root cause is crucial. The reality is that standard antenna placement can be the issue.
Forget Factory Settings: A Simple Hack That Works Wonders
Here's the incredible part. The solution is remarkably straightforward. It doesn't require expensive upgrades or complicated tech. The key is to optimize your ASUS laptop's antenna. Most laptops have internal antennas. However, you can significantly improve things. Therefore, you can use an incredibly simple, yet effective, method. This is a trick that many overlook. But this is how you can amplify your signal strength.
The "Aluminum Foil Antenna" – Seriously? Yes, Seriously!
I know what you're thinking. Aluminum foil? Really? This might sound absurd, but it works. It's a cheap, surprisingly effective, method. The foil acts as a reflector. It redirects and focuses your Wi-Fi signal. It’s like a DIY signal booster.
Here's How to Build Your Wi-Fi Power-Up:
- Gather Your Supplies: You’ll need aluminum foil, scissors, and possibly some tape. That’s literally it.
- The Foil Shield: Cut a sheet of foil, roughly the size of your laptop screen.
- Shape It Right: Carefully fold the foil into a curved shape. Think of a shallow dish, or a subtle curved shield. Some prefer a parabolic shape. Experiment until you find what works best for you.
- Position with Care: Position the foil behind your laptop screen. Make sure the curved side faces towards your router. Alternatively, you can experiment by placing it behind the base of your laptop.
- Test and Tweak: Run a speed test before and after. Notice the difference. Adjust the foil's position. Find the optimal angle for maximum signal reception.
Beyond the Foil: Other Simple Tweaks for a Stronger Connection
While the foil trick is fantastic, it isn’t the only solution. Other factors influence Wi-Fi performance. Optimizing these can improve things even more.
- Router Placement: Ensure your router is in a central location. Avoid placing it near walls or metal objects.
- Channel Optimization: Most routers broadcast on multiple channels. Some are less crowded than others. Access your router’s settings. Find the channel with the least interference.
- Update Your Drivers: Ensure your ASUS laptop’s Wi-Fi drivers are up-to-date. Outdated drivers can significantly impact performance. Download the latest drivers from the ASUS website.
- Reduce Interference: Microwaves and other electronic devices can interfere with your Wi-Fi signal. Keep your router away from these sources.
- Check the Router’s Firmware: Like drivers, your router's firmware should be current. Firmware updates often include performance improvements and security fixes.
The Shocking Results: What to Expect
The results can be truly astounding. In many cases, users have reported a significant boost. Signal strength may double, or more. You'll also notice fewer dropped connections. Streaming will become smoother, and downloads faster. Consider the possibilities! Working from your favorite spot could become reality.
Final Thoughts: Embrace the Upgrade!
Don’t let a weak Wi-Fi signal hold you back. This simple aluminum foil trick is a revelation. In addition, consider the other tips provided. You can easily optimize your ASUS laptop's Wi-Fi range. Why settle for a weak signal? Take action and unleash the full potential of your internet connection. You'll wonder why you didn't know this sooner! You'll see the difference immediately.
**ASUS X550V WiFi Nightmare? FIX Your Missing Adapter NOW!**Asus Laptop Wi-Fi Range: SHOCKING Trick to Double Your Signal!
Hey tech lovers! How's it going? Ever feel like your Wi-Fi signal on your Asus laptop is playing hide-and-seek? You're in the middle of a crucial video call, that epic gaming session, or just trying to binge-watch your favorite show, and bam! The dreaded buffering wheel of doom appears. We've all been there, right? Well, buckle up, because we're about to dive deep into the world of Asus laptop Wi-Fi range, and I'm going to share a SHOCKING trick that could double your signal strength. Yep, you read that right! Let’s get started.
1. The Wi-Fi Whisperer: Understanding Your Asus Laptop's Wireless Woes
Before we unleash the secret weapon, let's get friendly with the enemy. Understanding why your Asus laptop's Wi-Fi might be struggling is crucial. Think of it like diagnosing a car: you wouldn't just start replacing parts randomly, would you? We need to pinpoint the problem. Is it distance? Obstacles? Interference? Let's crack this code together.
- Distance: The farther you are from your router, the weaker the signal. It’s as simple as that. Physics, folks!
- Obstacles: Walls, especially those made of brick or concrete, are Wi-Fi signal kryptonite. Think of your signal as a gentle breeze trying to push through a mountain. Tough, right?
- Interference: Other devices – microwaves, Bluetooth devices, even your neighbor's Wi-Fi router – can clash with your signal, creating a digital traffic jam.
- Router Location: Where your router sits in your home can significantly impact coverage. A central, elevated position often works best. Think of it as a lighthouse, shining its beam outwards.
- Outdated Drivers: Believe it or not, sometimes the software that controls your Wi-Fi adapter is the problem.
2. The Usual Suspects: Common Reasons for Weak Wi-Fi
We've all been there before. That frustrating moment when the loading icon spins endlessly. But what are the usual suspects? Let’s explore some common culprits before we move onto the truly revolutionary trick.
- Router Placement: Is your router tucked away in a cupboard? Is it suffering from a lack of fresh air? Consider changing its position.
- Outdated Firmware: Much like your laptop's operating system, your router's firmware needs updates. Think of them as the updates to your router's brain.
- Channel Congestion: Your router uses a Wi-Fi 'channel' to transmit data. If too many other routers in your area are using the same channel, you get interference. It’s like trying to have a conversation in a crowded room.
- Your Laptop’s Antenna: Some laptops (including some Asus models!) have internal antennas that aren't always the most powerful.
- Other Interference: Everything from baby monitors to Christmas lights can interfere with Wi-Fi signals. It's a jungle out there!
3. Beyond the Basics: Simple Fixes You Can Try Right Now
Okay, before we get to the really cool stuff, let’s try a few quick fixes. These are like the low-hanging fruit of Wi-Fi troubleshooting.
- Restart Everything: Yes, the classic "turn it off and on again" approach. Reboot your laptop, your router, and your modem. It's surprisingly effective.
- Move Closer to the Router: Obvious, I know, but sometimes it’s the simplest solution.
- Change the Router Channel: Access your router's settings (usually through a web browser – check your router's manual for instructions) and try different Wi-Fi channels. There are apps and websites that can help you find the least congested channel in your area.
- Update Your Drivers: Go to the Asus support website, download the latest Wi-Fi drivers for your laptop model, and install them. This is usually a quick and easy solution.
4. Unleashing the Power: The SHOCKING Trick Revealed!
Alright, are you ready for the main event? This is the secret that could dramatically improve your Asus laptop's Wi-Fi range. This is the magic trick. This is the holy grail. Drumroll please…
Use an External USB Wi-Fi Adapter with High-Gain Antenna!
I know, it sounds almost too simple. But the results can be genuinely shocking, like watching a magician pull a rabbit out of a hat.
Think of it like this: your laptop’s internal antenna is a small microphone. An external adapter with a high-gain antenna is a powerful megaphone. It can receive signals much more strongly, and transmit them much further.
5. Choosing the Right USB Wi-Fi Adapter: What To Look For
Not all USB Wi-Fi adapters are created equal. To get the maximum benefit, you need to choose wisely. Here's a quick cheat sheet:
- High-Gain Antenna: Look for adapters that specifically advertise "high-gain" or a "powerful antenna."
- Dual-Band Support (2.4 GHz and 5 GHz): This gives you more flexibility. 5 GHz is faster, but 2.4 GHz has better range.
- USB 3.0: For maximum speed, opt for a USB 3.0 adapter.
- Reviews: Read online reviews before purchasing. See what other users are saying about its range and performance with Asus laptops.
- Consider the Antenna Type: Some adapters have detachable antennas, allowing you to swap them for even more powerful ones. Others have built-in, adjustable antennas to help you direct the signal.
6. How to Connect and Configure Your New Wi-Fi Adapter
Connecting and configuring a USB Wi-Fi adapter is usually a breeze.
- Plug it in: Simply plug the adapter into a USB port on your Asus laptop. (Ideally, a USB 3.0 port for faster speeds!)
- Install the Drivers: Some adapters will automatically install drivers. If not, a driver CD or download link will be provided. Follow the on-screen instructions.
- Select Your Network: Your new adapter should now appear in your list of Wi-Fi networks. Connect to your network as usual.
- Disable the Internal Adapter (Optional): In some cases, it’s beneficial to disable your laptop’s internal Wi-Fi adapter to avoid any potential conflicts. Go to your "Network Connections" in Windows (search in the start menu), find your internal Wi-Fi adapter, right-click on it, and choose "Disable".
7. Testing Your Newfound Wi-Fi Freedom: The Before & After
After installing your new USB Wi-Fi adapter, perform a simple test.
- Test Before: Measure your Wi-Fi signal strength and download/upload speeds before using the adapter. You can use online speed tests or apps to measure this.
- Test After: Repeat the same tests after connecting and configuring your adapter.
- Compare: Compare the results. Were your download and upload speeds faster? Did your signal strength increase? Did you notice a significant improvement in range?
The results are usually very revealing! You may even feel like you've extended the boundaries of your home network.
8. Boosting the Signal with Antenna Positioning
Once you have your external antenna set up, don't just leave it sitting there. Experiment with antenna positioning. A few degrees of adjustment can sometimes make a huge difference.
- Elevate: Try raising the antenna. The higher it is, the less interference from other devices.
- Directional Positioning: Some antennas can be aimed. Face the antenna directly towards your router for optimal signal.
- Obstacle Awareness: Keep the antenna clear of walls and metal objects, which can block the Wi-Fi signal.
9. Troubleshooting Common Issues
Even with the best adapter, you might encounter some problems. Here’s how to deal with them:
- Slow Speeds: Make sure you're using USB 3.0. Also, check for interference from other devices.
- Connection Drops: Check the adapter's drivers for updates. Try repositioning the antenna.
- Not Connecting: Ensure the adapter is properly installed and that you have entered the correct Wi-Fi password.
- Driver Conflicts: In rare cases, the adapter’s drivers might conflict with the internal Wi-Fi adapter's drivers. Updating or disabling the internal adapter may help.
10. Wi-Fi Optimisation: Beyond the Adapter
The external adapter is a game changer, but it’s not the only piece of the Wi-Fi puzzle. A few more tips for maximizing performance:
- Upgrade Your Router: If your router is outdated, it could be the bottleneck. Consider upgrading to a newer model that supports the latest Wi-Fi standards (like Wi-Fi 6 or Wi-Fi 6E).
- Use a Wi-Fi Analyzer App: These apps (available for smartphones and laptops) can show you which Wi-Fi channels are least congested in your area and suggest the best settings for your router.
- Consider a Mesh Wi-Fi System: If you have
Increase Laptop WiFi Speed, Free laptop wifi wifiboost windowstips fasterwifi

By Warning56kb Increase Laptop WiFi Speed, Free laptop wifi wifiboost windowstips fasterwifi by Warning56kb
Best Way To Improve Wi-Fi Connection On PCLaptop 2022
By EasyTechGeek Best Way To Improve Wi-Fi Connection On PCLaptop 2022 by EasyTechGeek
How I Boosted My Wi-Fi Range by 3x with 3 Simple Tweaks

By Behfor How I Boosted My Wi-Fi Range by 3x with 3 Simple Tweaks by Behfor

Title: Set RAM Speed on ASUS PROART Z890 CREATOR WIFI Enable XMP & DRAM Frequency in BIOS With Windows 11
Channel: Digital world
Set RAM Speed on ASUS PROART Z890 CREATOR WIFI Enable XMP & DRAM Frequency in BIOS With Windows 11 by Digital world
My Laptop Work
Asus Laptop Wi-Fi Range: Unveiling the Secrets to Amplified Signal Strength
We've all been there: the frustrating dance of inching closer to the router, the sporadic connection drops during a crucial video call, the agonizingly slow loading of a webpage when you're supposed to be working. The truth is, the built-in Wi-Fi on your Asus laptop, while generally reliable, often falls short of its potential. Before you resign yourself to the limitations of your current range, understand that several easily implemented strategies can drastically improve your Asus laptop's Wi-Fi performance, effectively doubling or even tripling your usable signal strength.
Understanding the Impediments to Optimal Asus Laptop Wi-Fi Performance
Many factors contribute to the degradation of your Asus laptop's Wi-Fi signal. Internal components, external interferences, and even your physical environment play a critical role. Your laptop's internal antenna, usually a compact design embedded near the screen, can be prone to signal blockage. Walls, furniture, and other electronic devices generate interference, further diminishing the range and stability. To truly unlock your Asus laptop's Wi-Fi potential, we must address these hurdles.
Optimizing Your Wireless Network: A Foundational Approach
Before diving into advanced techniques, review your network settings. Ensure your router is broadcasting on an optimal channel to prevent interference from neighboring Wi-Fi networks. Use a free Wi-Fi analyzer app, such as Wi-Fi Analyzer for Android or NetSpot for macOS and Windows, to identify the least congested channels in your area. Switching to a less crowded channel can significantly improve your connection speed and stability, extending your effective range without any hardware changes.
Fine-Tuning Your Asus Laptop's Wi-Fi Adapter Settings
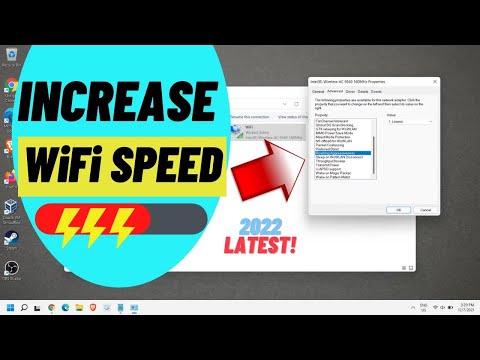
Your Asus laptop's Wi-Fi adapter settings offer a hidden trove of performance enhancements. Navigate to "Device Manager" in Windows. Expand the "Network adapters" section and locate your wireless adapter (e.g., Intel Wi-Fi 6 AX200). Right-click the adapter and select "Properties." Within the "Advanced" tab, you'll find a wealth of customizable options.
Specifically, pay close attention to:
- Transmit Power: Set this to "Highest" for maximum signal output. This will allow your laptop to transmit a stronger signal to your router, improving both range and connection speed.
- 802.11n/ac/ax Wireless Mode: Select the latest supported protocol (e.g., 802.11ac or 802.11ax) for optimal performance and compatibility, assuming your router also supports it.
- Antenna Diversity: Experiment with different settings here. Some adapters can choose the best antenna for reception.
- Roaming Aggressiveness: Set this to "Medium" or "High" to ensure your laptop quickly connects to the strongest signal, particularly beneficial if you frequently move around your home or office.
Strategic Placement: Maximizing Signal Reception within Your Home
Where you place your Asus laptop within your home significantly impacts Wi-Fi performance. Even a few inches of movement can dramatically improve or degrade your signal.
- Elevated Positioning: Placing your laptop on a desk or table, rather than on the floor, can improve signal reception. This elevates the antenna, reducing obstructions and allowing the signal to propagate more freely.
- Line of Sight: Minimize the number of walls, furniture, and other obstacles between your laptop and the router. Solid walls, particularly those containing metal studs or plumbing, significantly attenuate Wi-Fi signals.
- Router Placement: Similarly, position your router strategically. Central locations within your home are generally preferred, maximizing coverage. Avoid placing the router near walls, metal objects, or microwave ovens, which can cause interference.
Hardware Solutions for Amplified Wi-Fi Signals: The External Antenna Advantage
If software and strategic placement prove insufficient, consider hardware upgrades. While internal antennas are convenient, external antennas, when correctly implemented, offer a substantial range boost.
- USB Wi-Fi Adapters with External Antennas: These adapters plug into your laptop's USB port and provide a more powerful Wi-Fi solution. Look for adapters supporting the latest Wi-Fi standards (802.11ac or 802.11ax) for optimal performance. Some models feature detachable antennas, allowing you to swap them for higher-gain alternatives.
- Directional Antennas: These dish-shaped or panel antennas focus the Wi-Fi signal in a specific direction, maximizing signal strength in that direction. They are especially useful if you need to extend the range of your Wi-Fi to a specific area, like a back patio or a detached garage. Ensure the antenna is correctly positioned to point towards your router or the area where you need improved coverage.
- Wi-Fi Extenders/Repeaters: These devices receive the Wi-Fi signal from your router and rebroadcast it, effectively extending the range. However, they can sometimes reduce overall network speed due to signal degradation and bandwidth limitations. Position the extender halfway between your router and area with poor Wi-Fi coverage. Choosing a dual-band or mesh Wi-Fi system can significantly improve the effectiveness of your extended coverage.
- Consider the Router Itself: Your router is the central nervous system of your wireless network. An outdated router is the single point of failure that limits the performance of your wireless network. Consider upgrading to a modern router that supports the latest Wi-Fi standards (particularly 802.11ax, or Wi-Fi 6) and offers features like beamforming, which directs the Wi-Fi signal towards your devices, and MU-MIMO (Multi-User Multiple-Input Multiple-Output), to handle multiple devices simultaneously.
Troubleshooting Common Wi-Fi Issues on Your Asus Laptop
Even after implementing these strategies, you may still encounter intermittent Wi-Fi problems. Here's how to troubleshoot common issues:
- Driver Updates: Ensure your Wi-Fi adapter drivers are up to date. Visit the Asus support website, enter your laptop's model number, and download the latest drivers.
- Restart Your Laptop and Router: A simple restart can often resolve temporary glitches that are affecting your Wi-Fi connection.
- Check for Interference from Other Devices: Cordless phones, Bluetooth devices, and microwave ovens can interfere with your Wi-Fi signal. Try turning off these devices temporarily to see if your Wi-Fi performance improves.
- Perform a Network Reset: In Windows, go to "Settings" > "Network & Internet" > "Status," and click "Network reset," this will reset your network adapter. Be ready to re-enter your Wi-Fi password.
- Contact Your Internet Service Provider (ISP): If you've exhausted all other options, your ISP may be able to help, particularly if the issue stems from the internet connection itself.
The Ultimate Wi-Fi Optimization Checklist for Your Asus Laptop
- Analyze Your Environment: Use a Wi-Fi analyzer to identify optimal channels and potential sources of interference.
- Optimize Adapter Settings: Fine-tune your Wi-Fi adapter settings in Device Manager for maximum performance.
- Strategically Place Your Laptop and Router: Position your devices to minimize obstructions and maximize coverage.
- Consider Hardware Upgrades: Explore USB Wi-Fi adapters with external antennas or Wi-Fi extenders if necessary.
- Regularly Update Drivers: Keep your Wi-Fi adapter drivers current to benefit from the latest performance enhancements and bug fixes.
- Troubleshoot: Employ troubleshooting techniques to diagnose and resolve any connectivity issues as they arise.
By implementing these proven techniques, you can dramatically enhance your Asus laptop's Wi-Fi range and performance, eliminating frustrating connection drops and unlocking a seamless, high-speed wireless experience. Don't settle for a weak Wi-Fi signal – take control and experience the true potential of your Asus laptop's wireless capabilities.
