connect two laptops via wifi windows 10

Title: Transfer Files Between Two Laptops over Wi-Fi
Channel: Techy Druid
Transfer Files Between Two Laptops over Wi-Fi by Techy Druid
connect two computers via wifi windows 10, connect two laptops using wifi windows 10, how to connect two laptops wirelessly windows 10, can i connect my laptop to two wifi networks at the same time
Laptop Linkup: Connect Your Windows 10 Laptops Wirelessly in 60 Seconds!
Seamless Laptop Sync: Conquer Windows 10 Connectivity in Under a Minute!
Imagine this: you're juggling presentations, files scattered across multiple laptops, and time is slipping away. The frustration mounts. The solution? A wireless connection, quick and painless. Forget tangled wires and complicated setups. We’re diving in, right now! This guide provides a super-fast method. It's for linking your Windows 10 laptops. Prepare to be amazed.
Unveiling the Magic: What You’ll Need
First off, let's gather our essentials. You’ll need two Windows 10 laptops. Furthermore, ensure they’re both connected to the same Wi-Fi network. That's the backbone of this operation. Secondly, you’ll both need to have user accounts. These accounts will allow full access. Ensure you have administrative privileges. Consequently, it simplifies some processes. Finally, a few minutes is all that’s needed. You’ll soon see the ease of linking laptops.
Step-by-Step: The Wireless Workflow
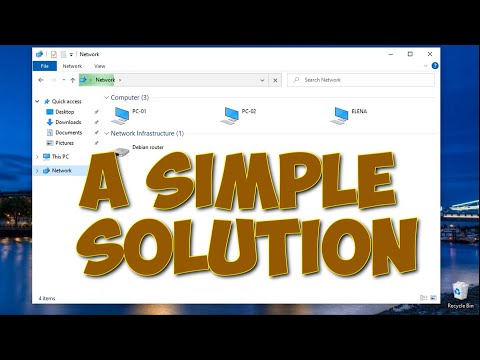
Okay, let's get started. This process is surprisingly simple. Firstly, on your primary laptop, navigate to File Explorer. You can find this down below. It's often on the taskbar. Click on "Network" located in the left-hand pane. If you don't see "Network", you may need to enable network discovery. So, right-click in the left pane and choose "Show Network views". Now, it should appear.
Secondly, we need to check settings. Right-click on "Network". Select "Properties." Then, scroll to "Network and Sharing Center". Look for "Change Advanced sharing settings". Therefore, it's time for the crucial sharing setup.
In the advanced sharing settings, expand "Private". Then, activate “Turn on network discovery”. Also, choose “Turn on file and printer sharing”. After that, repeat this stage for "Guest or Public". Make sure to switch on "Turn on network discovery" and "Turn on file and printer sharing." Finally, go to "All Networks." Use "Turn on sharing". Also, choose "Use 128-bit encryption". Lastly, click "Save changes."
Thirdly, you need to make sure the other laptop follows this specific method. Make sure both laptops are active. Ensure they are ready to share. Otherwise, this won't work.
Conquering Security: The Password Revelation
Next, you may encounter a prompt. Windows may ask for credentials. This is typical for security. This is where the user accounts you created come into play. You can use the username and password from either laptop. However, it’s important to use an account that has permission. In short, confirm the username and password. Then, click "OK." If things don't work as expected, double-check your username and password. Therefore, accuracy is important.
Accessing Your Files: The Final Frontier
Almost there! At this point, you will need to return to File Explorer on your main laptop. Now, you should see the other laptop listed under "Network". Click on that laptop's icon. Therefore, you'll be able to see shared folders and files. You can now access shared files. You can drag and drop them between the laptops. It’s as simple as that.
If you can't see the other laptop, patience is key. Sometimes, a simple restart does the trick. So, restart both laptops. Then, revisit File Explorer. This step resolves many issues.
Troubleshooting Troubles: Quick Fixes
Not working perfectly? No worries! Common issues have straightforward solutions. Firstly, double-check your network connection. Ensure both laptops are securely connected to Wi-Fi. Secondly, verify file-sharing settings. Confirm everything is enabled correctly. Thirdly, check your firewall. Your firewall might be blocking the connection. If so, permit file and printer sharing. For example, this is done through Windows Defender Firewall settings. Finally, a restart can solve many hiccups. Try restarting both laptops and repeating the process.
Beyond Basic Sharing: Elevating Your Experience
So, you’ve mastered the basics. But, what about more? Consider mapping network drives. Then, you can access shared folders with a single click. For this particular procedure, right-click a shared folder in File Explorer. Choose "Map network drive." Then, assign a drive letter. Also, you can use this process for greater efficiency.
Embracing the Future: Wireless Freedom
In summary, linking Windows 10 laptops wirelessly has never been easier. You can now effortlessly share files. You also avoid the frustration of tangled cables. You can enhance your productivity. Furthermore, experience the ease of seamless connectivity. Now, you're equipped to conquer your digital world. So, go forth, connect, and conquer!
WiFi's Down? Update Your Laptop Drivers ANYWAY! (Secret Trick Inside)Laptop Linkup: Connect Your Windows 10 Laptops Wirelessly in 60 Seconds!
Hey there, fellow tech enthusiasts! Ever felt like you're juggling a dozen tasks at once? We've all been there, especially when dealing with technology. You're trying to collaborate on a project, share files, or even just enjoy a movie with a friend, and suddenly you're wrestling with cables, confusing settings, and the dreaded "connection failed" message. But what if I told you there's a super-easy way to connect your Windows 10 laptops wirelessly, and it only takes about a minute? Buckle up, because we're about to dive into the world of seamless laptop linkups!
1. The Wireless Window: Why Connect Laptops, Anyway?
Before we jump into the how-to, let's quickly address the "why." Why bother connecting your laptops in the first place? Well, think of it like this: you've got two awesome tools, but they're in separate garages. You can't easily share the tools, the space, or the fun. Connecting wirelessly lets you:
- Share Files Easily: No more USB drives or emailing documents back and forth! Think of it as a digital handshake.
- Collaborate Seamlessly: Work together on projects, even if you're physically apart. Perfect for group projects or just enjoying a collaborative document with your best buddy.
- Extend Your Display: Turn one laptop into a second monitor for the other. Picture it as having a widescreen TV connected to your computer, doubling your workspace!
- Play Games Together: Enjoy multiplayer games without the hassle of LAN cables. Game night just got a whole lot easier (and more fun!).
- Stream Content: Share that epic movie you've been wanting to watch without a physical connection. Just beam it over!
2. Prerequisites: Are You Ready for the 60-Second Setup?
Before we get started, let's make sure you're all set. You'll need:
- Two Windows 10 Laptops: Seems obvious, right? Make sure both laptops are running the latest version of Windows 10. Keeping your operating system up-to-date is like giving your car a tune-up – it keeps everything running smoothly.
- Wi-Fi Connection: Both laptops need to be connected to the same Wi-Fi network. Think of it as the digital highway that connects your laptops.
- User Accounts: You'll need user accounts set up on both laptops. This is like having keys to get into each machine's digital world.
3. The Magic Ingredient: Enabling Network Discovery
This is the first major step, the key to unlocking the wireless connection. It’s like opening the door to your laptops so they can find each other!
- Open Control Panel: Search for "Control Panel" in the Windows search bar and open it.
- Network and Sharing Center: Click on "Network and Sharing Center."
- Advanced Sharing Settings: Click on "Change advanced sharing settings" on the left-hand side.
- Turn on Network Discovery and File and Printer Sharing: In the "Private" section, make sure both "Turn on network discovery" and "Turn on file and printer sharing" are checked.
- Save Changes: Click "Save changes."
Do this on BOTH laptops. It's like telling each device, “Hey, I'm open to sharing!”
4. Unlocking the Sharing Secret: Setting Up File Sharing
Now that your laptops can see each other, let's decide what they can share.
- Choose a folder: Navigate to the folder you want to share (Documents, Pictures, etc.).
- Right-click the folder: Select "Properties."
- Sharing Tab: Click the "Sharing" tab.
- Advanced Sharing: Click the "Advanced Sharing…" button.
- Share this folder: Check the box next to "Share this folder."
- Permissions: Click the "Permissions" button to control who can access the shared folder and what they can do (read, write, etc.).
- Apply and Close: Click "Apply" and then "OK" to save your settings.
5. The Grand Discovery: Finding the Other Laptop
Now it's time to see if the magic has worked!
- Open File Explorer: Click the File Explorer icon on your taskbar.
- Network: On the left-hand side, click "Network."
- See Your Laptop: You should see the other laptop listed. Click on it.
- Access the Folder: If you've done everything correctly, you should see the shared folder(s) from the other laptop.
6. Access Granted: Entering the Shared World
Once you see the shared folder, double-click it to access its contents. You can now:
- Copy files: Drag and drop files between laptops.
- Open files: Launch documents, images, or videos directly from the shared folder.
- Edit files (if permissions allow): Make changes to files and see them updated on the other laptop.
It's like having access to a shared cloud, but without the cloud!
7. Troubleshooting Tango: When Things Go Wrong
Sometimes, things don't go as planned. Don't worry; it happens! Here are some common issues and how to fix them:
- Can't See the Other Laptop:
- Make sure network discovery is enabled on both laptops.
- Check your firewall settings (more on that below).
- Ensure both laptops are connected to the same Wi-Fi network.
- Can't Access Shared Folders:
- Verify that you have given the correct permissions (read/write) to the user account on the other laptop.
- Double-check that the folder is actually shared.
- Firewall Issues: Your firewall might be blocking the connection. You can either temporarily disable your firewall (not recommended for long-term use) or create an exception for file and printer sharing.
8. Firewall Fiesta: Taming the Digital Dragon
Firewalls are like security guards for your laptops, protecting them from unwanted access. Sometimes, they can block legitimate connections.
- Open Windows Defender Firewall: Search for "Windows Defender Firewall" in the Windows search bar and open it.
- Allow an app or feature through Windows Defender Firewall: Click on this option from the left-hand menu.
- Change Settings: Click the "Change settings" button.
- Find File and Printer Sharing: Scroll down and find "File and Printer Sharing."
- Check the boxes: Make sure the boxes next to "File and Printer Sharing" are checked for both "Private" and "Public" (if you use public networks).
- OK: Click "OK" to save the changes.
9. Security Sensations: Protecting Your Digital Playground
While connecting wirelessly is convenient, it's crucial to be mindful of security.
- Strong Passwords: Use strong passwords for your user accounts.
- Keep Windows Updated: Regularly update Windows to patch security vulnerabilities.
- Use a Router with a Firewall: Your router usually has a built-in firewall, which provides an extra layer of protection.
- Be Careful with Public Wi-Fi: Avoid sharing sensitive information when using public Wi-Fi networks.
10. Beyond the Basics: Advanced Sharing Features
Let's quickly touch upon some advanced features you can explore:
- Homegroup: Windows 10 used to have a Homegroup feature, designed to simplify sharing. However, Microsoft has deprecated it in later versions of Windows. The sharing methods outlined above are the current recommended approach.
- Network Drives: You can map a shared folder as a network drive, making it appear as a regular drive on your laptop (e.g., Drive Z:). This allows even easier access.
- Remote Desktop: If you want to control one laptop from another, consider using Remote Desktop Connection (available in Windows).
11. The Speed Test: How Fast is Wireless Sharing?
The speed of your wireless sharing depends on a few things:
- Your Wi-Fi Router: A faster router (like one supporting Wi-Fi 6 or Wi-Fi 6E) will give you faster transfer speeds.
- The Distance: The farther the laptops are from the router, the slower things will get.
- Obstacles: Walls and other objects can interfere with the Wi-Fi signal.
Experiment to see what speeds you get! Consider it a fun exploration.
12. The Sharing Showdown: Wired vs. Wireless
Here is a quick comparison of wired and wireless connections:
| Feature | Wired (Ethernet) | Wireless (Wi-Fi) | | :---------------- | :-------------------------------------------- | :--------------------------------------------------- | | Speed | Generally faster and more reliable | Slower, speed varies depending on factors | | Setup | Requires cables, more complex initial setup | Easy setup, no cables | | Mobility | Limited mobility due to cable length | Excellent mobility, work anywhere within
Laptop Hotel WiFi: The SHOCKING Truth!WINDOWS 10 Koneksi langsung 2 Laptop Secara Nirkabel

By NETVN82 WINDOWS 10 Koneksi langsung 2 Laptop Secara Nirkabel by NETVN82
Windows 1110 - Cara membuat jaringan lokal dan berbagi file antar komputer melalui jaringan

By ipMalik Windows 1110 - Cara membuat jaringan lokal dan berbagi file antar komputer melalui jaringan by ipMalik
Cara Mempersiapkan 2 PC untuk LAN Offline Multiplayer Gaming File Sharing

By Gamers Art Cara Mempersiapkan 2 PC untuk LAN Offline Multiplayer Gaming File Sharing by Gamers Art
Title: Cara mengatur berbagi jaringan di Windows 10 dan berbagi file, folder antar komputer.Mudah
Channel: ipMalik
Cara mengatur berbagi jaringan di Windows 10 dan berbagi file, folder antar komputer.Mudah by ipMalik
Laptop Working
Laptop Linkup: Connect Your Windows 10 Laptops Wirelessly in 60 Seconds!
Introduction: Unleashing the Power of Wireless Connectivity
In today's fast-paced digital landscape, seamless connectivity is no longer a luxury, but an absolute necessity. Whether you're a seasoned professional juggling multiple projects or a student collaborating on assignments, the ability to effortlessly share files, access shared resources, and work in tandem across multiple devices can dramatically enhance your productivity and streamline your workflow. This is particularly true for those who utilize Windows 10 laptops, which form the backbone of many modern work environments and home offices. This guide will serve as your concise yet comprehensive map for navigating the often-opaque process of establishing a fast and reliable wireless connection between two or more Windows 10 laptops, empowering you to harness the combined power of your devices in under a minute. Forget the fumbling of cables and the frustration of intermittent connections; we're about to unlock a new level of digital synergy.
Setting the Stage: Prerequisites and Preparations
Before we dive into the specifics, let's ensure we have the necessary foundations in place. This preparation is crucial for ensuring a swift and successful connection. The following elements must be verified before proceeding:
- Operating System: Both laptops must be running Windows 10. Ensure your devices are equipped with the latest updates to iron out any potential compatibility issues and optimize the network protocols. To check this, navigate to the
Settingsapp, selectUpdate & Security, and clickCheck for updates. - Wireless Adapter: Both laptops require functional wireless network adapters (Wi-Fi cards). This is the hardware component that allows them to communicate wirelessly. Most modern laptops come standard with built-in Wi-Fi capabilities. Check within
Device Manager(search for it in the Windows search bar) and expandNetwork adaptersto confirm that your Wi-Fi adapter is present and not showing any error symbols. - Network Compatibility: The wireless adapters must be compatible with the same Wi-Fi standards (e.g., 802.11ac, 802.11n). While most modern hardware supports all of these, it's worth confirming.
- Network Connection (Optional, but Recommended): While not strictly required for direct laptop-to-laptop connections, having both devices connected to the same Wi-Fi network (e.g., your home Wi-Fi router) will simplify the setup and allow for Internet access on both devices during the connection.
- User Accounts: Ensure that you have user accounts set up on both laptops. It's highly recommended that these user accounts have the same username and password on both devices to facilitate easy file sharing.
The Simple Approach: Using the Built-In Wi-Fi Direct Feature
Windows 10 has a built-in feature called Wi-Fi Direct that makes connecting laptops wirelessly remarkably simple. This feature allows devices to create a direct, point-to-point connection without needing to go through a router. This method is perfect for immediate, ad-hoc file transfer and resource sharing.
- Initiate the Connection on the First Laptop: Navigate to
Settings>Devices>Bluetooth & other devices. - Add a Device: Click
Add Bluetooth or other device. - Select "Everything else": In the
Add a devicewindow, chooseEverything else. - Scan for Available Devices: Windows will now begin searching for nearby Wi-Fi Direct-enabled devices. Ensure that the second laptop is ready and within range.
- Select the Second Laptop: Once the second laptop appears in the list, click on its name. You may be prompted to enter a pairing code, which will be displayed on the second laptop.
- Confirm the Pairing Code: Enter the pairing code on both laptops.
- Connection Established: Once the pairing is successful, the two laptops are now connected via Wi-Fi Direct.
Sharing Resources and Files with Wi-Fi Direct
With Wi-Fi Direct activated, we can now share resources confidently with the steps following:
- File Sharing Setup on the First Laptop: Locate the file or folder on the first laptop that you wish to share. Right-click on it, and select
Give access to>Specific people. - Select the User: In the
File Sharingwindow, select the user account on the second laptop (e.g., the user account with the matching name). You may need to set permissions toReadorRead/Write, depending on your needs. - Share the File: Click
Share. The file or folder is now accessible on the second laptop. - Accessing Shared Files on the Second Laptop: On the second laptop, open File Explorer. In the left-hand navigation pane, under
Network, you should see the name of the first laptop, as it is connected via Wi-Fi Direct. - Browse and Access: Double-click on the first laptop's name, and you will be able to browse the shared folders and files.
Alternative: Leveraging the Power of HomeGroup (Though Deprecated)
While the HomeGroup feature has been deprecated in newer versions of Windows 10, it still offers a viable solution for quickly connecting multiple laptops, especially if you're running older versions of the OS.
- Create a HomeGroup: On one of the laptops, search for
HomeGroupin the Windows search bar and open the settings. If this is the first time setting up HomeGroup, you will be prompted to create one. ClickCreate a homegroup. - Choose What to Share: Select the libraries and devices you would like to share with other users within the homegroup.
- Get the HomeGroup Password: Windows will generate a password, which you'll need to enter on the second laptop.
- Join the HomeGroup on the Second Laptop: On the second laptop, search for and open
HomeGroup. SelectJoin now. Enter the password generated on the first laptop. - Select Sharing Options: Choose what libraries you want to share.
- Access Shared Resources: On either laptop, you can now access the shared libraries on the other device by opening File Explorer and navigating to
Network.
Troubleshooting Common Connectivity Challenges
Sometimes, despite our best efforts, you might encounter connection hiccups. Let's troubleshoot the most common issues:
- Wi-Fi Adapter Issues: If you can't see the other laptop, double-check the Wi-Fi adapter status in
Device Manager. Look for warning signs such as a yellow exclamation mark, which suggests a driver issue. Update the driver or reinstall it if required. - Firewall Interference: Windows Firewall or third-party firewalls can block network connections. Temporarily disable the firewall on both laptops to see if it's the cause. If this resolves the issue, create an exception for file and printer sharing.
- Network Discovery: Ensure that network discovery is enabled. Go to
Control Panel>Network and Internet>Network and Sharing Center>Change advanced sharing settings. UnderPrivatenetwork, make sure thatTurn on network discoveryis selected. - Incorrect Permissions: Double-check that the user accounts on both laptops have the necessary permissions to access shared files and folders. Ensure you have selected the appropriate sharing level in the file-sharing settings.
- IP Address Conflicts: In rare instances, IP address conflicts can prevent network connectivity. Although uncommon, a simple solution is to restart both laptops.
Advanced Tweaks: Optimizing Performance
Beyond the basics, there are several optimizations that can further enhance your wireless linkup:
- Prioritize Network Traffic: If you are engaged in demanding activities, like video conferencing or large file transfers, you can prioritize Wi-Fi traffic. Open
Network Connections(search in the Windows search bar), right-click on your Wi-Fi adapter, selectProperties, and then clickConfigure. Navigate to theAdvancedtab and look for settings related toQoS Packet Scheduleror similar options. You can adjust the settings to give priority to specific applications or traffic types. - Update Network Drivers: Outdated network drivers can cause performance bottlenecks. Regularly check for driver updates directly from your laptop manufacturer's website or through Windows Update.
- Optimize Router Settings (If Applicable): If you are connecting through a router, consider optimizing the router's settings. Ensure that the router firmware is up-to-date, and configure the Wi-Fi channel and bandwidth to minimize interference and maximize throughput.
Conclusion: Embracing Effortless Connectivity
Connecting your Windows 10 laptops wirelessly doesn't need to be a source of frustration. By following the steps outlined in this guide, whether you prefer the simplicity of Wi-Fi Direct or the features provided by HomeGroup, you can establish a reliable and efficient connection in a matter of seconds. Armed with this newfound knowledge, we encourage you to make the most of your devices, enhancing your productivity, collaboration, and overall digital experience. Embrace the power of effortless connectivity, and experience the next level of digital synergy.
