how to install a wifi antenna in toshiba satellite laptop

Title: WIFI card or antenna replace Toshiba Satellite Radius 14 E45W
Channel: Aires Communication
WIFI card or antenna replace Toshiba Satellite Radius 14 E45W by Aires Communication
Toshiba Satellite Wi-Fi Antenna Install: SHOCKINGLY Easy Guide!
Unleash Your Toshiba Satellite's Wi-Fi Potential: A Surprisingly Simple Upgrade!
Ever feel your Toshiba Satellite laptop is struggling for a decent Wi-Fi signal? Is buffering a constant companion during your streaming sessions? Perhaps, you're tired of weak connections and frustrating disconnections. Well, you’re in luck! This guide unveils the surprisingly simple process of upgrading your laptop's Wi-Fi antenna. I'll walk you through it, making it less intimidating than you might imagine. Prepare to bid farewell to those Wi-Fi woes.
Understanding the Wi-Fi Antenna’s Role
Before we leap into action, let's briefly discuss what a Wi-Fi antenna actually does. In essence, it’s the crucial bridge. It connects your laptop to the wireless world. Weak antennas translate to weak signals. That, in turn, means frustratingly slow internet speeds. The stock antenna might not be up to par, especially if you have an older model. Therefore, upgrading can dramatically improve your online experience.
Gathering Your Arsenal: The Essential Tools
Don't worry, you won't need a workshop full of specialized gadgets. The tools for this upgrade are readily available. First, you’ll need a reliable Wi-Fi antenna replacement. You can find these online. Next, acquire a set of small precision screwdrivers. These will be your best friends during the disassembly process. Also, a plastic prying tool (or even a guitar pick) is highly recommended. This will prevent scratches on your laptop's casing. Additionally, consider an antistatic wrist strap. This prevents static electricity from damaging sensitive components. Furthermore, a well-lit workspace is absolutely essential. Finally, have a small container to hold screws. This prevents them from getting lost.
Step-by-Step: The Surprisingly Simple Installation
Now, for the fun part! Let's get your Toshiba Satellite connected.
Step 1: Power Down and Prepare
First and foremost, power off your laptop completely. Then, unplug the power adapter. Take out the battery. This ensures your safety during the procedure. Doing so is a crucial safety precaution.
Step 2: Accessing the Internal Components
Carefully examine the bottom of your laptop. Usually, you'll find small screws securing the access panel. With your precision screwdriver, remove them. Gently pry up the access panel. You will find the Wi-Fi card.
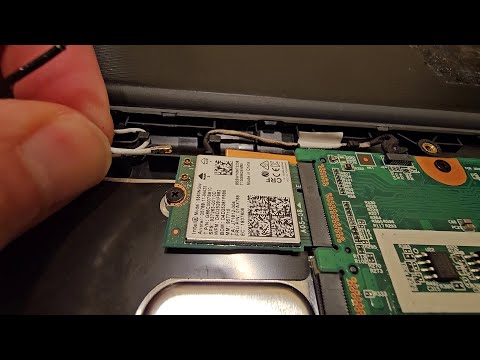
Step 3: Locating the Wi-Fi Card and Antennas
The Wi-Fi card will be a small, rectangular card. It’s often nestled in a slot. It's usually connected to two antenna wires. It’s connected via small connectors. These connectors are fragile, so proceed with care.
Step 4: Disconnecting the Old Antennas
Now, gently disconnect the antenna wires. Use the plastic prying tool, if needed. Carefully lift the small connectors. Gently pull them away from the Wi-Fi card. Make sure to note their positions. Taking a photo at this stage could be incredibly helpful.
Step 5: Removing the Old Wi-Fi Card
There’s usually a small screw securing the Wi-Fi card. Remove this screw. Sometimes, the card might have small clips. Gently unclip the card. Then, carefully remove the card from its slot.
Step 6: Installing the New Wi-Fi Card
Align the new Wi-Fi card in the slot. Make sure to align it correctly. Secure it back with the screw. Snap the clips back into place.
Step 7: Reconnecting the New Antennas
Carefully reconnect the antenna wires. Match them up with the corresponding connectors. Press them down gently until they click into place. Double-check the connections. Make sure they're secure.
Step 8: Reassembling Your Laptop
Carefully replace the access panel. Then, screw it back in. Reinsert the battery and plug in the power adapter.
Step 9: Testing Your New Wi-Fi Performance
Power on your laptop. Connect to your Wi-Fi network. Check your internet speed. Hopefully, you'll see a noticeable improvement.
Troubleshooting Common Hurdles
Sometimes, things don't go perfectly. If you experience problems, don't panic. First and foremost, ensure all connections are secure. Make sure you've seated the Wi-Fi card correctly. Check that your drivers are up-to-date. You can usually update these through Windows. If the problem persists, consult your laptop's manual or search online forums.
Beyond the Basics: Additional Tips and Tricks
Consider upgrading your router. This can also help boost your Wi-Fi speeds. Position your router strategically. Away from walls or obstructions. Regularly update your router firmware. This enhances security and improves performance. Finally, consider using a Wi-Fi analyzer app. It can help you find the best Wi-Fi channel for your network.
Wrapping Up: Embrace the Wireless Freedom!
Installing a new Wi-Fi antenna for your Toshiba Satellite is surprisingly straightforward. With patience, the right tools, and these step-by-step instructions, you can significantly improve your Wi-Fi performance. Consequently, you can enjoy a smoother, faster, and more reliable internet experience. Now, go forth and conquer the wireless world! Enjoy your improved connectivity.
Laptop WiFi: Fix That Weak Signal NOW!Toshiba Satellite Wi-Fi Antenna Install: SHOCKINGLY Easy Guide!
Hey tech adventurers! Ever felt the agonizing sting of a weak Wi-Fi signal, like a digital ghost trying to haunt your Toshiba Satellite laptop? We've all been there. You're trying to stream your favorite show, attend a crucial video call, or just browse the web, and bam! – buffering hell. But what if I told you that boosting your signal, often with just a little elbow grease and a few readily available parts, is shockingly easy? Prepare to be amazed, because today, we're diving headfirst into a guide that will equip you with the knowledge to conquer Wi-Fi woes on your Toshiba Satellite.
1. The Wi-Fi Whisperer: Understanding Your Toshiba Satellite's Antenna – The Foundation of a Strong Connection
Before we get our hands dirty, let's get acquainted with the enemy… I mean, the antenna. Many Toshiba Satellite laptops, like most laptops, have their Wi-Fi antennas embedded in the screen bezel or the lid itself. These tiny marvels are the gatekeepers of your wireless connection. They’re the ears that listen for the Wi-Fi signals and the mouths that… well, speak back to your router, relaying your demands for cat videos and online shopping sprees. Ignoring their importance is like trying to enjoy a concert with cotton in your ears. You'll miss out!
2. Recognizing the Problem: Is Your Wi-Fi Really Weak? – Diagnose Before You Fix
How can you tell if your Wi-Fi is struggling? It's not always obvious. Slow download speeds? Frequent disconnections? Websites taking ages to load? These are all red flags. But before you assume the worst (blaming your internet provider, of course!), let's run a few quick diagnostic tests.
- Speed Tests: Websites like Speedtest.net are your friends. Run a test near your router and then near your laptop. Compare the results. A significant dip in speed points towards a problem.
- Signal Strength Indicators: Check the Wi-Fi signal icon in your system tray (the bottom right corner of your screen). A weak signal (fewer bars) suggests a weak connection.
- Distance Tests: Move your laptop closer to your router. Does the signal strengthen? If so, it's likely a signal strength issue.
If you're seeing these symptoms, then it's likely your Toshiba Satellite's antenna could use a little help.
3. The Arsenal of a Wi-Fi Warrior: Gathering Your Tools and Supplies
The good news? You likely won’t need a treasure chest of tools. We're aiming for simplicity here.
- A new Wi-Fi antenna (if needed): Depending on the issue, you might need to replace the antenna. These are generally inexpensive and readily available online. Double-check your Toshiba Satellite model number to ensure compatibility. Think of it as the new sword for your digital knight!
- A small Phillips head screwdriver: For disassembling your laptop.
- Patience: This is crucial, trust me!
- A soft, clean surface to work on: Protect your laptop and its delicate components.
- Optional: a plastic pry tool: For gently separating components without scratching.
4. Caution: Before You Begin The Wi-Fi Antenna Installation – Safety First, Always!
I have a confession. I'm a bit clumsy. That's why I stress safety. Before you even think about touching your precious Toshiba Satellite, here's a very important heads-up:
- Power Down: Turn off your laptop and unplug it from the power source. This is non-negotiable. Electricity and electronics don't mix well when they're not supposed to.
- Static Electricity: Build-up can damage sensitive components. If you have an anti-static wrist strap, use it. If not, touch a grounded metal object (like a faucet) before touching the laptop's internals.
- Back Up Your Data: Just in case something goes wrong (it probably won't, but, you know, Murphy's Law).
5. The Grand Unveiling: Disassembling Your Toshiba Satellite
This is where the adventure begins! The exact steps will vary slightly depending on your Toshiba Satellite model, but the general process is similar. Let's walk through the most common approach.
- Locate the screws: Usually, the screws are located on the bottom of the laptop, often under rubber feet or hidden beneath access panels.
- Unscrew with precision: Use the Phillips head screwdriver to remove the screws. Keep them organized, using a small dish or a magnetic tray.
- Pry Away, Gently: If there's a seam, you might need to use a plastic pry tool, or even your fingernails, to carefully separate the top and bottom halves of the laptop. Work your way around the edges. Don't force anything!
- The Keyboard Dance: Sometimes, you'll need to remove the keyboard to access the internal components. This usually involves unclipping the keyboard from the chassis.
- Take Photos Or Record Video: Document the process! This is hugely helpful for reassembly.
6. The Antenna's Hideout: Locating the Wi-Fi Card and Antenna Cables
Now the fun begins! Inside your laptop, you're looking for the Wi-Fi card. It's a small card, usually located under a cover or shield. The antenna cables will be connected to this card. These are usually tiny wires with small connectors.
- Identify the Wi-Fi Card: It's often a mini-PCIe card. It will have a label.
- Unplug the Antenna Cables: Very gently detach the antenna cables from the Wi-Fi card. They often snap in with a light press. Remember which cable goes where. Take another photo if needed.
- Remove the Wi-Fi Card (If Necessary): The Wi-Fi card may be held in place by screws. Remove them.
7. Antenna Replacement – The Art of the Swap
If you have a faulty antenna, this is where the magic happens. The antenna may be attached to the cover of the screen or lid.
- Disconnect the Old: Unscrew and carefully detach the old antenna.
- Install the New Antenna: Secure the new antenna in the same position, using any screws or adhesive as appropriate.
- Route the Cables: Carefully route the antenna cables; they often route through the hinges.
8. The Wi-Fi Card Reconnection – Precision and Patience Combined
Now it’s time to reconnect everything.
- Reinstall the Wi-Fi Card: Place the Wi-Fi card back into its slot. Secure it with the screws.
- Reconnect the Antenna Cables: Carefully reconnect the antenna cables to the Wi-Fi card. Make sure they snap securely.
9. Reassembly – Putting the Pieces Back Together
Now it's time for reverse engineering!
- Replace the Keyboard: Clip or screw the keyboard back into place.
- Close the Lid: Carefully align the top and bottom halves of the laptop. Press them together firmly until they click into place. (If it doesn’t click, don’t force it! Check for any hidden screws or obstructions).
- Screw Everything Back In: Replace all the screws you removed, making sure they are snug.
10. The Moment of Truth: Testing Your New Wi-Fi Connection
Time to celebrate!
- Power Up and Test: Plug in your laptop and boot it up.
- Check the Signal: Look at the Wi-Fi signal strength icon in the system tray. Is it stronger?
- Surf the Web: Visit some websites and download and upload files. Are things faster?
- If the Signal is Still Weak: Double-check that all connections are secure and review the troubleshooting tips below.
11. Antenna Upgrades: External vs. Internal – Exploring Your Options
If you want to take your Wi-Fi game to the next level, you have options.
- External Antennas: These are often attached to the back of your laptop.
- Internal Antenna Tweaks: The most common option.
- Router Placement: Ensure the router is in a location that avoids obstructions or walls.
12. Troubleshooting Troubles: Common Wi-Fi Woes and Solutions
Sometimes, despite our best efforts, things go wrong. Here are a few common issues and how to troubleshoot them:
- No Wi-Fi Signal: Double-check all connections, including the antenna cables and Wi-Fi card. Ensure the Wi-Fi card is enabled in your operating system (usually with a function key combination).
- Weak Signal: Ensure the antenna cables are correctly connected to the Wi-Fi card. Consider moving your laptop closer to the router.
- Slow Speeds: Check your internet speed with a speed test. If your internet speed is slow, the problem might be with your internet service provider.
13. Preventing Future Wi-Fi Woes: Maintaining Your Strong Connection
Now that you've mastered the antenna install, here's how to keep your Wi-Fi strong:
- Keep Your Laptop Updated: Ensure your operating system and drivers are up to date.
- Manage Interference: Keep your laptop away from other devices
How to remove and reattach WiFi antenna cables
By James Has Answers How to remove and reattach WiFi antenna cables by James Has Answers
Toshiba Satellite Wifi Card take 2

By Squigglemom and Friends Toshiba Satellite Wifi Card take 2 by Squigglemom and Friends
Wi-Fi Fix for Old Toshiba Laptops with Windows 10 - TVAP and TBSWireless.exe - Jody Bruchon

By Jody Bruchon Wi-Fi Fix for Old Toshiba Laptops with Windows 10 - TVAP and TBSWireless.exe - Jody Bruchon by Jody Bruchon

Title: Laptop wifi antenna repair Perth
Channel: cirrus Link Repair
Laptop wifi antenna repair Perth by cirrus Link Repair
Laptop Working
Toshiba Satellite Wi-Fi Antenna Install: A Surprisingly Simple Guide
The digital world hinges on connectivity. For Toshiba Satellite owners, a robust Wi-Fi connection is not merely a convenience, but a necessity for everything from streaming entertainment to completing crucial work tasks. A weak or intermittent Wi-Fi signal can quickly transform a productive workstation into a source of frustration. Fortunately, upgrading or repairing the Wi-Fi antenna on your Toshiba Satellite is often a simpler task than many realize. This comprehensive guide will walk you through the entire process, providing clear, detailed instructions and insights, ensuring you can confidently tackle this project and significantly improve your wireless experience. Prepare to rediscover the speed and stability your Toshiba Satellite was always meant to provide.
Understanding Your Toshiba Satellite's Wi-Fi Antenna System
Before diving into the installation, it's essential to understand the core components involved. Most Toshiba Satellite models utilize an internal dual-band Wi-Fi antenna system, which typically includes two antennas: one for 2.4 GHz frequencies and another for 5 GHz frequencies. These antennas are usually embedded within the laptop's display bezel or integrated into the chassis. The precise location and configuration can vary slightly depending on your specific Satellite model. However, the general principles remain consistent. The Wi-Fi card itself is a vital part of the equation. It is a small circuit board, usually installed in a Mini PCI-e slot. The antennas connect to the Wi-Fi card through small, delicate antenna cables. These cables transmit and receive the radio signals that form the wireless connection to your router or access point. Identifying the specific model number of your Toshiba Satellite is the first step. This critical information can be found on a sticker located on the bottom of the laptop or inside the battery compartment. Having the model number readily available will help in finding the correct replacement parts and the model-specific service manual.
Gathering the Necessary Tools and Materials
A successful Wi-Fi antenna installation requires the right tools and materials. Before you begin, ensure you have the following:
- Replacement Wi-Fi Antenna: This is the most crucial component, and the quality of the replacement matters. Search for a replacement antenna compatible with your Toshiba Satellite model, paying close attention to the frequency bands supported (2.4 GHz and 5 GHz). Explore online marketplaces and electronics retailers.
- Small Phillips Head Screwdriver: This is essential for removing the screws that secure the laptop's chassis and internal components. A magnetic screwdriver is highly recommended to prevent losing tiny screws.
- Plastic Opening Tools or Spudger: These non-conductive tools are invaluable for safely prying apart the laptop's case without causing damage. They are specifically designed to gently separate plastic components.
- Anti-Static Wrist Strap: Protecting your laptop's sensitive electronics from static discharge is paramount. Wearing an anti-static wrist strap grounded to a metal surface prevents static buildup.
- Small Tweezers: These are useful for handling small screws, antenna cables, and other delicate parts.
- Soft, Clean Cloth: To protect the laptop's components from dust and debris.
- Optional: Magnifying Glass: For inspecting small connectors and screws, especially if your eyesight could use a little extra help.
- Your Toshiba Satellite Model's Service Manual: Accessing the service manual specific to your Satellite model is highly recommended. Most are available online via Toshiba or third-party websites. The service manual provides exploded diagrams, part numbers, and detailed disassembly instructions specific to your device.
Step-by-Step Installation Guide: Taking Apart Your Toshiba Satellite
Proceed with caution, patience, and attention to detail.
- Power Down and Disconnect: Turn off your Toshiba Satellite completely and unplug the power adapter. Also, remove the battery pack. This is a fundamental safety precaution.
- Locate the Access Panels: On most Toshiba Satellite models, the Wi-Fi antenna is accessible after removing the bottom panel. Identify the panel(s) that provide access to the internal components, including the Wi-Fi card and antenna cables. The service manual will be your helpful guide here.
- Remove the Bottom Panel Screws: Use your Phillips head screwdriver to carefully remove all the screws securing the bottom panel(s). Pay close attention to the screw sizes and locations. Some screws may be different lengths. It’s advisable to place the screws in an organized manner, perhaps taping them to a piece of paper, maintaining their relative positions as you remove them.
- Gently Separate the Panel: Using your plastic opening tools, carefully pry the bottom panel(s) away from the laptop chassis. Work your way around the edges, releasing the clips that hold the panel in place. Be patient. Be gentle. Avoid using excessive force, as this can damage the plastic. You may need to consider the use of a heat gun to warm up the plastic and soften the adhesive.
- Identify the Wi-Fi Card and Antenna Cables: With the bottom panel removed, locate the Wi-Fi card. It's typically a small circuit board located in a Mini PCI-e slot. The antenna cables will be connected to the Wi-Fi card. These cables will have small connectors that snap onto the card. The cables will be very thin and delicate, so handle with care. Note the exact location of the antenna cables on your Wi-Fi card for later.
- Disconnect the Antenna Cables: Carefully disconnect the antenna cables from the Wi-Fi card. Use your tweezers if necessary, to gently lift the connectors. Be sure the connectors separate from the pins straight up to avoid damage.
- Remove the Wi-Fi Card: You may need to remove a small screw securing the Wi-Fi card. Carefully remove the screw, then slide the Wi-Fi card, out of its slot.
- Locate the Antennas: The antennas are usually embedded in the display bezel or integrated within the chassis. Their exact location depends on your Toshiba Satellite model. Carefully trace the antenna cables, which you disconnected from your Wi-Fi card, to their points of origin.
- Detach the Old Antennas from the Chassis: Very gently detach the antenna cables from the chassis. This often involves removing screws or clips that secure the antenna cables or the antennas themselves. You might gently peel the antenna away from the screen bezel, if they are located there.
- Install the New Antennas: Attach the new antenna cables. Route the antenna cables through the same pathways as the original cables. Take extra care to ensure the cables are not pinched or crimped.
- Reconnect the Antenna Cables to the Wi-Fi Card: Align the antenna cable connectors with their corresponding ports on the Wi-Fi card. Gently press the connectors onto the pins until they snap securely in place.
- Reinstall the Wi-Fi Card: Slide the Wi-Fi card back into its slot and secure it with the small screw.
- Reassemble the Laptop: Replace the bottom panel(s) and carefully align the clips. Press gently until the panel snaps back into place.
- Replace the Screws: Secure the bottom panel(s) with the screws you removed earlier, ensuring they are placed in their original positions. Do not overtighten the screws.
- Reinsert the Battery: Reinsert the battery pack.
- Power On and Test the Connection: Plug in the power adapter and turn on your Toshiba Satellite. Test your Wi-Fi connection by connecting to your wireless network. Verify that the signal strength is improved. If the connection is not working correctly, double-check all connections and ensure all cables are firmly and securely connected, that you re-installed all the screws in their original positions.
Troubleshooting Common Wi-Fi Antenna Installation Issues
Even with careful execution, problems can arise.
- No Wi-Fi Connection: The most common issue. Double-check that the antenna cables are securely connected to both the Wi-Fi card and the antennas. Also, ensure the Wi-Fi card is properly seated in its slot. It's helpful to try re-seating the Wi-Fi card in its slot if trouble persists.
- Weak Signal Strength: Ensure the antennas are properly positioned. They should not be obstructed by any metal components. If you're still experiencing a weak signal, try repositioning your router. Sometimes, a simple router-to-laptop distance adjustment can make a huge difference. Make sure the antennas have been properly attached to the bezel or inside the chassis.
- Wi-Fi Card Not Detected: Double-check that the Wi-Fi card is properly installed and that the screw securing it has been properly attached. Try reseating the card. It is remotely possible the Wi-Fi card is defective, if nothing else works.
- Damaged Cables: Inspect the antenna cables for any signs of damage. If a cable is damaged, replace it. Bending the antenna cables at sharp angles is likely to damage them.
- Incorrect Replacement Antenna: Double-check that you have the correct replacement antenna that is compatible with your Toshiba Satellite model.
Advanced Tips for Optimal Wi-Fi Performance
While the antenna installation often resolves connectivity issues, consider these additional tips for maximizing Wi-Fi performance:
- Update Your Wi-Fi Drivers: Ensure your Toshiba Satellite's Wi-Fi drivers are up-to-date. Outdated drivers can cause performance problems. Visit Toshiba's support website to download and install the latest drivers for your specific model.
- Optimize Router Settings: Optimize your router settings. Choose the best Wi-Fi channel and security settings. Consider upgrading your router to a newer model with the latest
