how do i install wifi drivers on my lenovo laptop

Title: How to Fix Wi-Fi is Not Connecting to Lenovo Laptops Problem in Windows 1087 2025
Channel: FIXsage
How to Fix Wi-Fi is Not Connecting to Lenovo Laptops Problem in Windows 1087 2025 by FIXsage
Lenovo WiFi Driver Nightmare? Solved! (Easy Install Guide)
Lenovo WiFi Woes Vanquished: Your Ultimate Driver Rescue Remedy
Ever wrestled with a Lenovo laptop that stubbornly refuses to connect to the internet? You're not alone. Many users face the dreaded "no WiFi" situation. But fear not! This isn't an unresolvable tech tragedy. In fact, getting your Lenovo WiFi driver sorted typically involves a surprisingly straightforward path.
The Phantom WiFi: Recognizing the Culprit
First things first, how do you know that your driver is indeed the issue? Perhaps your WiFi icon displays an "X" mark. Or, worse, it's entirely absent from your system tray. The device manager might reveal a yellow exclamation mark. This signals a driver problem, or a hardware issue. However, because we're problem solving the WiFi driver, let's assume the WiFi hardware is present. Because this problem can be frustrating, don't panic. Let’s methodically troubleshoot.
Unearthing the Driver: Your Digital Detective Work
Now, let's get strategic. There are a few avenues to pursue your Lenovo WiFi driver. Luckily, these methods are largely painless.
Lenovo's Official Website: This is your primary resource. Visit the Lenovo support site. Navigate to the "Drivers & Downloads" section. Input your laptop's specific model number. You will find a list of available drivers, including the WiFi adapter. This is often the most reliable source, so start here.
The Device Manager Route: Press the Windows key and the "X" key. A menu pops up. Select "Device Manager". Expand the "Network adapters" section. You should see your WiFi adapter listed. Right-click on it. From there, select "Update driver". Choose to search automatically for updated driver software. Windows will hopefully locate and install the correct driver.
Using the Lenovo Vantage application: Some Lenovo laptops come with Lenovo Vantage pre-installed. This application provides several key features. Locate the "System Update" section. This can automatically scan for driver updates, including your WiFi driver. Install the recommended updates, and see if this solves your problem.
Installation Initiation: A Step-by-Step Guide
Once you've located the appropriate driver, installation is generally easy. The process is often a breeze!
Download and Save: Download the driver file from the Lenovo website. Save it to a convenient location on your computer.
Run the Installer: Double-click the downloaded file to start the installation. The installer will guide you through the process.
Follow Prompts: Carefully follow the on-screen instructions. Accept the license agreement. Select the installation location, if prompted.
Restart if Needed: The installer will sometimes prompt you to restart your laptop. Do so when requested. This ensures the new driver takes effect.
Troubleshooting Tactics: If the WiFi Still Won't Cooperate
Even with the correct driver installed, you might still encounter issues. Don't give up!
Verify WiFi Switch: Some laptops have a physical WiFi switch. Ensure it's in the "on" position. It's an easy fix!
Check Airplane Mode: Make absolutely certain that Airplane Mode is disabled. Windows usually displays the status in the system tray.
Network Adapter Settings: Back in Device Manager, right-click your WiFi adapter. Select "Properties". Check the "Driver" tab to confirm the driver is correctly installed. Then, explore other tabs to further troubleshoot.
Reinstall the Driver: Uninstall the driver from Device Manager. Then, reinstall it. Sometimes, a clean install can resolve stubborn problems.
Consider a Wireless Adapter: As a last resort, consider a USB wireless adapter. These are inexpensive and can provide a quick solution.
Advanced Maneuvers: For the Tech-Savvy Soul
For those comfortable with more advanced techniques, here are a few other possibilities.
Driver Rollback: If the problem appeared after a driver update, revert to a previous version. In Device Manager, right-click your WiFi adapter. Select "Properties". Click the "Driver" tab. Then, click "Roll Back Driver".
BIOS Update?: Rarely, an outdated BIOS can cause driver problems. Though, this usually is a symptom of other problems. Update it with extreme caution. Contact Lenovo support for guidance on this matter.
Success! Reclaiming Your Connectivity
By following these steps, you should be able to conquer the Lenovo WiFi driver challenge. So, take a deep breath. Stay patient. Typically, the solution lies within these straightforward steps. Once the driver is successfully installed, your laptop should be back online. You can now browse the internet. You can also stream your favorite shows. You can connect with friends and family. Now, go forth, and enjoy your newfound freedom!
Laptop WiFi: Fix That Weak Signal NOW!Lenovo WiFi Driver Nightmare? Solved! (Easy Install Guide)
Alright, fellow tech travelers! Let's be honest, haven’t we all been there? That sinking feeling when your Lenovo laptop, the technological marvel you depend on for everything from binge-watching your favorite shows to, you know, actually working, suddenly decides to… well, disconnect from the internet? And then you start seeing those terrifying error messages, those drivers that seem to vanish into thin air… a true Lenovo WiFi driver nightmare! Trust me, I’ve been there. I've wrestled with those elusive drivers, spent hours staring helplessly at my screen, and even considered throwing the entire laptop out the window (don’t judge!). But fear not, because after countless battles and a whole lot of learning, we've cracked the code! This isn't just a guide; it’s your rescue mission. Prepare to reclaim your WiFi connection and leave those driver dramas in the dust.
1. The WiFi Apocalypse: Why Are Lenovo Drivers So Troublesome?
Before we dive into the solutions, let's address the elephant in the room: Why does this keep happening? Well, it's not always Lenovo’s fault. Sometimes, it's a clash of software, a corrupted update, or even the infamous Windows update gremlins. Think of it like this: Your laptop's WiFi card is the messenger, and the driver is the language it speaks. If the driver doesn't understand the message, or if the messenger is speaking gibberish, well, you're not getting connected. It can feel like trying to understand a poem written in Klingon! Plus, with so many different models and operating systems, Lenovo has its own unique challenges.
2. Know Thine Enemy: Identifying Your Lenovo Model and OS
Before we can even begin, we need to know exactly what we're dealing with. Knowing your Lenovo model number and your operating system (Windows 10, Windows 11, etc.) is crucial. It's like having the map before starting your treasure hunt.
- Finding Your Lenovo Model:
- Look for a sticker on the bottom or side of your laptop. It will typically have a model number like "Lenovo Ideapad 3 15IIL05".
- You can also find it in your laptop's BIOS (usually accessed by pressing a key like F2 or Delete during startup – check your Lenovo manual).
- Within Windows, type "System Information" in the search bar. The model number is usually listed there.
- Finding Your Operating System:
- Right-click on the Start button.
- Select "System."
- The OS version (e.g., Windows 10 Home, Windows 11 Pro) will be displayed.
3. Method 1: The Official Lenovo Support Website – Your First Line of Defense
Okay, let’s start with the official route. The Lenovo support website is the equivalent of calling tech support (but way faster, and you don't have to listen to elevator music!).
- Step 1: Navigate the Lenovo Support Website: Go to Lenovo's official website and find the "Support" or "Drivers & Downloads" section.
- Step 2: Enter Your Model Number: Type in your model number (from step 2).
- Step 3: Select Your Operating System: Choose your operating system from the dropdown menu.
- Step 4: Find the WiFi Driver: Look for "Networking" or "Wireless LAN" drivers.
- Step 5: Download and Install: Download the driver that matches your system and follow the on-screen installation instructions. This is normally a case of clicking, and clicking again.
This method is the most straightforward and often the most reliable.
4. Method 2: The Device Manager Detective Work
If the official website doesn't deliver, don’t panic! We can try a little detective work within Windows.
- Step 1: Open Device Manager: Right-click on the Start button and select "Device Manager."
- Step 2: Locate Your Network Adapters: Expand the "Network adapters" section. You should see your WiFi adapter listed there.
- Step 3: Check for Errors: Look for any yellow exclamation marks or red crosses. These indicate driver issues.
- Step 4: Update Driver (Automatic): Right-click on your WiFi adapter and select "Update driver." Choose "Search automatically for drivers." Windows will try to find and install the latest driver.
- Step 5: Update Driver (Manual/Browse): If the automatic search fails, you can try downloading the driver from the Lenovo website (again!) and then selecting "Browse my computer for drivers" in the Device Manager. Point it to the downloaded file's location.
This method can solve a lot of problems without the fuss.
5. Method 3: The Driver Booster Rescue – (Use with Caution!)
There are driver update utilities like Driver Booster that claim to automatically identify and install drivers. They're like having a mechanic who already knows what's wrong with your car.
- Step 1: Download and Install (If You Choose to): Download a reputable driver update utility. Be careful to download it from a trusted source to avoid malware.
- Step 2: Run a Scan: Run a scan to identify outdated or missing drivers.
- Step 3: Update Your WiFi Driver: Select the WiFi driver and update it.
- Step 4: Restart Your Laptop: Restart your laptop for the changes to take effect.
Important Caveat: These utilities can sometimes install the wrong drivers, potentially causing more problems. Back up your system (create a restore point) before using them!
6. Troubleshoot Like a Pro! Common WiFi Driver Problems and Solutions
Even after installing the driver, things can still go wrong. Here are some common issues and how to fix them.
- No WiFi Networks Found:
- Make sure your WiFi adapter is enabled (check your laptop's physical switch or the Windows settings).
- Restart your router and modem.
- Move closer to your router.
- Update your router's firmware.
- Limited or No Internet Access:
- Restart your laptop.
- Check your network settings (IP address, DNS).
- Run the Windows Network Troubleshooter. The troubleshoot feature is often a real lifesaver.
- Slow WiFi Speeds:
- Check interference from other devices (microwaves, Bluetooth devices).
- Change your router's channel.
- Upgrade your router.
7. The Power of a Clean Reboot: Restarting for a Fresh Start.
Sometimes a simple restart is all you need. It's like hitting the reset button on your brain. A restart closes all running programs and gives your system a fresh start. This can often resolve conflicts and get your WiFi working again.
8. Reinstalling Drivers: The Nuclear Option (But Sometimes Necessary!)
If nothing else works, you might need to completely uninstall and reinstall your WiFi driver. It's like a hard factory reset, but for your driver.
- Step 1: Uninstall the Driver: In Device Manager, right-click on your WiFi adapter and select "Uninstall device."
- Step 2: Restart Your Laptop: Restart your laptop. Windows should automatically try to reinstall the driver.
- Step 3: Install from the Lenovo Website: If Windows doesn't reinstall the driver, go back to the Lenovo website and install the driver manually (see method 1).
9. Dealing with Conflicts: Unforeseen Software Battles
Other software can sometimes interfere with your WiFi driver.
- Antivirus Software: Temporarily disable your antivirus software (but remember to re-enable it afterward!).
- VPNs: If you are using a VPN, try disconnecting.
- Other Network Adapters: Disable any other network adapters (like Ethernet) to see if they are creating a conflict.
10. Check the Hardware: Ruling Out the Physical
Sometimes, the problem isn't the driver at all, but the WiFi card itself. It's like the engine in your car.
- Physical Switch: Make sure the WiFi switch on your laptop is turned on (this is often a physical switch on the side).
- Hardware Failure: If you strongly suspect a hardware failure, you might need to have your laptop serviced or replace the WiFi card.
11. Updating Your BIOS: the Ultimate Upgrade!
Your BIOS is the basic input/output system, which is the heart of your laptop. An updated BIOS can sometimes include fixes for hardware compatibility issues, including those related to WiFi.
- Check for Updates: Go to the Lenovo support website and check for BIOS updates for your specific model.
- Follow Instructions Carefully: BIOS updates are crucial, but you should follow the Lenovo's precise installation instructions. A mistake here can render your laptop unusable.
12. Operating System Tweaks: Fine-Tuning Windows for WiFi bliss.
Sometimes, tweaking your Windows settings can help with WiFi issues.
- Power Management: Go to Device Manager, right-click your WiFi adapter, select "Properties," and go to the "Power Management" tab. Uncheck "Allow
How To Fix Wireless Adapter Missing In Windows 10 Get WiFi Adapter Back
By Sandeep Singh How To Fix Wireless Adapter Missing In Windows 10 Get WiFi Adapter Back by Sandeep Singh
WiFi Driver Missing on Windows LaptopPC How to Install WiFi Driver on Windows 1011

By Tech Analytic 360 WiFi Driver Missing on Windows LaptopPC How to Install WiFi Driver on Windows 1011 by Tech Analytic 360
Windows 10 - How To Install Wifi Drivers

By tech How Windows 10 - How To Install Wifi Drivers by tech How

Title: How To Update Lenovo Laptop's Drivers Include Wi-Fi Driver In Windows 10 Three Ways
Channel: Thepcphone
How To Update Lenovo Laptop's Drivers Include Wi-Fi Driver In Windows 10 Three Ways by Thepcphone
Wifi On Laptop
Lenovo WiFi Driver Nightmare? Solved! (Easy Install Guide)
We understand the frustration. That sinking feeling when your Lenovo laptop, so recently a beacon of connectivity, suddenly refuses to recognize your WiFi network. The dreaded "no Wi-Fi networks found" message. It’s a common plight, a digital headache that can disrupt workflow, derail entertainment, and generally leave you feeling disconnected. But fear not! This isn't just another generic troubleshooting guide. We've scoured the digital landscape, gathered the most effective solutions, and crafted a step-by-step walkthrough that cuts through the technical jargon and empowers you to reclaim your online life. We're here to turn your WiFi woes into a distant memory.
Diagnosing the Lenovo WiFi Deficiency: Identifying the Root Cause
Before we dive into solutions, let’s pinpoint the source of your connectivity crisis. Understanding the potential culprits is key to a quick and effective fix. The issue often stems from a few primary areas: outdated or corrupted drivers, disabled Wi-Fi hardware, and network configuration problems. Don’t worry, we'll address each one comprehensively.
The Driver Dilemma: Why Your Lenovo Might Not Know WiFi
Drivers are the essential software bridges that allow your Lenovo laptop to communicate with its hardware, including the WiFi adapter. Think of them as translators. If the translation is broken, so is the communication. An outdated, corrupted, or incorrectly installed driver can throw a wrench into the wireless workings of your machine. This is one of the most frequent causes. Let's ensure your drivers are in tip-top shape.
Unveiling the Device Manager: Your Driver Diagnostic Hub
The Device Manager is your central command center for hardware and driver management. Accessing it is straightforward. Simply type "Device Manager" into the Windows search bar (usually located at the bottom left of your screen) and select the application. Alternatively, right-click the Windows Start button and select "Device Manager" from the context menu.
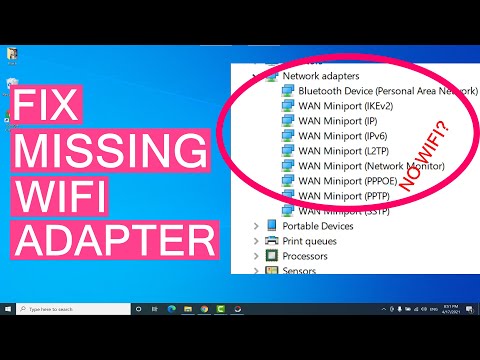
Locating Your Wireless Network Adapter:
Within the Device Manager, you'll find a section labeled "Network adapters." Click the small arrow to the left of this category to expand it, revealing a list of all network adapters installed on your Lenovo. This list typically includes both your wired (Ethernet) and wireless (WiFi) adapters. Look for the name of your wireless adapter; it usually contains terms like "Wireless," "WiFi," or "802.11." The exact name depends on the specific model of your Lenovo.
Decoding Driver Status: The Visual Clues
Pay close attention to the icons next to your wireless network adapter’s name. An exclamation mark (!) within a yellow triangle signifies a problem with the driver. This could indicate a missing, corrupted, or incorrectly installed driver. A downward-pointing arrow indicates the adapter is disabled.
Driver Update: The Path to Wireless Revival
Now, let's talk about updating your driver. There are a few approaches, each with its own merits. We will guide you towards the best options.
Automatic Driver Update: The Built-in Windows Approach
Right-click on your wireless network adapter in Device Manager and select "Update driver." Then, choose "Search automatically for drivers." Windows will then search for the latest driver online and attempt to install it. This is often a quick and convenient solution. However, it may not always find the most current or optimal driver, especially for less common Lenovo models.
Lenovo's Official Website: Sourcing Authentic Drivers
The most reliable source for Lenovo drivers is the official Lenovo support website. Navigate to the support section of the Lenovo website and enter your specific laptop model number. The model number is often found on a sticker on the bottom of your laptop or within the system information settings. Once you've located your model, navigate to the drivers and software download section. Filter by "Network" or "Wireless LAN" to find the relevant drivers. Download the latest available driver.
Driver Installation: A Step-by-Step Guide
After downloading the driver, locate the downloaded file (usually in your Downloads folder). Double-click the file to begin the installation. Follow the on-screen prompts. The installation process may require a restart of your Lenovo laptop. Be sure to save all your important work before restarting.
Driver Rollback: Reverting to a Previous Driver Version
If a recent driver update has caused connectivity issues, you can roll back to a previous driver version. Right-click your wireless network adapter in Device Manager, select "Properties," and then navigate to the "Driver" tab. If the "Roll Back Driver" option is available (not grayed out), click it. This will restore the previous driver version. If the option is unavailable, you can try uninstalling the current driver and reinstalling a previously downloaded version from the Lenovo support website.
Hardware Enablement: Ensuring Your WiFi Adapter is Active
Sometimes, the problem isn't the driver, but the hardware itself. It's possible your WiFi adapter is disabled, either intentionally or unintentionally.
The Physical WiFi Switch: A Simple Solution
Some Lenovo laptops have a physical switch, located on the side or front edge of the laptop, that controls the WiFi adapter. Ensure this switch is in the "on" position.
Keyboard Shortcuts: Enabling Wireless Radio
Many Lenovo laptops utilize keyboard shortcuts to enable or disable the WiFi adapter. Look for a key with a Wi-Fi symbol (often resembling an antenna with radiating lines). This key often functions in conjunction with the "Fn" (Function) key. Pressing the Fn key and the Wi-Fi key simultaneously will toggle the adapter's status.
Checking the BIOS Configuration:
In some rare instances, the Wireless adapter might be disabled in the BIOS setting. To check, restart your laptop and enter the BIOS setup. The key combination to enter the BIOS differs by models but is usually one of the following: F2, F10, F12, or Delete. Once in the BIOS, look for a setting related to "Wireless," "WiFi," or "WLAN" and ensure it is enabled.
Network Configuration: Verifying Your Connection Settings
Once you've addressed driver and hardware issues, the next step is to investigate your network configuration. Ensure your settings are correctly configured.
Checking Wireless Network Settings:
Click on the network icon in the system tray (usually located in the bottom-right corner of your screen). You'll see a list of available WiFi networks. Ensure your network is listed and select it. Enter your network password if prompted.
Troubleshooting Connection Issues:
If you can see your network but cannot connect, try the following:
- Restart your router: Unplug your router and modem, wait for 30 seconds, and then plug them back in. Allow the devices to fully restart before attempting to connect to your WiFi network again.
- Forget the network and reconnect: Click on the network icon in the system tray, right-click on your network name, and select "Forget." Then, reconnect and enter your password again.
- Check your IP address configuration: In your WiFi settings, verify that your IP address is obtained automatically.
- Run the Windows Network Troubleshooter: Windows has a built-in network troubleshooter that can identify and fix common connection problems. Right-click the network icon in the system tray and select "Troubleshoot problems."
Advanced Solutions: Delving Deeper into the Digital Realm
For persistent issues, consider these more advanced troubleshooting steps.
System File Checker (SFC): Repairing Corrupted System Files
Corrupted system files can sometimes interfere with network functionality. The System File Checker (SFC) is a built-in Windows utility that scans for and repairs corrupted system files. Open the Command Prompt as an administrator type
sfc /scannowand press Enter. Allow the scan to complete. Restart your Lenovo laptop after the scan.Network Reset: Returning to Default Settings
A network reset will restore your network settings to their default values. This can sometimes resolve persistent connectivity problems. Go to Settings > Network & Internet > Advanced network settings > Network reset. Then click "Reset now". Your computer will restart, and you will need to reconnect to your WiFi.
Checking for Interference:
WiFi signals can be impacted by electromagnetic interference from other devices. Ensure that your router is away from other electronic devices, such as microwaves, cordless phones, and Bluetooth devices.
Preventive Measures: Shielding Your Lenovo from Future WiFi Woes
Now that your Lenovo is up and running, let's implement some preventative measures to keep it connected.
Regular Driver Updates:
Make it a habit to check for driver updates periodically, especially after a Windows update or a major system change.
Protecting Against Malware:
Malware can sometimes disrupt network functionality, so always run reliable antivirus software to protect your machine.
Safeguarding Your Network Security:
Ensure your WiFi network is secure by using a strong password and enabling WPA2 or WPA3 encryption.
Conclusion: Reclaiming Your Digital Freedom
We've covered every facet of the Lenovo WiFi driver nightmare, from the diagnostics to the definitive solutions. By methodically working through these steps, you'll be well-equipped to conquer any Wi-Fi challenges that come your way. Remember, patience and a systematic approach are your allies. Hopefully, your Lenovo laptop is now happily connected, ready to serve your every digital desire. Go
