how to make wifi from laptop windows 7

Title: How to Create a WiFi Hotspot with Windows 7
Channel: 1stepatatime
How to Create a WiFi Hotspot with Windows 7 by 1stepatatime
how to make laptop as wifi hotspot windows 7, how to turn on wifi on laptop windows 7, how to connect to wifi in windows 7 laptop
**Windows 7 WiFi Hotspot: The Secret Trick They DON'T Want You To Know!**
Unleash the Wireless Wizard: Turning Your Windows 7 PC into a WiFi Hotspot (The Whisper They Miss!)
The digital age thrives on connectivity. We constantly seek ways to stay linked, to share, and to explore. Believe it or not, a relic of the past, Windows 7, holds a secret weapon. It can transform into a WiFi hotspot. It is a trick that isn't widely publicized. This simple feature can breathe new life into older hardware. It empowers you to share your internet connection. Let’s delve into this hidden gem.
Tapping into the Hidden Power: Ad-Hoc Networks and the Windows 7 Secret
The core of this magic lies in Windows 7's capabilities. It allows you to create an ad-hoc network. This is a direct connection between your computer and other devices. Many people were unaware of this possibility. Think of it as a personal WiFi router, crafted from your own machine. This opens doors to limitless possibilities. You can keep your devices connected, even without a dedicated router. You can also extend your network’s reach.
However, understand that setting up an ad-hoc network isn’t always the smoothest process. It might require a little patience and some minor tweaks. Don't worry; it's achievable. It provides a simple and effective solution for specific needs. For starters, you need a computer running Windows 7. You also need a network adapter. This enables the computer to broadcast a wireless signal.
Setting Sail: Launching Your Very Own WiFi Hotspot
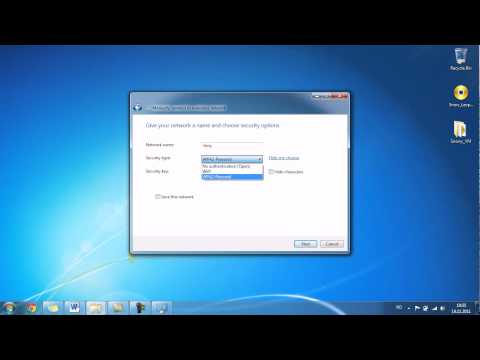
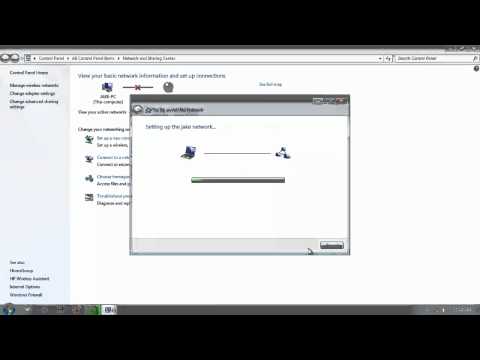
Now, let's get your hotspot up and running. Firstly, access the "Network and Sharing Center." You can find this in the Control Panel. Next, click on "Set up a new connection or network." Then, select "Set up a wireless ad hoc network." Follow the on-screen prompts. You'll be prompted to name your network. Choose a strong password for security. Keeping your network safe is vital.
Make sure you select the correct network adapter. This is the device that will broadcast the WiFi signal. After entering this information, click "Next." You'll receive confirmation that your network is ready. However, the job isn't quite finished. You will need to share your internet connection. This process is easy but vital to the functionality.
Sharing the Wealth: Internet Connection Sharing Explained
To share your internet, return to the "Network and Sharing Center." Locate your current internet connection. Right-click on the connection. Then, select "Properties." In the "Sharing" tab, check the box that says, "Allow other network users to connect through this computer's internet connection." Select the network you just created from the drop-down menu. Click "OK." Doing this is essential.
That is mainly all that is required to share your internet. Your Windows 7 machine is doing the work. It has become a functional WiFi hotspot. Because of this, any device within range can connect. Those devices will share your internet connection. But remember, you must have an active internet connection.
Troubleshooting and Triumphs: Common Hurdles and Solutions
Sometimes, the setup process isn't seamless. You might encounter some hiccups along the path. Perhaps devices struggle to connect. Maybe the internet speed feels slow. Moreover, let’s explore some common issues and their solutions. For instance, ensure your network adapter drivers are updated. This helps to improve performance. You can easily find them on the manufacturer's website.
Firewall settings can sometimes block connections. Check your Windows Firewall settings. Make sure it allows connections on the ports your network uses. Also, consider the signal strength. The distance between devices and your computer matters. Walls and obstructions can weaken the signal. If necessary, move your computer for better coverage. Try repositioning your devices.
Beyond the Basics: Advanced Tweaks and Considerations
Once your hotspot is running, consider some advanced tweaks. Firstly, adjust the security settings. Choose a strong password. This helps protect your network. You can change your network's name and password anytime. Just return to the "Network and Sharing Center." Select "Manage Wireless Networks."
Secondly, monitor your data usage. Sharing your internet connection can impact your data allowance. Be mindful of the data consumption. Consider setting up data limits or monitoring tools. This can help you avoid unexpected charges. Moreover, be aware that ad-hoc networks can sometimes be less reliable than dedicated routers. The connection might drop occasionally. However, for many situations, the trade-off is worthwhile.
Embrace the Freedom: Why This Hidden Trick Matters
Why should you care about this "hidden trick?" First, it offers a cost-effective solution. You can share your internet without purchasing a new router. This saves money. Second, it provides flexibility. You can create a hotspot anywhere you have internet access. It is convenient. Moreover, it is a useful backup strategy. In case your primary router fails, you can always resort to this method. This ensures you stay connected.
It keeps older hardware relevant. Your old Windows 7 machine can find a new purpose. It can be a functional hotspot. It is an effective way to extend the life of older devices. Remember that this setup relies on your computer staying on. Keep your computer running to maintain the WiFi connection. Overall, this Windows 7 trick offers an incredible opportunity. It provides a way to connect and share. It's a small change with significant impact.
Laptop's Secret WiFi Hotspot: Ethernet to Wireless Magic!Windows 7 WiFi Hotspot: The Secret Trick They DON'T Want You To Know!
Hey there, tech enthusiasts and frustrated internet users! Ever found yourself in a Wi-Fi desert, desperately craving a connection? Or perhaps your friends and family are constantly mooching off your precious data plan? Well, fear not! We're about to unlock a secret, a hidden gem, a digital cheat code that lets you turn your trusty Windows 7 machine into a powerful Wi-Fi hotspot. Sounds intriguing, doesn't it? Prepare to be amazed, because this is the secret trick they don't want you to know!
1. The Problem: Wi-Fi Woes and Data Drains
Let's face it, Wi-Fi can be a cruel mistress. Public hotspots are often slow, unreliable, and riddled with security risks. And tethering to your phone? Well, that guzzles down your data plan like a hungry hippo at a buffet. We've all been there, haven't we? That frustrating feeling of staring at a blank screen, unable to share that hilarious meme or check that important email. This brings us to the core issue: the need for a readily available, reliable, and preferably free Wi-Fi source.
2. Enter Windows 7: Your Unsung Hero
Believe it or not, your old friend Windows 7 still has a few tricks up its sleeve. While newer operating systems hog the spotlight, Windows 7 can surprisingly act as a capable Wi-Fi hotspot with a little know-how. It's like discovering your grandpa is actually a secret agent – you wouldn't have guessed it!
3. The Hidden Secret: Hosted Network
The key to this magic lies in the "Hosted Network" feature. This isn't something Microsoft shouts from the rooftops, but it’s a powerful tool that allows your Windows 7 PC to broadcast a Wi-Fi signal. It’s like building your own miniature Wi-Fi router, right there on your desktop or laptop.
4. Why Didn't Anyone Tell Us? The Suppression Conspiracy (Just Kidding…Mostly)
Okay, maybe it’s not a full-blown conspiracy, but why isn’t this feature more widely known? Perhaps it’s because Microsoft wants you to upgrade to the latest and greatest. Maybe it’s because they want you to buy a separate Wi-Fi router. Or, and this is just a guess, maybe it's because they simply haven't emphasized it enough. Either way, we're here to lift the veil and reveal the truth.
5. The Simple Steps: Setting Up Your Hosted Network
Now for the good part – the how-to! Don't worry, it's not as complicated as decoding the Da Vinci Code. We'll break it down into easy-to-follow steps.
- Step 1: Open Command Prompt as Administrator: This is crucial. Think of it as giving your computer the permission slip to do cool things. Search for "cmd" in your Start menu, right-click on "Command Prompt," and select "Run as administrator."
- Step 2: The Magic Command: Type the following command and hit Enter:
netsh wlan set hostednetwork mode=allow ssid="YourHotspotName" key="YourPassword"* Replace"YourHotspotName"with the name you want your Wi-Fi to have (e.g., "My Awesome Hotspot"). * Replace"YourPassword"with a strong password (at least eight characters) – this is very important for security! Consider using a mix of letters, numbers, and symbols. - Step 3: Start the Hosted Network: Type this command and hit Enter:
netsh wlan start hostednetwork - Step 4: Share Your Internet Connection: This is where the magic truly happens. * Open the "Network and Sharing Center" (search for it in the Start menu). * Click on "Change adapter settings." * You'll see a list of your network adapters. Identify the one that's actively connected to the internet (e.g., your Ethernet connection or your primary Wi-Fi). * Right-click on that adapter and select "Properties." * Click on the "Sharing" tab. * Check the box that says "Allow other network users to connect through this computer's Internet connection." * In the "Home networking connection" dropdown, select the name of your Hosted Network. * Click "OK."
And that's it! You've done it! Your Windows 7 PC is now broadcasting a Wi-Fi signal, ready to share its internet connection with any devices you want.
6. Troubleshooting Tango: Resolving Common Issues
Sometimes, things don't go perfectly the first time. Don't panic! Here are some common problems and their solutions.
- "The hosted network couldn't be started": Double-check your commands for typos, especially the password and network name. Make sure you're running Command Prompt as an administrator.
- No internet connection on connected devices: Go back to the network adapter settings and double-check that the correct adapter is sharing the internet connection. Run the command
netsh wlan show hostednetworkand check if the "Status" shows "Started". - Password issues: Make sure your password meets the required length and complexity.
- Driver Problems: Rarely, driver issues might interfere. Make certain all network drivers are current on your Windows 7 system through the "Device Manager".
7. Security Matters: Protecting Your Digital Fortress
Creating a Wi-Fi hotspot opens you up to potential security risks, so it's essential to take precautions.
- Strong Password: We said it before, but it bears repeating: use a strong, unique password for your hotspot.
- Encryption: Windows 7 should automatically use WPA2 encryption, which is generally secure. However, it's worth checking the settings in your Hosted Network configuration to be sure.
- Monitor Connected Devices: Keep an eye on what devices are connected to your network. If you see any unfamiliar devices, block them immediately.
- Keep Windows 7 Updated: While Windows 7 has reached its end-of-life for security updates, it is also critical that you have an updated antivirus or antimalware software present.
8. Advantages of Your Homemade Hotspot: Benefits Unleashed!
Why bother with this elaborate setup? Well, the benefits are numerous!
- Free Wi-Fi: It's free, provided you already have an internet connection.
- Convenience: No need to hunt for public hotspots.
- Control: You have complete control over your network and who connects to it.
- Data Saving: Saves you from burning through your mobile data allowance.
- Sharing is Caring: Share with friends and family, and make yourself the hero!
9. Limitations to Keep in Mind: The Fine Print
While this is a fantastic trick, it has limitations.
- Range: The range of your hotspot will be limited by your Wi-Fi adapter.
- Performance: The performance of your hotspot will depend on the speed of your internet connection.
- Battery Drain: Running a hotspot can drain your laptop's battery faster. Plug in your device when possible for optimal performance.
10. Beyond the Basics: Customization and Advanced Tricks
Once you're comfortable with the basics, you can explore some advanced customization options.
- Changing the SSID (Network Name): You can easily change the name later using the same
netsh wlan set hostednetworkcommand, just update the"YourHotspotName"value. - Changing the Channel: While not generally recommended, you can change the Wi-Fi channel to potentially improve performance. This can be modified within the network adapter setting in the "Device Manager."
- Using Software: There are third-party software programs that can make managing your Hosted Network even easier, but they're typically unnecessary.
11. Maximizing Your Hotspot's Reach: Optimization Techniques
Want to get the best performance out of your Wi-Fi hotspot? Here are some tips:
- Positioning: Place your laptop in a central location for optimal coverage.
- Obstacles: Move it away from walls and metal objects as they can reduce signal strength.
- Antennas: If your laptop has an external antenna connection, consider using an external antenna for better range.
12. Wi-Fi for Everyone: Ideal Situations for Your Hotspot
Your homemade Wi-Fi hotspot is especially useful in these scenarios:
- Traveling: When you can't find reliable Wi-Fi.
- Guest Network: Create a network for visitors without sharing your home network.
- Sharing with Friends: When you want to share your internet connection with friends and family.
- Troubleshooting: If you are having issues with network connectivity on a specific device.
13. Comparing Options: Windows 7 vs. Dedicated Router/Phone Tethering
How does this compare to other options like a dedicated Wi-Fi router or phone tethering?
- Dedicated Router: More reliable and
how to create a wifi hotspot on windows 7 Professional
By iTon how to create a wifi hotspot on windows 7 Professional by iTon
Create a laptop WiFi hotspot in under 30 seconds Windows 7
By jacobspeeds Create a laptop WiFi hotspot in under 30 seconds Windows 7 by jacobspeeds
How To Enable WiFi Internet Connection In Windows 7

By MDTechVideos International How To Enable WiFi Internet Connection In Windows 7 by MDTechVideos International

Title: Cara Download & Install Driver WIFI & ETHERNET Manual untuk Windows 781011
Channel: inprez id
Cara Download & Install Driver WIFI & ETHERNET Manual untuk Windows 781011 by inprez id
Laptop Working
Windows 7 WiFi Hotspot: The Secret Trick They DON'T Want You To Know!
The digital frontier constantly evolves, and the need for seamless connectivity has never been more critical. While newer operating systems like Windows 10 and Windows 11 have streamlined features, the often-overlooked Windows 7 still holds surprising power, especially when it comes to sharing your internet connection. We, however, have discovered a functionality that many articles fail to properly address: turning your Windows 7 machine into a reliable and secure WiFi hotspot. Those seemingly simpler guides often skim the surface, leaving users frustrated with spotty connections and security vulnerabilities. Let’s delve into a method that ensures both robust performance and complete peace of mind.
Unveiling the Hidden Capability: Windows 7's Hosted Network
Contrary to popular belief, Windows 7 possesses a built-in feature capable of creating a WiFi hotspot. This feature, known as the "Hosted Network," leverages the installed wireless adapter to broadcast a WiFi signal, effectively turning your laptop or desktop into a portable router. This is not about using third-party software; this is about harnessing the raw power already within your system. This method’s potency stems from its direct integration with the operating system's core network configuration, offering superior control and stability compared to some external applications.
Preparing Your Arsenal: Prerequisites for Success
Before we begin, confirming several prerequisites will ensure a smooth setup process. Firstly, you need a functional Windows 7 operating system. This is vital, obviously, for our method to function. Secondly, your computer must have a wireless network adapter. This is the hardware component that broadcasts the WiFi signal. Most laptops and many desktop computers have one pre-installed. Thirdly, you need an internet connection on your computer. This is the source from which you will share your internet. It could be an Ethernet connection, a 4G/5G USB dongle, or another existing WiFi network.
Step-by-Step Activation: Commanding the Hosted Network
The magic begins within the Command Prompt. Open the Command Prompt with administrator privileges. You can find it by searching for "cmd" in the Start menu, right-clicking on it, and selecting "Run as administrator." This elevated privilege is essential for making network configuration changes.
The Genesis of Your Network: Within the Command Prompt, type the following command and press Enter:
netsh wlan set hostednetwork mode=allow ssid="YourHotspotName" key="YourPassword"Replace
"YourHotspotName"with your desired network name. Select a name that is easily identifiable for your devices. Replace"YourPassword"with a strong, secure password composed of at least eight characters, incorporating uppercase and lowercase letters, numbers, and symbols. This password is the key to protecting your connection from unauthorized access.Igniting the Connection: This command configures the hosted network but doesn't start it. To launch the hotspot, execute this command:
netsh wlan start hostednetworkThis crucial step activates the virtual access point, making it visible to other devices within range. If you encounter an error, double-check your entered commands and ensure administrator privileges are enabled.
The Bridge to the Internet: Now, we must share your existing internet connection through your new hotspot. Navigate to the "Network and Sharing Center" in the Control Panel. You can access this via Start Menu -> Control Panel -> Network and Internet -> Network and Sharing Center.
The Sharing Algorithm: In the Network and Sharing Center, on the left panel, click "Change adapter settings." This will display a list of your network connections. Locate the connection that is currently being used for your internet access (e.g., "Ethernet" if connected by cable, or your current WiFi network connection). Right-click on that connection and select "Properties."
The Sharing Symphony: In the Properties window, click the "Sharing" tab. Check the box labeled "Allow other network users to connect through this computer's internet connection." In the "Home networking connection" dropdown menu, select "Microsoft Hosted Network Virtual Adapter" or a similar adapter name associated with your created hotspot. Click "OK" to save these settings.
Troubleshooting Your WiFi Hotspot: Common Roadblocks and Solutions
Even with a perfect recipe, sometimes, minor hiccups can occur. We will cover a few common stumbling blocks, along with proven remedies.
"The Hosted Network Could Not Be Started." This error frequently arises due to incorrect commands entered in the Command Prompt or an outdated wireless adapter. Double-check for typos in your
netshcommands. Ensure your wireless adapter drivers are up to date. Visit the manufacturer's website for the most recent drivers."No Internet Access." This is a major issue. This usually points to an incorrect sharing configuration. Double-check that you've enabled internet connection sharing in your network adapter properties, and properly selected the "Microsoft Hosted Network Virtual Adapter" or similar. Also, ensure your firewall isn't obstructing the connection.
"Connection Drops Frequently." This can be due to interference or the limited range of your wireless adapter. Move your computer closer to devices that will connect. Test different channels in the "Wireless adapter properties" within your device manager. Experiment with different channels to find the one that yields the most stable results.
Elevating Security: Shielding Your Wireless Fortress
Because the internet itself is a dangerous place, security must be a top priority. Here is how to fortify your new WiFi hotspot.
Strong Passwords: Never underestimate the power of a robust password. Use a complex password, incorporating a mix of uppercase and lowercase letters, numbers, and special characters. Change your password regularly to prevent unauthorized access.
Network Encryption: While the "WPA2-Personal" or "WPA3-Personal" setting provides encryption, it's critical to ensure that it is properly enabled. Windows 7 defaults can occasionally be less secure. You can typically verify this information, often through your wireless adapter properties.
Monitor Connected Devices: Keep a watchful eye on the devices connected to your hotspot. Most wireless adapter software allows you to view a list of connected devices. If you see any unfamiliar devices, consider changing your password immediately.
Firewall Protection: Ensure Windows Firewall is active. It acts as a first line of defense against malicious traffic. You can configure the firewall to block or allow specific applications from accessing the internet, thereby improving security.
Beyond the Basics: Fine-Tuning Your WiFi Experience
We can further customize your hotspot for optimal performance.
Bandwidth Management: Some software allows you to limit the bandwidth allocated to each connected device. This prevents any single device from monopolizing the connection, ensuring fair and consistent internet speeds for everyone.
Wireless Channel Selection: Wireless networks operate on different channels. By default, your access point will choose a channel automatically. However, manually selecting a channel can improve stability. Use a WiFi analyzer tool to identify the least congested channel in your area and configure your wireless adapter to use that channel.
Wireless Adapter Power Settings: The power settings of your wireless adapter can affect its performance. In the Device Manager, find your wireless adapter, then open its properties. Under the "Power Management" tab, disable the "Allow the computer to turn off this device" option. This can help with consistent performance.
Conclusion: Mastering the Art of the Windows 7 WiFi Hotspot
Creating a WiFi hotspot using Windows 7 is not just a simple trick; it is a demonstration of your ability to understand and wield technology. With these comprehensive processes, you can transform your older machine into a powerful tool for connectivity, ensuring you can share your internet connection securely and reliably. By following these steps and paying close attention to potential problems, you are equipped to outmaneuver the limitations of the standard methods, creating a solution that’s both powerful and easy to manage. Embrace the capability of Windows 7, and experience the freedom of dependable wireless connectivity wherever you go.
