how to make a wifi booster antenna for laptop
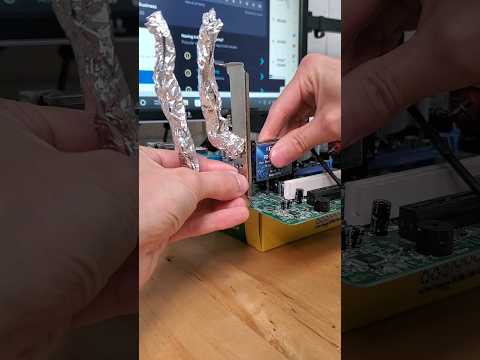
Title: can you use aluminum foil as a wifi antenna in your PC shorts
Channel: mryeester
can you use aluminum foil as a wifi antenna in your PC shorts by mryeester
Laptop WiFi Nightmare? This DIY Antenna Will SHOCK You!
Conquer Your Wi-Fi Woes: A Shockingly Simple DIY Antenna
Ever wrestled with a laptop that stubbornly refuses to connect? That frustrating buffering symbol, the dead zones – it's enough to make you chuck your beloved machine out the window. However, before you resort to such drastic measures, there's a secret weapon at your disposal. This DIY antenna solution will genuinely surprise you, and it might just resurrect your Wi-Fi signal from the digital graveyard.
The Silent Struggle: Why Your Wi-Fi Fails You
Let's face it, modern laptops are marvels of engineering. Nevertheless, the built-in Wi-Fi antennas are often… underwhelming. They're compact, integrated, and unfortunately, sometimes feeble. Consequently, their range can be limited, especially when facing obstructions like walls or other electronic devices. Moreover, interference from neighboring networks can further cripple your connection. As a result, you're left with a slow, spotty, and generally infuriating experience. Now, consider the possibilities.
Unleashing the Power: The DIY Antenna Revelation
The good news? You don't need to be a tech wizard to remedy the situation. In fact, the solution is remarkably straightforward. It’s a DIY antenna, crafted from common household items. This simple project can dramatically boost your Wi-Fi signal strength. Thus, you'll enjoy faster download speeds and a more stable connection throughout your home. Believe it or not, you can achieve this with minimal effort and cost.
Gather Your Arsenal: Essentials for Antenna Construction
Here's what you'll need to assemble your Wi-Fi signal savior:
- A USB Wi-Fi Adapter: This is the heart of your project.
- Materials for the Antenna: Consider the possibilities. You can use a metal coat hanger, some copper wire, or even aluminum foil.
- Soldering Iron and Solder: This is optional but highly recommended for a more robust connection.
- A Plastic Container: This will serve as the antenna's housing.
- A Drill: This will help you to create mounting holes.
- Electrical Tape: This is crucial for insulation.
Step-by-Step Guide: Crafting Your Wi-Fi Supercharger
Now, let's get started on the construction process.
- Prepare the USB Adapter: Begin by carefully disassembling your USB Wi-Fi adapter. Expose the internal antenna connection points, often a small wire or a solder pad.
- Craft the Antenna Element: If using a metal coat hanger, straighten it out. Then, cut the wire into a suitable length for your antenna. Shape it into a loop or a small dipole, the design can vary based on your preference. Alternatively, you can craft a simple dipole antenna using two pieces of copper wire, connected to the adapter.
- Solder the Connection: If you are using a soldering iron, solder the antenna wire to the exposed Wi-Fi adapter connection. This provides a strong and reliable connection.
- Construct the Housing: Drill holes into the plastic container, allowing you to mount the antenna. Moreover, these holes will help to improve the signal.
- Test and Refine: Once assembled, plug your new antenna into your laptop. Observe your Wi-Fi signal strength. Fine-tune the antenna's orientation for optimal performance.
Troubleshooting Tactics: Addressing Potential Hiccups
Not working perfectly right away? Don't panic. Troubleshooting is simple.
- Poor Connections: Ensure all connections are secure, particularly solder points.
- Antenna Placement: Experiment with different locations for the antenna.
- Interference: Try moving away from other electronic devices.
- Driver Issues: Confirm your USB Wi-Fi adapter drivers are up-to-date.
Beyond the Basics: Expanding Your Wi-Fi Horizons
This isn't just a fix; it's an upgrade. After the initial setup, you can fine-tune your antenna design. Try different materials or antenna shapes. Experiment with different mounting locations for maximum effect. Similarly, consider adding a reflector to your antenna to further direct and amplify the signal. Ultimately, you can personalize your setup.
The Payoff: Experiencing the Difference
The difference will be obvious. With your new DIY antenna, you'll notice a significant improvement in Wi-Fi signal strength and range. Download speeds will increase. Buffering will become a distant memory. Finally, you'll be able to stream, game, and browse with greater ease.
The Final Verdict: Unleash Your Wi-Fi's Potential
So, are you ready to banish those Wi-Fi woes for good? With a few simple steps, you can build a DIY antenna that dramatically improves your laptop's wireless performance. It’s a rewarding project. It empowers you to take control of your digital life. So, gather your materials, follow the steps, and prepare to be shocked by the results.
Laptop WiFi Nightmare? This 1 Weird Trick Fixes It INSTANTLY!Laptop WiFi Nightmare? This DIY Antenna Will SHOCK You!
Ever felt like your laptop's Wi-Fi is possessed? One minute you're streaming seamlessly, and the next, you're staring at a buffering wheel like it's a modern art piece. We've all been there. That frustrating dance between hope and despair, fueled by the promise of the internet and the reality of… well, dial-up speeds. But what if I told you there's a secret weapon in your arsenal, a DIY solution that costs next to nothing and can drastically improve your Wi-Fi signal? Prepare to be shocked (in a good way!), because we're about to build a Wi-Fi antenna that’ll blow your mind. Seriously, you might even start questioning if your internet provider is secretly throttling you.
The Wi-Fi Abyss: Why is My Signal So Weak?
Before we dive into the building process, let's diagnose the problem. Think of your Wi-Fi signal as a tiny, digital whisper trying to reach your laptop. This whisper has to navigate a treacherous landscape of walls, metal objects, and even the Wi-Fi signals of your neighbors. It’s a constant battle! Your laptop's built-in antenna, often a tiny strip of metal, is like a megaphone that’s been muffled with cotton balls. It's simply not powerful enough to cut through the noise and reach that sweet, sweet internet nectar. This weak signal leads to buffering, dropped connections, and the kind of rage that makes you want to throw your laptop out the window (don't do that, though!).
The DIY Antenna: Your Secret Weapon against a Weak Signal
We’re going to construct a simple, yet surprisingly effective, directional antenna. Think of it like a satellite dish, focusing the Wi-Fi signal and amplifying its power. This DIY project is incredibly easy, cheap, and requires only a few readily available materials. No advanced engineering degree required! I'm talking beginner-level craftsmanship, which means even I can do it (and believe me, my DIY skills are… questionable).
What You'll Need: The Simple Shopping List
Here's what you need to raid your junk drawer for (or, you know, actually purchase):
- A metal can: A soup can, a coffee can, anything cylindrical and made of metal will do. The bigger, the better, but anything will work. We’re aiming for a signal reflector here, so the metal is key.
- A Wi-Fi adapter (or a USB extension cable): This is the receiving end. You can use an external USB Wi-Fi adapter, or, if you’re feeling adventurous, a USB extension cable and the internal antenna of an old router (more on that later… it's a bit more involved, but worth it for a serious signal boost).
- A drill: For making a hole. Borrow one if you don’t have one.
- A hot glue gun (and glue sticks): To hold everything in place.
- Aluminum foil: To line the inside of the can. Think of it as a shiny, metallic hug for your Wi-Fi signal.
- Scissors or a knife: For cutting the foil.
- A ruler or measuring tape: To make accurate measurements.
- Duct tape (optional): For reinforcement or further customization.
Step-by-Step Guide: Building Your Wi-Fi Signal Amplifier
Alright, it's building time! Follow these steps, and you'll be well on your way to Wi-Fi nirvana:
- Preparing the Can: Wash and dry your can. Get rid of any labels – we want a clean slate.
- Lining the Can with Aluminum Foil: This is where the magic happens. Carefully measure and cut the aluminum foil to fit snugly inside the can. Make sure the shiny side faces inward. Use the hot glue gun to secure the foil to the inside of the can. Smooth out wrinkles as much as possible – think of it like wrapping a present.
- Drilling the Hole (and Inserting the Adapter): Measure and mark the center of the can's bottom. Use the drill to make a hole large enough to accommodate your Wi-Fi adapter or USB extension cable. If using an adapter, insert it through the hole.
- Securing the Adapter/Cable: Use the hot glue gun to secure the adapter or cable in place, sealing the hole. This will help keep everything stable.
- Testing and Tweaking: Plug your newly created antenna into your laptop (or your computer). Position the can so that the open end faces your router. Then, test your connection! You might be amazed at the improvement. If needed, experiment with the can's position and angle to find the optimal signal.
This is a simplified version. The more elaborate versions could involve attaching the USB wifi receiver internally, inside the can, soldering the adapter directly to the can, and using a wider can.
Beyond the Basics: Advanced Antenna Adventures (Optional)
Feeling ambitious? Let's jazz it up a bit!
- The Router Antenna Hack: If you're feeling adventurous, you can use the internal antenna from an old router. This typically involves opening the router, carefully extracting the antenna (which often looks like a small circuit board), and connecting it to your USB extension cable. This method can offer a significant signal boost, but requires some technical know-how and a steady hand.
- Can Size Matters (To a Degree): A larger can generally offers better amplification. If you have a really large soup can, go for it!
- The Angle of Your Antenna: Experiment with the angle of your antenna. Point it directly at your router, then adjust it slightly to find the sweet spot.
Troubleshooting: What If It Doesn't Work?
Don't worry if things don't go perfectly on the first try. Here are a few troubleshooting tips:
- Check Your Connection: Make sure your Wi-Fi adapter is properly connected.
- Try Different Angles: Experiment with the position and angle of your antenna.
- Placement, Placement, Placement: Move your antenna closer to your laptop or router.
- Interference: Move the antenna away from other electronic devices.
- Rebuild: Did you make a mistake? Don’t hesitate to start over, especially if you have a USB extension cable.
The Results: Experiencing the Wi-Fi Renaissance
Once you've built and tested your DIY antenna, prepare to be amazed. You might experience:
- Faster Download and Upload Speeds: No more waiting for webpages to load!
- Reduced Buffering: Stream your favorite shows without interruptions.
- Extended Range: Connect to your Wi-Fi from further away.
- Improved Stability: Say goodbye to dropped connections.
- A sense of accomplishment: You built a Wi-Fi antenna! How cool is that?
Beyond the Can: Exploring Further Enhancements
Let’s be real, we’re not reinventing the wheel here. But the can antenna is a starting point.
- Yagi-Uda Antenna: For those of you interested in true signal amplification, research this type of antenna. It’s a bit more complex, but very effective.
- Reflector Dishes: These antennas use a parabolic reflector dish. Like a satellite dish, they concentrate the signal. This is similar to what we are trying to do, but on a grander scale.
- Software Tweaking: Explore software settings on your laptop and router.
Embracing the Future of Seamless Connectivity
We’ve journeyed from signal weakness to signal strength. We’ve learned that a simple can, some foil, and a bit of elbow grease can be a surprisingly effective solution to a common problem. I encourage you to embrace the DIY spirit, have fun, and enjoy the benefits of a stronger, more reliable Wi-Fi signal. And if you encounter a problem, just be patient and try again!
Closing Thoughts
So, there you have it. Building a DIY Wi-Fi antenna is a fun, affordable project that can significantly improve your laptop's Wi-Fi performance. It's a testament to the power of ingenuity and the joy of solving problems with your own two hands. Go forth, build your antenna, and enjoy the sweet, sweet taste of a lag-free internet experience. The world wide web awaits!
FAQs: Your Burning Wi-Fi Questions Answered
1. Will this antenna work with all laptops?
Yes, the basic concept should work with any laptop that uses a Wi-Fi adapter. The key is to have a Wi-Fi adapter that can connect to your laptop.
2. How much does it cost to build this DIY antenna?
Typically, the cost is minimal. The most expensive component might be a USB extension cable or a new Wi-Fi adapter. Everything else is probably stuff you have lying around. It's a great project for those on a budget.
3. Is this antenna safe?
Yes, this antenna is perfectly safe. There's no risk of electric shock or anything harmful. It's simply a passive device that redirects and amplifies existing Wi-Fi signals.
4. How far can this antenna extend my Wi-Fi range?
The improvement in range will vary depending on your router, the environment, and the materials used. However, you should notice a noticeable improvement, potentially extending your range by a
5G WiFi Nightmare? Fix Your Laptop's Connection NOW!How To Increase Mobile WIFI Signal WIFI Antenna Upgrade

By Smrity Computer How To Increase Mobile WIFI Signal WIFI Antenna Upgrade by Smrity Computer
Convert LNB to a very powerful antenna to receive remote WiFi networks
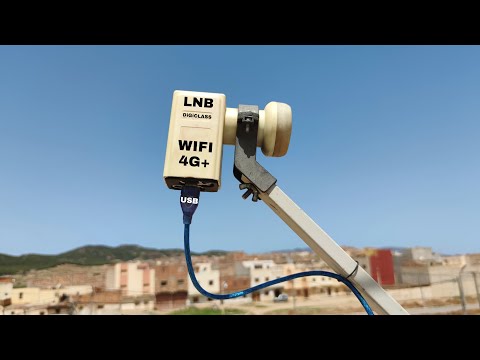
By Digital Sat Pro Convert LNB to a very powerful antenna to receive remote WiFi networks by Digital Sat Pro
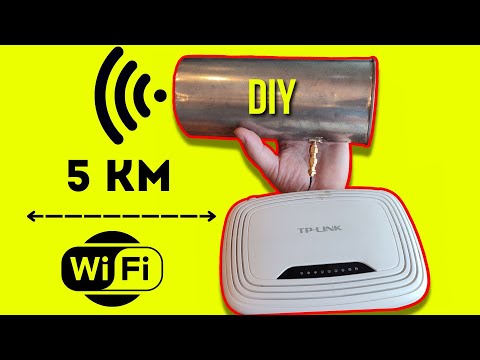
WiFi Booster Homemade WiFi booster how to increase WiFi signal

By SF Crafting WiFi Booster Homemade WiFi booster how to increase WiFi signal by SF Crafting
Title: DIY ultra long range WiFi directional antenna using thin can and old router
Channel: FixitEasy
DIY ultra long range WiFi directional antenna using thin can and old router by FixitEasy
Change Wifi Settings
Laptop WiFi Nightmare? This DIY Antenna Will SHOCK You!
Are you constantly battling the dreaded WiFi dead zone? Does your laptop's wireless connection feel more like a dial-up connection from the early 2000s? Do you find yourself migrating around your home, desperately seeking a bar or two of signal strength? If so, you're not alone. Millions of laptop users experience frustrating WiFi woes, stemming from a myriad of factors, from thick walls and interference to the limitations of your laptop's integrated antenna. Forget expensive upgrades and complex technical jargon; we are here to share a surprisingly effective, budget-friendly solution that could dramatically improve your laptop's WiFi performance: a DIY antenna.
Understanding the WiFi Signal Struggle: Why Is My Laptop WiFi So Weak?
Before we dive into the how-to guide, let's briefly consider the challenges your laptop faces when communicating wirelessly. Your laptop, designed for portability and aesthetics, often makes sacrifices when it comes to antenna design. Internal antennas, while convenient, can be small and lack the power of their external counterparts. Furthermore, the materials surrounding your laptop, from the metal frame to the plastic casing, can inadvertently block or absorb the WiFi signal.
Add to this the complexities of your home environment. Walls, especially those constructed from concrete or brick, are notorious signal killers. Appliances, like microwaves, and other electronic devices, such as cordless phones or Bluetooth peripherals, further contribute to interference, crowding the already congested 2.4 GHz and 5 GHz frequency bands used by most WiFi routers. The result? Lagging connections, slow download speeds, and the maddening buffering wheel.
Unveiling the Solution: The Surprisingly Simple DIY Antenna
We are about to reveal a DIY project that leverages the principles of antenna design to provide a significant boost to your laptop's WiFi reception. This antenna relies on readily available materials, can be constructed with basic tools, and requires no prior knowledge of electronics. Prepare to be amazed by its simplicity and effectiveness!
Materials You'll Need:
- A USB WiFi Adapter (with an external antenna port): Not all laptops have external antenna ports, but many modern ones do. This is the key to the whole project. Make sure your laptop uses an external USB WiFi adapter.
- Copper Wire: Approximately 22 gauge copper wire will work best. You could purchase bare wire from the hardware store. About 10 feet will be plenty.
- A Ruler or Measuring Tape: Accurate measurements are essential for optimal performance.
- Wire Cutters/Strippers: To cut and strip the wire.
- Electrical Tape: For insulation and securing the antenna.
- A Soldering Iron and Solder (Optional): For a more permanent and robust connection, soldering is recommended. If soldering, ensure you have proper soldering safety equipment.
- An RP-SMA Connector (Optional): The RP-SMA connector will connect your adapter.
Step-by-Step Construction: Building Your WiFi-Boosting Antenna
- Preparation is Key: Identify the antenna port on your USB WiFi adapter. This may be a small, threaded connector, typically RP-SMA (Reverse Polarity SMA), and it will become the focal point of this project. Remove any small antenna that came with the adapter.
- Measure and Cut the Wire (Yagi-Uda Design): This is the heart of the antenna, and precise measurements are critical. We will be creating a simplified directional antenna, using the Yagi-Uda principles.
- The Reflector: Cut a piece of copper wire to a length that's roughly 5% longer than the antenna, which operates on the frequency of 2.4 GHz or 5 GHz. The length will vary by the antenna but measuring the original antenna gives you a good base.
- The Driven Element: Cut a piece of wire to a length that's roughly the same length as antenna for the 2.4 GHz or 5 GHz WiFi band.
- The Director: Cut several pieces of wire to the same length as the antenna, and gradually decrease the length as you move towards the end of the antenna. This creates a beam effect that directs the signal.
- Construct the Antenna Elements: Arrange the elements along a support beam. You can use a piece of plastic, wood, or even cardboard for this purpose.
- Place the driven element in the center of the beam.
- Space the reflector approximately ¼ wavelength behind the driven element.
- Space the directors in front of the driven element, with some space in between.
- Connect the Elements:
- If soldering, solder the antenna wire from the adapter directly to the driven element. Solder is perfect for a long-lasting and consistent connection. Be very careful to avoid any shorts.
- If not soldering, crimp the wire ends with an appropriate tool.
- Insulate and Secure Everything: Carefully wrap all exposed wire connections with electrical tape to prevent shorts and ensure a stable connection. Secure the elements to your support beam using tape or another suitable method. The goal is a structurally sound antenna. This ensures the longevity of the antenna.
- Attach and Test: Plug the RP-SMA connector of your new antenna into the antenna port of your USB WiFi adapter, and insert the adapter into your laptop.
- Optimize Position: Experiment with positioning your DIY antenna. Rotate the antenna, aiming it towards your router. The Yagi-Uda design is directional, meaning you need to point it towards your router for optimal signal reception.
Troubleshooting and Enhancements
- Signal Still Weak? Double-check all your connections for any shorts or loose wires. Ensure your antenna is properly aligned with your router.
- Soldering Woes? If you're uncomfortable with soldering, consider seeking help from a friend who is experienced.
- Material Considerations: Experiment with different materials. Different thicknesses of wire or the materials you chose for your support beam can affect performance.
- Professional Advice: Remember that if you're not comfortable with building electronics, seek professional advice.
The Shocking Truth: Why This DIY Antenna Works
This DIY antenna works by exploiting the principles of antenna design. The copper wire elements are carefully sized and positioned to resonate at the WiFi frequency, effectively capturing and amplifying the radio waves emitted by your router. The directional design focuses the signal, improving signal strength and reducing interference. The design we've provided is a simplified version. You can experiment to find the optimal configuration for your environment.
Beyond the DIY: Other Factors for Improved WiFi
While this DIY antenna provides a significant boost, it's crucial to consider other factors that impact WiFi performance.
- Router Placement: Position your router in a central, elevated location, free from obstructions.
- Channel Congestion: Use a WiFi analyzer app on your smartphone or laptop to identify the least congested WiFi channels in your area. Change your router's channel accordingly.
- Router Firmware: Regularly update your router's firmware to ensure optimal performance and security.
- Router Upgrades: If you're still struggling, consider upgrading your router to a more modern model with a stronger signal and advanced features.
Final Thoughts: Unlock the Power of WiFi!
With just a few readily available materials and minimal effort, you can create a DIY antenna that dramatically improves your laptop's WiFi reception. Say goodbye to dead zones, buffering, and frustrating lag. This simple project empowers you to take control of your wireless connection, all without breaking the bank. So grab your supplies, follow the steps, and prepare to be shocked by the performance gains!
