how to turn on wifi on windows vista laptop
Title: How to connect Windows Vista to your wireless network
Channel: NetComm
How to connect Windows Vista to your wireless network by NetComm
Unlock Your Vista Laptop's WiFi: The Secret Trick You NEED!
Vista WiFi Woes? Conquer That Connection!
Remember those early days of laptops? The clunky designs and the promise of wireless freedom? Ah, the Vista era! It was a mixed bag, wasn't it? If you’re still clinging to your Vista laptop, you might be battling the WiFi demons. Don’t despair! Getting your WiFi working is possible. This article will show you a trick. It’s one you need to know. We're going to unlock your Vista’s WiFi potential.
The Frustration is Real: Vista and Wireless Connectivity
Let’s be honest: Vista could be… temperamental. Therefore, WiFi issues are a common problem. The struggles ranged from intermittent drops to complete connection failure. It could leave you pulling your hair out. You want to browse the internet, but you're facing a dead end. It’s frustrating, especially when you just want to check your email! So, you start troubleshooting and hit a roadblock. Many users blamed outdated drivers. Others blamed the wireless adapter. Still more blamed Vista itself! But, there's hope.
Unveiling the Hidden Solution: The Wireless Zero Configuration Service
Here’s the secret: the Wireless Zero Configuration (WZC) service. It’s a powerful tool. It manages your WiFi connections. It’s an essential component of your network setup. Sometimes, however, it needs a nudge. Sometimes, it stops working as it should. As a result, your laptop stays disconnected. Finding it, restarting it, and ensuring it's running is your first step.
Diagnosing the Problem: Is WZC the Culprit?
First, let’s confirm the problem. Are you seeing the "No Internet Access" message? Does your WiFi icon show a limited connection? The first action should be checking the WZC service. Locate the services section in your Control Panel. Or, you can use the search bar. Type "services" and open the Services app. Scroll until you find "Wireless Zero Configuration." Its status might be "Stopped." It could also be running but malfunctioning. So, keep an eye on the status.
The Reboot Remedy: Restarting the WZC Service
If WZC is stopped, restart it! Right-click on "Wireless Zero Configuration." Then, select "Restart." If it's already running, try restarting it anyway. Right-click it again. Select "Restart" directly. Wait a moment. The service will reboot. Then, see if your WiFi now connects. Sometimes, a simple restart is all it needs. You must ensure that it's set to start automatically. Double-click on "Wireless Zero Configuration". Check the “Startup type.” Choose "Automatic" if it's not already. Click "Apply" and then "OK".
Driver Dilemmas: Updating Your Wireless Adapter
Sometimes, the answer is more complex, however. Outdated drivers can cause havoc. Consequently, you'll need to update your wireless adapter drivers. Open the Device Manager. You can find it by searching in the Start menu. Look for "Network Adapters." Expand this section. Right-click on your wireless adapter. Select "Update driver." Choose "Search automatically for drivers." If this fails, you can try to manually update them from the manufacturer’s website. Download and install the latest drivers for your specific wireless adapter.
Network Nuisances: Checking Your Security Settings
Furthermore, examine your network security settings. Vista laptops can sometimes struggle with newer security protocols. They might have compatibility issues, in fact. Double-check the security settings on your router. Ensure your network is broadcasting in a compatible format. Try a WPA or WPA2 security setting. It often works best. Older laptops don't always play nicely with the newest methods.
The IP Address Adventure: Static vs. Dynamic
In addition, consider your IP address configuration. By default, your laptop usually uses a dynamic IP. Your router assigns it automatically. If you’re still struggling, you might need a static IP. This is more advanced, but it can work. In your network adapter settings, change the “Obtain an IP address automatically” option to “Use the following IP address.” Then, manually enter an IP address. You'll also need to set a subnet mask, gateway, and DNS servers. Always consult your router’s documentation.
Troubleshooting Tactics: Resetting the TCP/IP Stack
Another trick is to reset your TCP/IP stack. Your TCP/IP stack manages how your computer communicates. Open Command Prompt. Type "netsh winsock reset" and press Enter. Then, type "netsh int ip reset" and press Enter. After doing that, restart your computer. This can clear up underlying network issues.
Final Thoughts: Staying Connected with Your Vista Laptop
These steps will help you. You can revive your Vista’s WiFi connection. Don’t let internet problems get you down. Patience and persistence are key. Troubleshooting is a process. Thus, you may need to try multiple approaches. Remember, there are still resources available. Online forums offer excellent support. With the correct knowledge, you can make your Vista laptop a useful tool.
Laptop Wifi Calling: Ditch Your Phone, Embrace Freedom!Unlock Your Vista Laptop's WiFi: The Secret Trick You NEED!
Hey tech adventurers! Remember those trusty steeds of a bygone era – the Windows Vista laptops? They might be old timers now, but they still hold a special place in many of our hearts (and maybe, just maybe, nestled away in a drawer somewhere!). But let’s face it, getting those older machines connected to the internet can sometimes feel like you're trying to crack a particularly stubborn digital safe. The good news? We're here to bust that safe wide open! We're talking about unlocking your Vista laptop's WiFi connection, and we've got the secret trick you absolutely need.
1. The Vista WiFi Woes: Why Is Connecting So Tricky?
Think of your Vista laptop as a classic car. Beautiful, reliable in its day, but sometimes requires a bit of TLC to get going. Specifically, when it comes to WiFi, we often encounter issues like: dropped connections, slow speeds, or the dreaded "no networks found" message. It can be incredibly frustrating, especially when you just want to check your email or watch a quick YouTube video. The underlying factors? Often outdated drivers, security settings that are a little… well, outdated, and a general lack of compatibility with modern WiFi standards. It’s like trying to fit a square peg (your Vista) into a round hole (today’s WiFi networks).
2. Checking Your Hardware: Is Your WiFi Card Even Alive?
Before we dive into the nitty-gritty, let's make sure your WiFi card is actually, well, working. This is like checking the engine before you try to drive a car. To do this:
- Click the Start button.
- Type "Device Manager" into the search bar and open it.
- Look for "Network Adapters." Expand this section by clicking the arrow next to it.
- See your WiFi adapter listed? Great! If you see a yellow exclamation mark next to it, it means there's a driver problem. If it's entirely missing, you might have bigger hardware issues…but don’t panic! We'll address potential driver problems later.
3. The Driver Dilemma: The Real Culprit Behind Connectivity Crumbles
Drivers are the software instructions that allow your laptop's internal components to communicate with your operating system. Think of them as the translators between your hardware and your software. If your WiFi adapter's driver is outdated or corrupted, it's like trying to have a conversation in a language nobody understands. That's where the connectivity chaos begins.
4. The Secret Weapon: Updating Your WiFi Driver (The Easy Way!)
Here's the magic bullet: updating your WiFi driver. There are a few ways to do this. And trust me, it's much easier than deciphering ancient hieroglyphics.
Using Device Manager (Again!): Right-click on your WiFi adapter in Device Manager (as we found in the first steps!) and select "Update driver." Choose "Search automatically for drivers." Windows will attempt to find and install the latest drivers automatically. This is your first port of call.
Manufacturer's Website: If the automatic update fails, head to the manufacturer's website (e.g., Intel, Broadcom) to download the latest drivers for your specific WiFi adapter model and Windows Vista. This is your backup plan.
Manual Installation: Download the driver file. Double-click the downloaded file and follow the on-screen instructions to install the driver. Restart your laptop after installation.
5. Security Settings Shenanigans: WEP, WPA, and the WiFi Alphabet Soup
Your WiFi network uses security protocols to protect your data. Older Vista laptops were designed for older protocols. If your router uses a more modern (and secure) protocol, your Vista might struggle to connect. The key here is understanding what encryption your router uses.
- WEP: This is the ancient, rickety old protocol. Avoid it if possible. Consider it the horse-drawn carriage of WiFi security – it's charming but slow and vulnerable.
- WPA/WPA2: These are far more secure and a better starting point. It is the current standard.
- WPA3: The latest and greatest, but probably not compatible with Vista.
You'll need to access your router's settings (usually through its web interface, by typing in it's IP address) to adjust your security settings. Switching your router to WPA/WPA2 (with a strong password!) will often resolve connection issues.
6. The Router Reboot: A Digital Reset Button
Sometimes, the simplest solutions are the best. Before you tear your hair out, try rebooting your router. Think of it as a digital reset button. Unplug your router and modem for about 30 seconds, then plug them back in. This often clears up temporary glitches that might be preventing your Vista laptop from connecting.
7. Troubleshooting Tips: When Things Still Don't Work
Okay, so you've tried the above, and still no joy? Don’t give up! Here are some extra troubleshooting steps:
Check the Physical WiFi Switch: Many laptops have a physical switch (often on the side or front) to enable or disable WiFi. Make sure it's switched on. It sounds silly, but it’s a common problem.
Firewall Interference: Your firewall might be blocking the connection. Temporarily disable your firewall to see if that's the issue (but don't forget to turn it back on afterward!).
Antivirus Conflicts: Occasionally, your antivirus software might interfere with your WiFi connection. Try temporarily disabling the antivirus to see if that makes a difference.
Network Reset: In Vista, open the Command Prompt (search for cmd, right-click and run as administrator) and try the following commands, typing each and pressing Enter:
netsh winsock resetnetsh int ip reset- Restart your computer.
8. Signal Strength Savvy: Location, Location, Location!
WiFi signal strength is another crucial factor. Just like a radio signal, the farther you are from your router, and the more walls and obstacles in between, the weaker the signal gets.
- Move Closer to the Router: This is the simplest solution. Literally, bring your laptop closer!
- Minimize Obstructions: Walls, appliances, and even large metal objects can interfere with the signal. Try to position your laptop in a clearer area.
- External Antenna (If Possible): Some Vista laptops have external antenna ports. If yours does, consider investing in an external antenna for a stronger signal.
9. The Power Saving Predicament
Vista has power-saving features that, while designed to conserve battery life, can sometimes interfere with your WiFi connection.
- Check Power Management Settings: In Device Manager, right-click on your WiFi adapter, and go to "Properties." Then, go to the "Power Management" tab. Uncheck the box that says "Allow the computer to turn off this device to save power."
10. The Secret Trick: Manually Configuring Your WiFi Connection
Sometimes, Vista struggles to automatically find and connect to networks. Here's a workaround – manually configuring your WiFi connection:
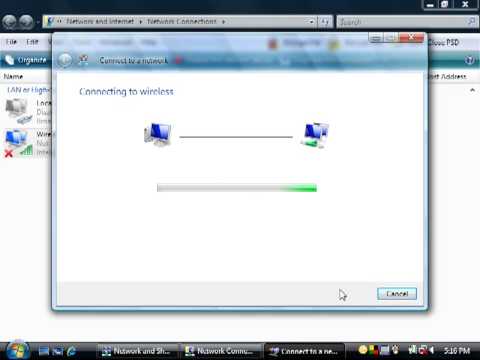
- Open Network and Sharing Center: Click the network icon in your system tray (bottom right corner of your screen) and select "Open Network and Sharing Center."
- "Manage wireless networks." Open this option.
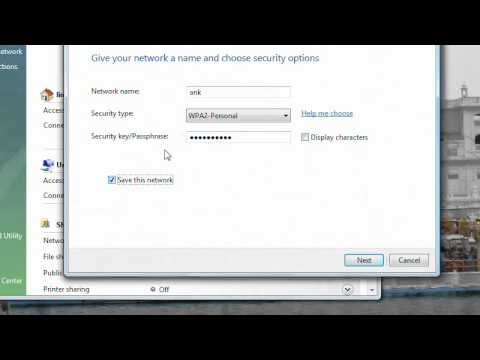
- Add a Connection: Click "Add." Select "Manually create a network profile."
- Enter Your Network Details: Enter your network name (SSID), security type (WPA2-Personal, for example), security key (your WiFi password), and choose "Start this connection automatically."
11. Wireless Network Adapter Issues: Addressing Adapter-Specific Problems
While we've covered general troubleshooting, sometimes, your specific wireless network adapter might have its quirks.
Consult Your Adapter's Manual: Search online for a manual specific to your adapter model. This often provides helpful, adapter-specific tips.
Check for Known Issues: Search online forums or tech support sites for your adapter model. You might find solutions for known issues specific to that adapter.
Reinstall the Wireless Network Adapter: Sometimes, simply uninstalling and reinstalling your wireless adapter in Device Manager can solve connection issues.
12. Compatibility Conundrums: The Modern World vs. Vista
Let’s be honest, your Vista laptop is a vintage beauty. The modern world is not always so accommodating. Some modern WiFi routers use standards (like 802.11ac or 802.11ax) that your Vista adapter might not fully support.
- Consider a Router Upgrade: If you have a very old router, it might not be compatible. Upgrading to a more modern router can sometimes solve compatibility issues.
- External WiFi Adapter: If your laptop’s internal WiFi adapter is truly ancient, consider a USB WiFi adapter. These are inexpensive and can provide a faster, more reliable connection.
13. The DNS Dilemma: Resolving Website Address Issues
The Domain Name System (DNS) translates website names into IP addresses. Sometimes, your DNS settings might be causing connection problems.
- Change Your DNS Servers: In Network and Sharing Center, click "Change adapter settings." Right-click on your WiFi
How to Connect Windows Vista to Home Network

By ExpertVillage Leaf Group How to Connect Windows Vista to Home Network by ExpertVillage Leaf Group
Windows Vista How to connect to the Internet

By How-To Guide Windows Vista How to connect to the Internet by How-To Guide
Microsoft Windows Vista Cannot Find Any Additional Wireless Networks - Detailed Tutorial
By Andrews Roy Microsoft Windows Vista Cannot Find Any Additional Wireless Networks - Detailed Tutorial by Andrews Roy
Title: Turn your windows vista into wifi hotpsot
Channel: Ankit bhatia
Turn your windows vista into wifi hotpsot by Ankit bhatia
Laptop Working
Unlock Your Vista Laptop's WiFi: The Definitive Guide to Seamless Connectivity
We've all been there: staring at a blank screen, the dreaded "no internet connection" message mocking our attempts to browse, work, or simply stay connected. If you're a user of a Vista laptop, this frustrating reality can become even more poignant, as the operating system, while once cutting-edge, now requires a bit more finesse to maintain a strong, reliable WiFi connection. Forget the generic troubleshooting steps. We're diving deep into the core of Vista's wireless capabilities, offering a comprehensive guide to ensure you're always connected.
Understanding Vista's Wireless Landscape: Key Components
Before we begin troubleshooting, it's best to understand the key elements at play. Vista, like any operating system, relies on a complex interplay of hardware and software to establish a WiFi connection.
- The Wireless Network Adapter: This is your laptop's crucial bridge to the wireless world. It's the physical hardware, the antennae, and chipset, which translates radio signals into data the computer can understand. Vista's compatibility with these adapters varies, so understanding the specific model installed on your laptop is crucial.
- The Wireless Driver: This is the software that allows your Vista laptop to communicate with and control the wireless network adapter. Drivers are essential; they're the interpreters allowing the operating system to understand the hardware. Outdated or corrupted drivers are a leading cause of WiFi connectivity issues.
- The Wireless Network Configuration: This is where you define the parameters of your connection: the Service Set Identifier (SSID) of the network (the network's name), the security type (WEP, WPA, WPA2), and the security key (the password). Incorrect configurations will prevent a successful connection.
- The Router (or Access Point): The physical box that transmits the wireless signal. Its settings (channels, security protocols) must align with your laptop's configuration for seamless communication.
- The Network Stack: A series of software layers that manage the flow of network traffic. Issues within the network stack can silently cripple connectivity.
Diagnosing the WiFi Dilemma: A Systematic Approach
The key to solving WiFi problems is a systematic approach. Avoid random, scattershot solutions. Instead, follow these steps, each designed to pinpoint the source of the issue.
Step 1: Verify Physical Connections and Hardware Status
Often, seemingly complex problems have simple solutions. Begin by ensuring your WiFi adapter is enabled.
Check the Physical Switch: Many Vista laptops have a physical switch, often located on the side or front of the laptop, to enable or disable the wireless adapter. Ensure the switch is set to "On."
Visual Inspection: Look for a dedicated WiFi indicator light, usually on the front of the laptop or near the power button. If the light is off or a different color than usual, it signals a problem. Refer to your laptop's manual for the meaning of various light colors.
Device Manager Check: Open Device Manager. To do this, click on the Start Menu, right-click on "Computer," and select "Manage." Navigate to "Device Manager" in the left-hand pane. Expand "Network adapters." Do you see your wireless adapter listed? If it has a yellow exclamation point or a red "X," it indicates a problem.
- If there is a yellow exclamation point, the driver has an error code.
- If there is a red "X", the adapter is disabled.
Step 2: Driver Integrity: The Cornerstone of Connection
Outdated or corrupted drivers are the silent killers of WiFi connectivity. Updating or, if necessary, reinstalling the network adapter driver is a critical step.
- Identify Your Adapter: In Device Manager (as mentioned in Step 1), note the exact make and model of your wireless network adapter. If you are unsure, right-click the device and select "Properties" to see its information.
- Driver Update: Visit the laptop manufacturer's website. Search for the drivers specifically for your Vista laptop model and wireless adapter. Download the latest driver. Install the driver, following the manufacturer's instructions.
- Driver Rollback: If a recent driver update caused the problem, you can roll back to a previous version. In Device Manager, right-click the adapter, select "Properties", go to the "Driver" tab, and click "Roll Back Driver." This returns you to a prior, potentially more stable version.
- Driver Reinstallation: If a driver update or rollback doesn't help, try uninstalling and reinstalling the driver. In Device Manager, right-click the adapter and select "Uninstall." Restart your computer, and Vista should automatically attempt to reinstall the driver. If not, manually install the driver using the downloaded file from the manufacturer's website.
Step 3: Network Configuration Refinement
Ensure your network settings are correctly configured. Incorrect settings can lead to connection failures.
- Verify SSID and Security Key: Double-check that you are entering the correct network name (SSID) and the corresponding security key (password). Case sensitivity matters. You can usually find these details on your router or in your router's settings.
- Security Protocol Compatibility: Vista may have compatibility issues with modern security protocols. Try changing your router's security protocol to WPA2-AES or WPA-TKIP. Note: Experimenting with these settings in your router means that all devices may not be compatible.
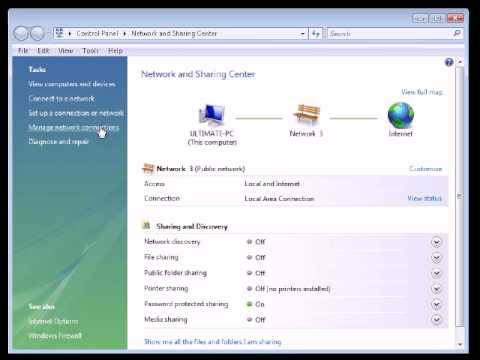
- IP Address Settings: Access your network connection settings. Right-click the WiFi icon in the system tray (lower right corner), select "Open Network and Sharing Center," then click "Manage wireless networks." Right-click your network and select "Properties." Ensure "Obtain an IP address automatically" and "Obtain DNS server address automatically" are selected. This allows your computer to obtain the appropriate network settings from the router automatically.
Step 4: Router-Side Troubleshooting – The Other Half of the Equation
Your Vista laptop isn't the only device responsible for internet connection. Your router plays a very important role.
- Router Reboot: A common but often effective solution. Power off your router for 30 seconds, then power it back on. This resets the router and clears cached data.
- Channel Optimization: Wireless routers broadcast on different channels. Interference from other devices or networks can disrupt your connection. Access your router's settings (usually through a web browser by typing the router's IP address – often 192.168.1.1 or 192.168.0.1) and experiment with different channels. Use a WiFi analyzer app on another device (like a smartphone) to identify the least congested channels.
- Firmware Updates: Outdated router firmware can cause compatibility issues. Check your router manufacturer's website for firmware updates. Always follow the manufacturer's instructions for firmware updates meticulously.
- Router Location: Ensure your router is centrally located and free from physical obstructions. Thick walls, metal objects, and microwave ovens can weaken the WiFi signal.
Step 5: Advanced Troubleshooting: Delving Deeper
If the above steps fail, try these more advanced techniques.
- Network Reset: Resetting the network settings can occasionally solve stubborn connectivity issues. Open the Command Prompt as an administrator (search for "cmd" in the Start Menu, right-click "Command Prompt," and select "Run as administrator"). Then, type the following commands, pressing Enter after each one:
netsh winsock resetnetsh int ip resetipconfig /releaseipconfig /renewipconfig /flushdnsRestart your computer after running these commands.
- Firewall Interference: Occasionally, Vista's built-in firewall or third-party firewalls can block network connections. Temporarily disable your firewall (or create an exception for your wireless adapter) to see if it resolves the issue. Remember to re-enable the firewall after testing.
- Power Management Settings: Windows Vista's power management settings can sometimes cause issues related to how your wireless adapter is behaving. In Device Manager, find your wireless adapter, right-click it, select "Properties," and go to the "Power Management" tab. Uncheck "Allow the computer to turn off this device to save power."
- Check for Malware: Malware can interfere with network connections. Run a full scan with a reputable antivirus program.
Maintaining a Strong Connection: Best Practices for Vista
To ensure a smooth WiFi experience, consider the following best practices:
- Regular Driver Updates: Regularly check for updated drivers from your laptop manufacturer's website.
- Protect Your Network: Use strong passwords and enable WPA2 or WPA3 security on your router.
- Limit Wireless Interference: Reposition your router away from potential sources of interference.
- Regular Router Reboots: Reboot your router periodically to maintain optimal performance.
- Monitor Connection Strength: Keep an eye on the WiFi signal strength indicator in the system tray. If the signal is weak, move closer to the router or take steps to improve coverage.
Final Thoughts: Reclaiming Seamless WiFi
WiFi connectivity issues can be frustrating, but by understanding the components involved, adopting a structured troubleshooting approach, and practicing proactive maintenance, you can restore and maintain a reliable WiFi connection on
