compartir wifi desde mi laptop cmd

Title: . crear una zona Wi Fi con cmd
Channel: Soluciones en 2 minutos
. crear una zona Wi Fi con cmd by Soluciones en 2 minutos
Unlock Your Laptop's WiFi Hotspot in SECONDS! (CMD Trick)
Unleash Your Laptop's WiFi: The Speedy CMD Secret
Ever needed a quick WiFi hotspot on the fly? Forget complicated setups! This method utilizes a hidden power. It is surprisingly fast. You can transform your laptop into a personal WiFi hub. This secret lies within the Command Prompt. Let's dive right in.
The Command Prompt: More Than Meets the Eye
Many see the Command Prompt as a relic. It is a tool often associated with tech gurus. However, it packs immense power. It lets you control your system at a fundamental level. It's a gateway to many hidden functions. One such function is the ability to create a WiFi hotspot. This is simpler than you think.
Setting the Stage: Preparation is Key
Before we begin, ensure something. You must have a laptop with WiFi capabilities. You should also have administrative privileges. You should also have a stable internet connection. Keep those things in mind. These are simple pre-requisites. Let's get started quickly.
Step 1: Summoning the Command Prompt
First things first. You need to open the Command Prompt. The easiest way is a quick search. Type "cmd" into your Windows search bar. Right-click on "Command Prompt." Then, select "Run as administrator." This is crucial for success. This grants the necessary permissions.
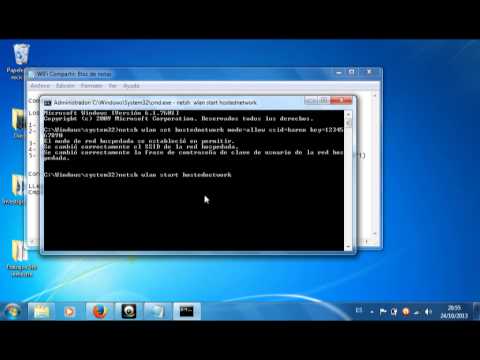
Step 2: The Magic Command: Creating the Hotspot
Now, the fun part begins! Type the following command into the Command Prompt.
netsh wlan set hostednetwork mode=allow ssid="YourNetworkName" key="YourPassword"
Replace "YourNetworkName" with your desired network name. Then, replace "YourPassword" with something secure. Don't worry, this is a one-time setup. Hit Enter. You've just created your virtual hotspot!
Step 3: Activating Your WiFi Hotspot
You've set the stage, but you need to turn it on. Next, type this command in the Command prompt:
netsh wlan start hostednetwork
Press Enter. And there you have it! Your laptop is now broadcasting a WiFi signal. Note the network name and password. You will use this to connect your devices.
Step 4: Connecting Your Devices
Grab your phone or tablet. Scan for available WiFi networks. You should see your network name appear. Enter the password you chose. Connect. You are now sharing your internet connection. It is that easy.
Troubleshooting: Smooth Sailing Ahead
Encountering issues? Don’t panic! Common problems are easily fixed. Therefore, first, check your internet connection. Ensure you have an active connection. Also, double-check the commands you typed. Typos can cause problems. If issues persist, restart your computer. This often solves the issue. Restarting can refresh the settings.
Beyond the Basics: Customization and Control
You can further customize your hotspot. The Command Prompt offers more control. For instance, you can view connected devices. You can also monitor data usage. Explore the "netsh wlan" commands. You can discover more possibilities.
Why This Method Wins: Speed and Simplicity
So, why use this method? In short, it's fast. It's incredibly straightforward. It bypasses the need for third-party software. It's readily available on almost all Windows laptops. It's a hidden gem. This is a fantastic solution for on-the-go connectivity.
Security First: Keeping Your Hotspot Safe
Security is vital. Choose a strong password. This safeguards your network. Regularly change your password. This prevents unauthorized access. Be mindful of public networks. Protect your data always.
The Takeaway: WiFi Freedom at Your Fingertips
You now have the power. You can create a WiFi hotspot in seconds. It's a simple trick. However, it's incredibly useful. Enjoy the freedom of instant WiFi access. It works anywhere, anytime, on your terms. So go forth and connect confidently!
Unlock Your Laptop's Wi-Fi: The Secret Trick You NEED To Know!Unlock Your Laptop's WiFi Hotspot in SECONDS! (CMD Trick)
Alright, tech adventurers! Ever been in a situation where you desperately needed to share your internet connection but didn't have access to a dedicated Wi-Fi router? Maybe you’re at a friend's place whose Wi-Fi is spotty or you're stuck in a café with a terrible connection and you've got a crucial presentation to deliver? We've all been there. The good news? Your laptop is a secret weapon, a Wi-Fi hotspot powerhouse ready to be unleashed. And the even better news? We're not talking about complicated software or lengthy setup processes. We're talking about a ridiculously easy trick – leveraging the Command Prompt (CMD) – to get your laptop acting as a Wi-Fi hotspot in a matter of seconds. Prepare to be amazed!
1. The Wi-Fi Hotspot Revelation: Why Your Laptop Already Has the Superpower
Think of your laptop as a meticulously crafted Swiss Army knife. It's got all sorts of hidden tools just waiting to be deployed. One of these often-overlooked tools is its ability to become a Wi-Fi hotspot. Essentially, your laptop can broadcast its internet connection (whether it's from Wi-Fi, Ethernet, or mobile data) allowing other devices – phones, tablets, other laptops – to connect and share the connection. It's like having a portable, personal Wi-Fi router, ready when you need it. Why isn't this common knowledge? That, my friend, is a question for the tech gods. But we are here to demystify the process.
2. Decoding the CMD: Your Gateway to Wi-Fi Hotspot Nirvana
Forget those clunky, often-expensive software programs. We're going straight to the source: the Command Prompt. Think of CMD as your laptop's secret language interpreter. It lets you communicate directly with the operating system, giving you granular control over various functions. This is where the magic happens for setting up your hotspot. It’s like learning a simple spell that unlocks a hidden power!
3. Step-by-Step: CMD Command - Your Hotspot Recipe
Don't worry, this isn't some complex coding exercise. We're talking about a few simple commands that even your grandma could (and probably should) learn. Here's the blueprint:
Step 1: Fire Up CMD – The Portal: Search for "cmd" in your Windows search bar (or press Windows key + R, type "cmd," and hit Enter). This will open the Command Prompt window. You'll see a black screen staring back at you, ready for your commands. This is where the transformation begins.
Step 2: The First Incantation – The Setup Command: Now, type the following command and press Enter. This command essentially sets up your virtual Wi-Fi adapter and defines the network name (SSID) and password.
netsh wlan set hostednetwork mode=allow ssid="YourHotspotName" key="YourPassword"Replace
"YourHotspotName"with the name you want your hotspot to have (e.g., "MyLaptopHotspot"). Make it memorable or funny! Replace"YourPassword"with a strong password (at least 8 characters). Think of this as setting the magic password to open the door.Step 3: The Activation Spell – Start the Hosted Network: Next, type and press Enter:
netsh wlan start hostednetworkThis command activates the hosted network you just created. Boom! You've essentially flicked the switch and turned on your hotspot.
Step 4: The Sharing Charm – Enabling Internet Connection Sharing: This is the final, crucial step. Go to your Network Connections settings. You can do this by searching for "Network Connections" in the search bar or by right-clicking on the Wi-Fi icon in your system tray and selecting "Open Network & Internet settings."
- Find the adapter you're using to connect to the internet (Wi-Fi or Ethernet).
- Right-click on it, select "Properties."
- Go to the "Sharing" tab.
- Check the box that says "Allow other network users to connect through this computer's Internet connection."
- Select your newly created hosted network (the one you just started in CMD) from the drop-down menu. Click "OK." This part is like saying, "Okay, internet, share with the others!"
4. Troubleshooting Troubles: When Things Go Awry
Did something go wrong? Don't sweat it! Sometimes, the tech gods like to play tricks. Here are a few common issues and their solutions:
"The hosted network couldn’t be started" Issue: This can be fixed by ensuring your network adapter drivers are up to date. Go to Device Manager (search in the Windows search bar), expand "Network adapters," right-click on your Wi-Fi adapter, and select "Update driver."
Internet Not Sharing: Double-check the "Sharing" settings mentioned in Step 4. Make sure the right network adapter and hosted network are selected. Sometimes, a simple restart of your laptop can also do the trick.
Password Doesn't Work: Ensure your password is strong enough (at least 8 characters). Double-check that you’re entering it correctly on the connecting devices.
5. The Shutdown Sequence: Turning Off the Hotspot
When you're done sharing your internet, it’s important to turn off your hotspot to save battery life and security. Fortunately, shutting it down is just as easy as starting it:
Open CMD (as an administrator).
Type and press Enter:
netsh wlan stop hostednetworkThis command disables the hosted network. You can also disable the "Sharing" settings to prevent accidental connections.
6. Security First: Password Protection is Essential!
Your Wi-Fi hotspot is just that: a hotspot. Think of it as an open invitation to your internet connection. Therefore, never use a weak or easily guessable password. Use a strong, unique password to prevent unauthorized access to your internet and potentially your personal data. Make sure the password is a mix of uppercase and lowercase letters, numbers, and symbols. Imagine your password as the lock on your digital castle.
7. Boosting Performance: Optimizing Your Hotspot for Speed
While the CMD trick is fantastic, you can fine-tune your hotspot's performance. Here's how:
Placement Matters: Position your laptop in a central location for optimal signal coverage. Think of it as placing a beacon in the middle of the room.
Minimize Interference: Keep your laptop away from other electronic devices, which can cause interference, like microwaves or cordless phones.
Know Your Limitations: The speed of your hotspot is often determined by the speed of your original internet connection and the number of devices connected.
8. When to Use Your Laptop Hotspot: The Situations Where It Shines
This CMD trick is a lifesaver in several scenarios:
- Travel Time: Stuck on a train or in a hotel without Wi-Fi? Your laptop to the rescue!
- Emergency Situations: When your home Wi-Fi is down, and you need to stay online.
- Sharing with Friends: Whenever you want to quickly share your internet with friends or family.
9. The Downside: Potential Battery Drain
Like any superpower, there's a catch. Running a Wi-Fi hotspot consumes battery life. Be mindful of your battery level when using this trick, especially if you're away from a power outlet. It's like running a race; you need to pace yourself intelligently.
10. Alternatives Considered: Other Methods Compared to CMD
Sure, there are other ways to create a hotspot, like dedicated software or your smartphone's hotspot feature. However, the CMD method wins because:
- It's built-in and free.
- It's fast and easy to set up.
- No need for additional software installations.
11. Beyond the Basics: Advanced CMD Customization (Optional)
If you're feeling adventurous, you can customize your hotspot further like changing the channel it operates on or configuring other advanced settings. However, the steps we've covered are enough for most users.
12. Safety Measures: Protecting Your Privacy While Hotspotting
When sharing your internet, remember to: (1) Use a strong password. (2) Be aware of the websites your users are accessing. (3) Monitor your data usage.
13. The Future of Hotspots: Mobile Connectivity Trends
As technology advances, mobile connectivity will be even more crucial. Your laptop’s ability to be a hotspot highlights its versatility and underscores how important it is to be connected.
14. Real-World Applications: Stories and Case Studies
I once was stranded in an airport and desperately needed to send an important email. My phone’s hotspot was too slow, but the CMD trick on my laptop saved the day! This simple tool can make all the difference.
15. Conclusion: Unleash Your Laptop's Hidden Power!
So, there you have it! You now have the knowledge to transform your laptop into a Wi-Fi hotspot in a matter
Intel 3x3 WiFi: Blazing-Fast Laptop Wi-Fi You Won't Believe!Compartir internet WIFI con CMD, sin programas...
By Diego1994 Compartir internet WIFI con CMD, sin programas... by Diego1994
Como Compartir Wifi con CMD

By D Myeers Como Compartir Wifi con CMD by D Myeers
CREA UN ROUTER VIRTUAL wifi virtual COMPARTE INTERNET WIFI CMD SIN PROGRAMAS PROGRAMA 2021
By briefrenzo CREA UN ROUTER VIRTUAL wifi virtual COMPARTE INTERNET WIFI CMD SIN PROGRAMAS PROGRAMA 2021 by briefrenzo

Title: Crear un punto de acceso wifi en un equipo con Windows 7
Channel: TECNOpeda
Crear un punto de acceso wifi en un equipo con Windows 7 by TECNOpeda
Laptop Wifi Hotspot
Unlock Your Laptop's WiFi Hotspot in SECONDS! (CMD Trick)
Are you tired of clunky software and complicated interfaces just to share your laptop's internet connection? Do you yearn for a simple, rapid solution that allows you to turn your Windows machine into a WiFi hotspot in a flash? We understand. We've all been there, wrestling with settings and menus, only to be met with frustration. Fortunately, there's a hidden gem, a powerful tool buried within the very heart of your operating system: the Command Prompt. This isn't just a shortcut; it's a streamlined approach that sidesteps the bloat and delivers precisely what you need: an instant WiFi hotspot. Prepare to be amazed.
The Power of the Command Prompt: Your Secret Weapon
Forget complex third-party apps. The Command Prompt, often overlooked, is a potent utility within Windows, ready to be harnessed. It's a direct line to the core functionalities of your system, allowing for precise control and lightning-fast execution. This is where the magic happens, transforming your laptop into a WiFi broadcasting station with just a few carefully crafted commands. Forget lengthy installations and unnecessary processes; with the Command Prompt, the setup is swift and the results are immediate.
Step 1: Initiate the WiFi Hotspot - The Foundation
The first step is to establish the foundation for your WiFi hotspot. Open the Command Prompt as an administrator. This requires a few simple actions. First, navigate to the Windows search bar, usually found near the Start button. Type "cmd" and press Enter. Right-click on the "Command Prompt" result and select "Run as administrator." This is crucial, as standard user privileges won't allow the necessary network modifications.
Once the Command Prompt window appears, type the following command precisely:
netsh wlan set hostednetwork mode=allow ssid="Your Hotspot Name" key="YourPassword123"
Replace "Your Hotspot Name" with the name you want your WiFi hotspot to broadcast. Choose a name that's easy to remember but also unique. Replace "YourPassword123" with a strong, secure password. The password should be at least eight characters long and include a mix of uppercase and lowercase letters, numbers, and symbols.
Carefully review the command for any typos. Once you've confirmed it's accurate, press Enter. The Command Prompt will respond, typically with a confirmation message. If you encounter an error, double-check your syntax, especially the spelling of keywords and the password.
Step 2: Activate the Hosted Network - Broadcasting the Signal
Now that you've configured the settings, it's time to bring your WiFi hotspot to life. In the same Command Prompt window, type the following command and press Enter:
netsh wlan start hostednetwork
This command activates the hosted network, effectively enabling your laptop to begin broadcasting its WiFi signal. If the command executes successfully, your hotspot is now live and ready to receive connections. Observe the status messages in the Command Prompt window.
Step 3: Share Your Internet Connection - Bridging the Gap
You've created a WiFi hotspot, but it won't be of much use if it can't access the internet. The final step is to share your existing internet connection with the newly created hotspot.
Open Network Connections: Press the Windows key + R, type "ncpa.cpl," and press Enter. This opens the Network Connections window.
Identify Your Internet Connection: Locate the network adapter that your laptop is currently using to connect to the internet. This is typically labeled as "Ethernet" (if you're connected via a cable) or "Wi-Fi" (if you're connected wirelessly).
Access the Properties: Right-click on your internet connection and select "Properties."
Navigate to Sharing: Click on the "Sharing" tab at the top of the properties window.
Enable Sharing: Check the box that says "Allow other network users to connect through this computer's Internet connection."
Select Your Hosted Network: In the "Home networking connection" dropdown menu, select the name of your hosted network adapter. It will likely be named similar to "Microsoft hosted network virtual adapter." It might also be "Local Area Connection [number]."
Confirm and Apply: Click "OK" to save the changes.
Your hotspot is now sharing your internet connection. Devices that connect to your hotspot will have access to the internet. This process is essential to ensure devices connected to your hotspot can actually browse the web or access online services.
Troubleshooting Common Issues
Even the most streamlined process can sometimes encounter minor setbacks. Here are solutions to some common issues you may encounter:
"The hosted network couldn't be started.":
- Reason: This indicates a problem with your network adapter or its drivers.
- Solution: Ensure your network adapter drivers are up to date. You can typically update them through Device Manager. Right-click the Start button, select Device Manager, expand "Network adapters," right-click on your network adapter, and select "Update driver." A restart might be needed.
"Access to Internet is not available" on connected devices:
- Reason: This often means you haven't correctly enabled internet connection sharing.
- Solution: Double-check all the steps in "Step 3: Share Your Internet Connection," ensuring the "Sharing" tab settings are correctly configured and that you've selected the correct network adapter.
Can't Connect to the Hotspot or Password Incorrect:
- Reason: Typing errors are the most common culprit when trying to connect to the hotspot.
- Solution: Double-check the SSID (network name) and password you used when setting up the hotspot. Make sure there are no typos in either the SSID or password when you enter them on your connecting device.
Hotspot Disconnecting:
- Reason: The hosted network may be automatically turned off.
- Solution: You can set your laptop to never turn off the network adapter. You can find this option by navigating to "Device Manager", and then find your network adapter, right-click, and then "Properties." Then select the "Power Management" tab and then uncheck "Allow the computer to turn off this device to save power".
Customizing Your Hotspot: Beyond the Basics
While the core steps above are fundamental, you can customize your hotspot for optimal performance and security.
Change the SSID and Password: To change your hotspot's name or password, repeat the commands in Step 1. The network will need to be stopped and started again.
Check the Hosted Network status: You can also get the status of your hotspot by typing
"netsh wlan show hostednetwork". This command displays the hosted network's status, including the SSID, authentication type, and number of connected clients.
Why This Method Excel
This Command Prompt approach offers several distinct advantages over alternative methods:
Speed and Efficiency: It's remarkably fast. No cumbersome software installations or lengthy setup processes; the entire process can be completed in seconds.
Reliability: The Command Prompt directly leverages Windows' core network functionalities, offering a stable and reliable solution.
Control: You have granular control over your hotspot's configuration. You can easily change the SSID and password.
Lightweight: No extra software is installed, which contributes to a cleaner, faster, and leaner system.
Conclusion: Your Seamless WiFi Hotspot Awaits
With this simple CMD trick, transforming your laptop into a WiFi hotspot is no longer a frustrating endeavor. By harnessing the power of the Command Prompt, you gain access to a streamlined, efficient, and reliable solution, bypassing the complexities of third-party software. Follow these straightforward steps, and you'll be sharing your internet connection in seconds, empowering your devices and expanding your digital horizons. Say goodbye to cumbersome software and welcome the simplicity and speed of the Command Prompt. Enjoy your instant WiFi hotspot.
