laptop tidak bisa konek ke wifi windows 8
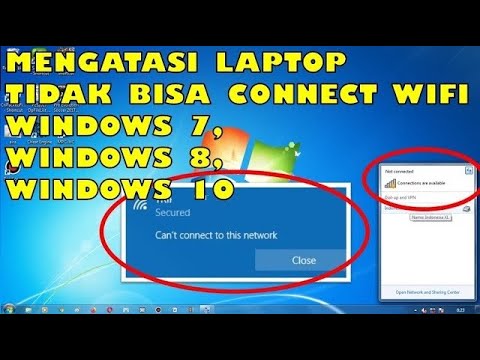
Title: Cara Mengatasi Laptop Tidak Bisa Connect Wifi Windows 10, 8 & 7
Channel: Jari Mungil Rayyan
Cara Mengatasi Laptop Tidak Bisa Connect Wifi Windows 10, 8 & 7 by Jari Mungil Rayyan
Windows 8 Wifi Nightmare? Fix Your Laptop's Connection NOW!
Battling the Wi-Fi Beast: Conquering Windows 8 Connection Chaos
Ah, Windows 8. It arrived with a fanfare but, for many, the reality of Wi-Fi connectivity often morphed into a frustrating, head-scratching experience. You're not alone if you’ve stared at your laptop screen, cursing the elusive internet connection. This article will guide you through the treacherous Wi-Fi terrain and rescue your sanity. So, let's dive in!
The Phantom Network: Recognizing the Symptoms of Wi-Fi Woes
First off, how do you know you've been struck by the Wi-Fi gremlins? The telltale signs are often frustratingly subtle. Perhaps your connection suddenly drops, leaving you stranded in a digital desert. Then, you might experience sluggish browsing speeds, even when your signal strength appears strong. Similarly, websites load at a snail's pace. Moreover, you might find your device frequently "losing" your network. Are you constantly reconnecting? These are all red flags. Subsequently, you're probably ready to throw your laptop through the window. But before you do, take a deep breath.
Diagnosing the Digital Disease: Pinpointing the Root Cause
Identifying the source of your connection woes is crucial. Consequently, you can formulate an effective plan of attack. Let's start with the obvious. Is your router functioning correctly? Check other devices. Do they have a solid internet connection? If not, the problem likely lies with your router or internet service provider. However, if other devices are fine, the problem is likely with your Windows 8 laptop.
Restarting the Engine: A Simple, Yet Effective First Aid
Sometimes, the simplest solutions are the most effective. Consequently, a quick reboot can work wonders. Restart both your laptop and your router. After a few minutes, try reconnecting to your Wi-Fi network; thus, you may have resolved the issue without getting technical. If that doesn't work, don't panic! We have more tricks up our sleeve.
The Driver's Dilemma: Ensuring Compatibility is Key
Outdated or corrupted network adapter drivers can be a major culprit. Therefore, checking for updates is a must. Here's how: Press the Windows key + X, and select "Device Manager.” Then, expand “Network adapters.” Right-click on your Wi-Fi adapter (it might be called something like "Wireless Network Adapter" or "Wi-Fi Adapter"). Select "Update driver." Select either "Search automatically for drivers" or "Browse my computer for driver software." After updating, restart your laptop. Hopefully, with the recent updates, the problems have been fixed.
Power Management's Pitfalls: Optimizing for Performance
Windows 8 (sometimes, sadly) has power-saving settings that can interfere with your Wi-Fi connection. Let's disable them. In "Device Manager," right-click your Wi-Fi adapter again. Select "Properties." Go to the "Power Management" tab. Uncheck "Allow the computer to turn off this device to save power”. Then, press "OK" and restart your laptop. Hence, your Wi-Fi reliability may see significant improvement.
Network Troubleshooter: Your Digital Detective
Windows 8 has a built-in troubleshooter that can often diagnose and fix common network problems. Right-click on the Wi-Fi icon in your system tray (usually in the lower-right corner of your screen). Select "Troubleshoot problems." Follow the prompts, and allow the troubleshooter to apply any suggested fixes. Sometimes, it finds and resolves issues you weren't even aware of.
Advanced Tactics: Exploring the More Technical Realms
If basic troubleshooting doesn't work, you may need to dig a little deeper. Open the "Network and Sharing Center" (search in the Start menu). Click "Change adapter settings." Right-click on your Wi-Fi adapter and select “Properties.” In the “Properties" window, ensure that "Internet Protocol Version 4 (TCP/IPv4)" is checked. Double-click on "Internet Protocol Version 4 (TCP/IPv4)." Make sure "Obtain an IP address automatically" and "Obtain DNS server address automatically" are selected. Click "OK" and close all windows.
The Ultimate Gambit: Resetting Network Settings (Use with Caution!)
As a last resort, you can reset your network settings. It's a more drastic measure. However, it can sometimes resolve persistent issues. However, this will remove any custom network configurations. Open the "Command Prompt" as an administrator (search in the Start menu, right-click, and select "Run as administrator"). Type the following commands, pressing Enter after each line:
netsh winsock resetnetsh int ip resetipconfig /releaseipconfig /renewipconfig /flushdns
Restart your computer after these commands. Hopefully, things will work better now.
Prevention is Key: Building a Stronger Wi-Fi Foundation
Preventing future Wi-Fi problems involves a few simple practices. Regularly update your drivers. Secure your Wi-Fi network with a strong password. Also, keep your router's firmware updated. Doing those things will ensure optimal security. Furthermore, consider using a Wi-Fi analyzer app to pick a less-crowded channel for your router.
Victory Achieved: Reclaiming Your Digital Connection!
By systematically working through these steps, you'll be well on your way to conquering the Windows 8 Wi-Fi beast. Remember, the key is persistence. The internet is vital in modern life. Don't give up. It's time to reclaim your digital freedom and enjoy a seamless online experience!
Laptop WiFi Stick: Blazing-Fast Internet, Anywhere!Windows 8 WiFi Nightmare? Fix Your Laptop's Connection NOW!
Hey there, fellow digital travelers! Ever felt like your laptop is playing hide-and-seek with your Wi-Fi? You know, that frustrating experience where you desperately need to get online, and the internet just…vanishes. If you're nodding your head, especially if you're still rocking Windows 8, welcome to the club! We've all been there, staring at the screen, cursing the unreliable connection. But don't despair! We're diving deep into the Windows 8 Wi-Fi nightmare and equipping you with the tools to reclaim your sanity and your internet access. Think of this as your survival guide, because trust me, resolving those connection issues feels as rewarding as finally finding the last matching sock in the laundry.
1. The Ghost in the Machine: Understanding the Wi-Fi Woes of Windows 8
First things first, let’s acknowledge the elephant in the room (or, in this case, the ghost in your laptop). Windows 8, while innovative in its day, had its quirks. Its network management could be… temperamental, to put it kindly. This wasn’t necessarily a design flaw, but rather a constellation of factors that, unfortunately, often resulted in connection problems. Think of it like a delicate dance – if one dancer (your network card) misses a step, the entire performance (your internet access) suffers. Various components – drivers, settings, and even the router itself – have to sing in harmony. When they don’t, you get the dreaded "limited connectivity" or "no internet access" errors.
2. Diagnosing the Drama: Pinpointing the Source of Your Wi-Fi Woes
Before we start flailing around with fixes, we need to identify where the problem lies. Is it your laptop, your router, or something else entirely? Think of it like being a detective. Here’s how to begin your investigation:
- Check the Obvious: Are other devices connected to your Wi-Fi? If they aren't, the problem is likely with your router or your internet service provider (ISP). If they are, it narrows the focus to your laptop.
- Airplane Mode Assassin: Ensure airplane mode is off. It sounds silly, but sometimes we accidentally flick that switch.
- Restart Reality: Restart your laptop. Seriously. It's the IT equivalent of "Did you try turning it off and on again?" Sometimes, a simple reboot can resolve glitches.
- Router Reboot Ritual: Reset your router. Like your laptop, routers can accumulate bloat and temporary errors. Unplug it for about 30 seconds and plug it back in.
- Signal Strength Savior: Observe your Wi-Fi signal strength icon (the little bars in the system tray). Is the signal strong, weak, or absent? A weak signal can hamper your connection.
3. Driver Dilemma: Updating Your Network Adapter Drivers
Drivers are the little software interpreters that allow your network adapter to "speak" the language of your operating system. If these interpreters are outdated or corrupted, communication breaks down, resulting in connectivity issues. It’s like trying to have a conversation in a language you only partially understand. Updating your drivers is crucial. Here's how, in a nutshell:
- Open Device Manager: Press the Windows key + X, then select "Device Manager."
- Network Adapter Nirvana: Expand "Network Adapters." You’ll see your Wi-Fi adapter listed here (it will probably mention "Wireless" or "Wi-Fi").
- Right-Click and Upgrade: Right-click on your Wi-Fi adapter and select "Update driver." Windows will automatically search for and install updated drivers.
- Manual Magic: If the automatic update fails, you might need to manually download drivers from your laptop manufacturer’s website. Search for your laptop model and download the relevant Wi-Fi drivers.
4. The Security Squad: Examining Your Wi-Fi Security Settings
Sometimes, the problem isn’t your drivers, but the security settings on your router and laptop. Incorrect security protocols can prevent your laptop from connecting.
- Router's Rulebook: Access your router's settings (usually by typing its IP address into your web browser). Check the Wi-Fi security settings. Make sure it's using WPA2-PSK or WPA3-PSK, which are the most secure options. Avoid using WEP, as it's outdated and vulnerable.
- Password Patrol: Double-check your Wi-Fi password. It's easy to mistype a character, especially in the heat of frustration.
- Channel Chaos: Routers broadcast on different channels. If your Wi-Fi signal is congested, try changing the channel in your router's settings. There are apps to help you identify the least congested channels.
5. Troubleshooting Toolkit: Using the Windows 8 Network Troubleshooter
Thankfully, Windows 8, even with its quirks, offers a built-in network troubleshooter. Think of it as your personal IT assistant.
- Right-Click Connection: Right-click on the Wi-Fi icon in the system tray (the little network bars).
- Troubleshoot Troubles: Select "Troubleshoot problems."
- Follow the Wizard: The troubleshooter will scan for and attempt to resolve common network issues. It might suggest fixes like resetting your network adapter or clearing your DNS cache.
6. The Power Plan Puzzle: Adjusting Power Management Settings
Windows power management settings can sometimes interfere with your Wi-Fi connection. They might put your network adapter to sleep to conserve battery.
- Power Plan Pursuit: Open the Control Panel and go to "Hardware and Sound" > "Power Options."
- Plan Selection: Choose your current power plan (e.g., "Balanced" or "Power Saver").
- Advanced Arrangement: Click "Change plan settings" next to your selected plan, then "Change advanced power settings."
- Wireless Adapter Wonderland: Find "Wireless Adapter Settings" and expand it. Set "On battery:" and "Plugged in:" to "Maximum Performance." This will prevent the adapter from being shut down to save power.
7. DNS Dilemma: Flushing Your DNS Cache
DNS (Domain Name System) is like the phone book of the internet. It translates website names into IP addresses. Sometimes, the information in the DNS cache on your laptop can become outdated, causing connection issues.
- CMD Command: Open the Command Prompt as an administrator (search for "cmd" in the Start screen, right-click, and select "Run as administrator").
- Flush the Files: Type
ipconfig /flushdnsand press Enter. This clears your DNS cache. - Reboot Request: Restart your laptop.
8. The IP Address Expedition: Configuring Your IP Settings
Your IP address is your laptop's unique identifier on the network. It's like having a street address on the internet. Sometimes, misconfigured IP settings can cause connection problems.
- Network and Sharing Center: Open the Control Panel, then go to "Network and Sharing Center."
- Adapter Adjustments: Click "Change adapter settings."
- Wi-Fi Wizardry: Right-click on your Wi-Fi adapter and select "Properties."
- IP Protocol Provision: Double-click on "Internet Protocol Version 4 (TCP/IPv4)."
- Automatic or Manual: Make sure "Obtain an IP address automatically" and "Obtain DNS server address automatically" are selected. If you have to use a specific IP address, make sure it is correct for your network.
9. Firewall Fumbles: Checking Your Firewall Settings
Your firewall protects your computer from threats, but sometimes, it can inadvertently block internet access.
- Firewall Fortress: Open the Control Panel, then go to "System and Security" > "Windows Firewall."
- Allowed App Adventures: Select "Allow an app or feature through Windows Firewall."
- Check the Box: Make sure your web browser and any other apps you use to connect to the internet are allowed.
10. The Router Reset Remedy: Factory Resetting Your Router (Last Resort)
If everything else has failed, consider resetting your router to its factory default settings. WARNING: This will erase any custom settings you've made, such as your Wi-Fi password.
- Locate the Button: Find the tiny reset button on the back or side of your router. It is typically recessed and requires a paperclip or similar tool to press.
- Press and Hold: Press and hold the reset button for about 30 seconds. The lights on your router will start blinking.
- Reconfigure Rebirth: Once the router restarts, you'll need to reconfigure it using the default settings (check your router’s manual for the initial username and password and setup process).
11. MAC Address Mayhem: Filtering MAC Addresses (Advanced)
MAC (Media Access Control) addresses are unique hardware identifiers. Some routers allow you to filter MAC addresses, meaning they can only allow certain devices to connect. This is generally a security feature. If your laptop's MAC address is not allowed, it won't connect.
- Router Access: Access your router’s settings.
- MAC Address Mansion: Look for "
Cara atasi WiFi tidak bisa connect di laptop not connected

By ijal tutorial Cara atasi WiFi tidak bisa connect di laptop not connected by ijal tutorial
Cara mengaktifkan wifi di windows 8

By AW Tutorial Cara mengaktifkan wifi di windows 8 by AW Tutorial
Cara Mengatasi Wifi Laptop Tidak Bisa di Aktifkan Windows 8

By LAPTOP TUTORIAL Cara Mengatasi Wifi Laptop Tidak Bisa di Aktifkan Windows 8 by LAPTOP TUTORIAL

Title: Cara Download & Install Driver WIFI & ETHERNET Manual untuk Windows 781011
Channel: inprez id
Cara Download & Install Driver WIFI & ETHERNET Manual untuk Windows 781011 by inprez id
My Laptop Work
Windows 8 Wi-Fi Woes: Conquer Your Laptop's Connectivity Crisis
We've all been there: That frustrating moment when your laptop, supposedly a portal to the boundless digital realm, flatly refuses to connect to the internet. The spinning wheel of despair, the dreaded "limited connectivity" message, the gnawing feeling that you're missing out on something crucial. If you're wrestling with these very demons on a Windows 8 machine, you're not alone. Many users experienced significant Wi-Fi challenges with this operating system, but thankfully, solutions exist. We're not going to simply offer generic advice; we're going to delve deep into the core of the problem and equip you with the tools to reclaim your reliable wireless connection. Prepare to say goodbye to Wi-Fi headaches and hello to seamless online experiences.
Understanding the Root of the Problem: Why Windows 8 and Wi-Fi Clashed
Windows 8, while introducing a host of new features and a revamped user interface, unfortunately, brought with it a share of Wi-Fi connection complications. The implementation of new power management features, driver compatibility issues, and complexities within the network stack itself created a perfect storm for connectivity glitches. These weren't always the fault of your hardware; sometimes, they stemmed from conflicts within the operating system itself. This is where the troubleshooting efforts take shape, and we will address them diligently.
Initial Diagnostics: Uncovering the Hidden Causes of Wi-Fi Failure
Before jumping into advanced fixes, let's perform some initial checks to pinpoint the source of your Wi-Fi troubles. These are quick, simple steps that can often resolve basic connectivity issues:
- Airplane Mode: Ensure Airplane Mode is disabled. A simple toggle in the Action Center, accessed by swiping from the right edge of your screen or by clicking the notification icon, can accidentally cripple your Wi-Fi.
- Physical Switch: Confirm that your laptop has a physical Wi-Fi switch and that it's enabled. While less common these days, some laptops have an external switch (often on the side or front of the device).
- Restart Your Laptop: A classic solution, but surprisingly effective. Restarting your computer can clear temporary glitches and refresh network connections.
- Restart Your Router: The router is the gateway to your internet connection. Unplug your router and modem for at least 30 seconds, and then plug them back in. Allow them time to fully power up before testing the Wi-Fi connection.
- Check the Network Icon: The system tray network icon should display a full connection indicator. The presence of a yellow exclamation mark or a red "X" indicates a problem. Hovering over the icon can provide more information about the error.
- Run the Network Troubleshooter: Windows 8 includes a built-in network troubleshooter capable of identifying some network problems. Right-click on the network icon in the system tray, and select "Troubleshoot problems." Follow the on-screen instructions.
If these fundamental steps fail to resolve the issue, it's time to dig deeper.
Driver Dilemmas: The Cornerstone of Wireless Connection Stability
Outdated, corrupted, or incompatible network drivers are the bane of a stable Wi-Fi connection. These software components act as intermediaries between your Windows 8 operating system and your wireless network adapter. Regularly updating your network adapter drivers is paramount.
- Device Manager: Access the Device Manager by searching for it within the Windows 8 search bar (accessible by swiping down from the top or using the Windows key + W keyboard shortcut).
- Locate Network Adapters: Expand the "Network adapters" category. Look for your wireless network adapter, which will likely be named something like "Intel Wireless-AC 7260" or "Realtek RTL8188CE Wireless LAN 802.11n PCI-E NIC."
- Update Driver: Right-click on your wireless network adapter and select "Update driver software." Choose "Search automatically for updated driver software." Windows 8 will attempt to find and install a driver from its internal database or connect to the internet to locate a suitable driver.
- Manual Update: If the automatic update fails, you can manually download the latest drivers from the manufacturer's website (Intel, Realtek, TP-Link, etc.). Visit the manufacturer's website, search for your specific network adapter model, and download the driver for Windows 8 (if available). Once downloaded, right-click on the driver, choose "Update driver software," select "Browse my computer for driver software," and then point to the location where you saved the downloaded file.
- Roll Back Driver: If a recent driver update has caused issues, you can roll back to the previous driver. In Device Manager, right-click the adapter and select "Properties." Navigate to the "Driver" tab and click "Roll Back Driver."
Power Management Pitfalls: Preventing Unwanted Disconnections
Windows 8, in its quest for efficiency, often aggressively manages power consumption, especially on laptops. This can result in the wireless adapter being disabled to conserve battery life, leading to dropped connections.
- Device Manager Settings: In the Device Manager, right-click your wireless network adapter, select "Properties," and navigate to the "Power Management" tab.
- Disable Power Saving: Uncheck the box that reads "Allow the computer to turn off this device to save power." This prevents Windows from disabling your Wi-Fi adapter indiscriminately.
- Adjust Power Plan Settings: Go to the Control Panel (search for it in the Windows 8 search bar) and select "Hardware and Sound," then "Power Options." Choose your active power plan (e.g., "Balanced," "Power saver"). Click "Change plan settings" for the selected plan and then "Change advanced power settings."
- Wireless Adapter Settings: Expand the "Wireless Adapter Settings" and then "Power Saving Mode." Set this to "Maximum Performance" to ensure your wireless adapter always receives sufficient power. Some systems allow for more specific settings based on battery and AC power.
Advanced Troubleshooting: Diving Deeper into the Network Stack
If the basic troubleshooting steps and driver updates fail, more advanced techniques are required to diagnose and repair the connection issues.
- Network Reset: Windows 8 offers a network reset feature that can address some underlying network configuration issues. Search for "Network Reset" in the Windows search bar and follow the on-screen instructions. This will reset your network settings to their default values, so you will need to re-enter your Wi-Fi password.
- TCP/IP Reset: There is a potential of corruption within the TCP/IP address, causing connectivity problems. Open the command prompt by searching for "CMD" and then right-clicking to open as an administrator. Type
netsh winsock resetthen press Enter. Next, typenetsh int ip resetthen press Enter. Restart your computer after completion. - Flush DNS Cache: The DNS (Domain Name System) cache stores addresses that your computer uses to connect to websites. Over time, this cache can become corrupted. Open the command prompt as an administrator (as mentioned above) and enter the command
ipconfig /flushdns. This will clear the DNS cache. - Static IP Address: In some cases, assigning a static IP address can resolve conflicts. Open the Network and Sharing Center (search in the Windows 8 search bar), click on your Wi-Fi connection, select "Properties," and then double-click "Internet Protocol Version 4 (TCP/IPv4)." In the properties window, select "Use the following IP address" and enter a static IP address (consult your router's manual for the appropriate IP range and subnet mask). Enter your router's IP address as the default gateway and the DNS server information.
- Check Router Settings: Log in to your router's configuration interface (usually by typing the router's IP address – often 192.168.1.1 or 192.168.0.1 – into your web browser). Ensure that your router is broadcasting the SSID (network name) and that the security settings are compatible with your laptop's Wi-Fi adapter. WPA2-PSK (AES) is generally the most secure and recommended security setting. Check for firmware updates for your router.
Security Software Interference: The Unseen Culprit
Overzealous security software can sometimes interfere with Wi-Fi connections by blocking legitimate network traffic.
- Disable Firewall: Temporarily disable your firewall (Windows Firewall or a third-party firewall) to see if it's the cause of the problem. If connectivity improves, you'll need to configure your firewall to allow network traffic from your wireless adapter.
- Check Antivirus Settings: Some antivirus programs include features that can block network connections. Check your antivirus settings and temporarily disable any network protection features to see if they're interfering with your Wi-Fi.
- Update or Reinstall Security Software: Outdated security software can cause compatibility issues. Make sure your security software is up-to-date. Consider reinstalling the software if the problems persist.
Final Considerations and Preventative Measures
Wi-Fi issues can be incredibly frustrating, but with a methodical approach, they are usually resolvable. Remember these final points:
- Isolate the Problem: Try to determine if the problem affects all devices on your network or just your laptop. This information can help pinpoint the source of the issue.
- Environmental Factors: Consider potential interference sources, such as microwave ovens, cordless phones, and other electronic devices that operate on the 2
