how to make your laptop a wifi hotspot windows 8.1

Title: Make a Wi fi Hotspot Using your Windows 8 Laptop
Channel: Syed Shah Zahurullah Hussaini
Make a Wi fi Hotspot Using your Windows 8 Laptop by Syed Shah Zahurullah Hussaini
Turn Your Windows 8.1 Laptop into a WiFi Hotspot: The Easiest Trick EVER!
Unleash the Wireless Wizard Within: Your Windows 8.1 Laptop's Hidden Hotspot Potential!
Ever feel like your Windows 8.1 laptop is a technological vault, brimming with untapped potential? Well, prepare to crack it open because we’re delving into a seriously cool trick. It's about transforming your trusty machine into a personal WiFi hotspot. Consider it your digital superhero cape, ready to share the internet far and wide. This isn’t just some tech tip; it's a game changer.
The Wireless World Awaits: Why This Matters More Than You Think
Let’s face it, reliable internet access is a modern-day necessity. Think about those times when your phone begs for a connection. Perhaps you are traveling with a tablet that desires data. Now, imagine having a readily available solution. That's the beauty of creating a hotspot. It bridges the connectivity gap. Moreover, it transforms your laptop into a mobile hub. This is perfect for sharing your internet, regardless of location. Considering how many devices we use, this feature is invaluable. Imagine the possibilities!
Digging In: Unveiling the Magic Behind Windows 8.1's Hotspot Power
Here's the exciting part: the process is surprisingly simple. It's practically hidden in plain sight. However, before we jump in, a quick note. You'll need a Windows 8.1 laptop with a functional Wi-Fi adapter. Ensure your laptop has an active internet connection via Ethernet or another Wi-Fi network.
Step-by-Step: Your Easy Guide to Becoming a WiFi Guru
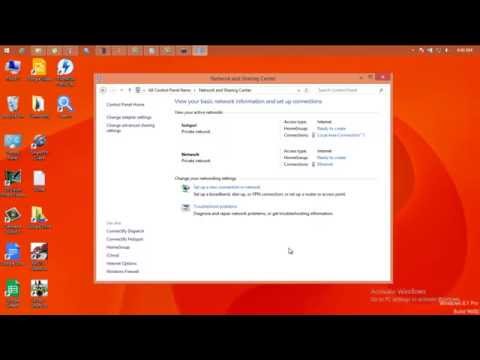
Ready to initiate the process? Let's get started. First, navigate to the "Network and Sharing Center." You can usually find this by right-clicking the network icon in your system tray. It’s usually at the lower right corner of your screen. Then, select "Change adapter settings" from the left sidebar.
Now, right-click on the internet connection you're currently using. It's likely you’re using Ethernet or Wi-Fi. Subsequently, select "Properties." In the properties window, locate the "Sharing" tab. Check the option that says "Allow other network users to connect through this computer's Internet connection." A dropdown menu will appear.
Next, select the network adapter you want to use for your hotspot. This is almost always your wireless adapter. Furthermore, if you don’t see the option, ensure your Wireless Network Adapter is active. Then, consider configuring the "Settings" button in the "Sharing" tab. This allows you to select which ports your hotspot should use.
Finally, click "Ok" on all open windows. Then, locate the Wireless Network icon in the system tray again. You should see that you can create a wireless network at this point. Click on "Open Network and Sharing Center." Select "Set up a new connection or network." Choose "Set up a wireless ad hoc network." Follow the on-screen prompts. You'll need to set a network name (SSID) and security key.
Fine-Tuning: Customizing Your Wireless Realm
Once your hotspot is live, you can make adjustments. For instance, you can change the network name, password, and security type. These settings are typically adjustable within the Network and Sharing Center. Also, you can change them through the command prompt if you wish. These choices affect the security and accessibility of your personal network.
Furthermore, remember to protect your hotspot with a strong password. This will safeguard your connection from unwanted users. You can experiment with different security settings to customize your network's performance. Explore other options to ensure the best experience possible.
Troubleshooting Tactics: Conquering the Connectivity Conundrums
Encountering hiccups? Don’t fret! Troubleshooting is part and parcel of the technological landscape. If devices cannot connect, check your password. Double-check the shared internet connection settings. It is also worth restarting your laptop and the connecting devices.
If you still face issues, verify that your firewall isn't blocking the hotspot. You can also try updating your network adapter drivers. Also, ensure that your internet connection is stable. Sometimes, a simple restart of your router can solve connection problems. In addition to these, consult online resources for more advanced troubleshooting tips.
Embracing the Freedom: Your Laptop's Newfound Power
And there you have it! Your Windows 8.1 laptop has transformed into a wireless wonder. Therefore, you can now share your internet connection with phones, tablets, and other devices. You are now the master of your own personal wireless domain. This is a fantastic feature to keep at your fingertips.
Therefore, consider the time you can save. Also, think about the productivity boost you can receive. Most of all, appreciate the freedom this setup provides. This simple trick opens a world of connectivity possibilities! Go forth and share the internet with the world.
Laptop to TV Wireless: The SHOCKINGLY Easy Method!Turn Your Windows 8.1 Laptop into a WiFi Hotspot: The Easiest Trick EVER!
Hey tech adventurers! Ever been in a pinch, desperately needing the internet for your phone, tablet, or another laptop, but the sweet, sweet Wi-Fi was nowhere to be found? We’ve all been there. Picture this: you're on a train, miles from civilization, and you realize you forgot to download that crucial presentation. Or perhaps you’re at a friend's house, the Wi-Fi is playing hide-and-seek, and you're dying to stream your favorite show. Fear not, because today, we're going to unveil a ridiculously easy trick to transform your trusty Windows 8.1 laptop into your own personal Wi-Fi hotspot. Think of it as your pocket-sized internet superhero, always ready to swoop in and save your data.
1. The Problem: Wi-Fi Woes and Data Desperation
Let's be honest, Wi-Fi can be as reliable as a politician's promise. Sometimes it works like a dream, and other times, it's about as useful as a chocolate teapot. We've all faced the frustration of spotty connections, weak signals, or, the ultimate internet tragedy, no Wi-Fi whatsoever. This leaves us scrambling for a solution, desperately trying to tether, hotspot via another device (if we have one), or, the dreaded reality, burning through our precious data allowance. But what if you had a super convenient, super reliable solution right under your nose?
2. Enter the Hero: Your Windows 8.1 Laptop to the Rescue!
Believe it or not, your Windows 8.1 laptop is a powerhouse. It's like a Swiss Army knife of computing, and one of its most underrated features is its ability to act as a Wi-Fi hotspot. This means you can share your laptop's internet connection (whether it's via Ethernet cable or another Wi-Fi network) with other devices. It's like creating your own mini-network, a personal oasis of internet access wherever you go.
3. Why This Trick is the Easiest Thing Ever (Seriously!)
We’re not talking about complicated software downloads or hours of techy fiddling. We want to make this as easy as ordering pizza online! We’re going to bypass complexities, go straight to the heart of the matter, and have you connected in minutes.
4. The Magic Formula: Setting Up Your Hotspot
Ready to unleash the power? Here's the step-by-step, simple-as-pie guide:
Step 1: Open Network and Sharing Center. You can find this by right-clicking on the Wi-Fi icon in your system tray (the little icons in the bottom-right corner of your screen, near the clock). Select "Open Network and Sharing Center." It's like opening the secret map to internet access!
Step 2: Change Adapter Settings. On the left side of the Network and Sharing Center window, you'll see "Change adapter settings." Click on it. This is where the magic happens.
Step 3: Find Your Internet Connection. Locate the connection your laptop is currently using to access the internet. It will either be an Ethernet connection (if you’re using a cable) or a Wi-Fi connection (if you’re connected to Wi-Fi).
Step 4: Right-Click and Dive In. Right-click on your internet connection and select "Properties." We're about to tweak some settings.
Step 5: Sharing Tab – The Gateway to Freedom. In the "Properties" window, click on the "Sharing" tab.
Step 6: Check the Box – "Allow other network users to connect through this computer's Internet connection." Check this box. This is your permission slip to become a hotspot hero!
Step 7: Select Your Network: Below the checkbox, there's a dropdown menu for "Home networking connection." Select the "Microsoft Hosted Network Virtual Adapter" (or similar, it may show as virtual adapter #2, or virtual adapter #3, etc.). If you don’t see this, it means you need to activate the hosted network feature, which we'll cover shortly.
Step 8: Click "OK" and close the windows: You’ve done it!
5. Troubleshooting Time: What if It's Not Working (and How to Fix It)
Sometimes, things don't go according to plan. If your hotspot isn't working:
Check Your Connection: Make sure your laptop is actually connected to the internet. Seems obvious, but it's the first thing to check!
Restart Your Laptop: A good old restart can fix a surprising number of tech gremlins.
Double-Check the Settings: Go back and carefully retrace the steps. Did you miss a checkbox? Did you select the correct network adapter?
Activate the Hosted Network if needed: If you do not see "Microsoft Hosted Network Virtual Adapter," you will need to enable it. Open Command Prompt as an Administrator (type "cmd" in the search bar, right-click "Command Prompt" and select "Run as administrator.") Then, type the following commands, pressing Enter after each:
netsh wlan set hostednetwork mode=allow ssid=YourHotspotName key=YourPassword(Replace "YourHotspotName" with the name you want for your hotspot and "YourPassword" with a password you want.) These credentials can be changed later.netsh wlan start hostednetwork(This actually triggers the hotspot).
Firewall Fears: Your firewall might be blocking the connection. Temporarily disable your firewall (be careful when doing this – only do it if you know what you're doing!). If the hotspot starts working, you'll need to add exceptions for your hotspot connection in your firewall settings.
6. Naming Your Hotspot: Branding Your Digital Fortress
Choose a name for your Wi-Fi hotspot that’s memorable and easy to identify. "MyLaptopHotspot" is a classic. Or be creative! "TheBatcave" or "InternetExpress" – It's about making it yours.
7. Securing Your Fortress: Setting a Strong Password
Protect your hotspot with a strong, unique password. This is critical! You don't want anyone else using your data and accessing your connection. Make it complex – at least 12 characters, with a mix of uppercase and lowercase letters, numbers, and symbols. Think of it as the drawbridge to your internet castle.
8. Connecting Your Devices: The Wi-Fi Welcome
Once you've set up your hotspot, connecting your other devices is a breeze. On your phone, tablet, or another laptop, simply search for available Wi-Fi networks. Your hotspot’s name should appear in the list. Select it, enter your password, and voila! You're connected.
9. Monitoring Your Data Usage: Keeping an Eye on the Bill
Remember, you're sharing your laptop's internet connection, which means you're using your existing data plan. Keep an eye on your data usage, especially if you have a limited data allowance. Most devices have data usage monitoring tools.
10. Mobile Broadband Alternative: When Your Laptop Has Its Own Internet
If your laptop has a built-in mobile broadband connection (like a SIM card slot), the process is even simpler. You can directly share that internet connection as a Wi-Fi hotspot without needing to connect to another network. Just go to your network settings and look for the option to share your mobile broadband connection.
11. The Great Debate: Ethernet vs. Wi-Fi Connection
- Using Ethernet: Provides a more stable connection and can often be faster for sharing your internet.
- Using Wi-Fi: More convenient, but the shared Wi-Fi will be dependent on the strength and speed of the initial Wi-Fi connection.
Consider what's most important to you: speed, stability, or convenience.
12. Power Consumption Considerations: Fueling the Battery Beast
Acting as a Wi-Fi hotspot will drain your laptop's battery more quickly than usual. Make sure your laptop is plugged in, or be prepared for a shorter battery life. It’s like a marathon runner – you need to stay hydrated (charged!).
13. Security Best Practices: Always Stay Vigilant
Always update your Windows 8.1 system, including updating drivers. This will help protect you from security vulnerabilities. Consider using a firewall and anti-virus software to keep your connection safe.
14. The Limitations: What You Can and Can't Do
- Speed: The speed of your shared Wi-Fi connection depends on the speed of your original internet connection.
- Range: The range of your hotspot is limited by your laptop's Wi-Fi antenna.
- Number of Devices: Your laptop can typically handle multiple connected devices, but the more devices connected, the slower the speed.
15. Beyond the Basics: Advanced Tips and Tricks
- Use a VPN. A Virtual Private Network (VPN) will encrypt all data traveling over your hotspot, adding an extra layer of security.
- Optimize Your Settings: Experiment with your laptop's power settings to balance battery life and performance.
Conclusion: Conquer the Internet Desert!
So there you have it! With
iPhone to iTunes: No Wi-Fi? No Problem! (Secret Trick Inside!)Turn Windows 8 Laptop into WiFi HotSpot How To

By TechEmpty Turn Windows 8 Laptop into WiFi HotSpot How To by TechEmpty
Turn your Windows 8 Laptop into Wifi Hotspot

By Tricks That Make you Smart Turn your Windows 8 Laptop into Wifi Hotspot by Tricks That Make you Smart
Create WiFi Hotspot in windows 8.1, 8, 7 LaptopPC
By ANDREW CRUZ Create WiFi Hotspot in windows 8.1, 8, 7 LaptopPC by ANDREW CRUZ

Title: Turn Windows 8 Laptop into WiFi HotSpot How To
Channel:
Turn Windows 8 Laptop into WiFi HotSpot How To by
Change Wifi Settings
Turn Your Windows 8.1 Laptop into a WiFi Hotspot: The Easiest Trick EVER!
Unleashing the Power Within: Your Windows 8.1 Laptop as a Personal WiFi Hub
In an increasingly interconnected world, the need for seamless internet access extends far beyond the confines of our homes and offices. Imagine this: You're on a train, a bus, at a coffee house, or simply in a location where a reliable WiFi connection eludes you. Your laptop, teeming with untapped potential, could be your lifeline. With a few simple steps, you can transform your Windows 8.1 laptop into a fully functional WiFi hotspot, effectively sharing your existing internet connection with all your other devices. This seemingly complex task is, in reality, remarkably straightforward. We will unveil the most accessible and remarkably simple method to achieve this, empowering you to stay connected wherever life's journey takes you.
The Gateway Configuration: Mastering the Command Prompt
The secret to unlocking your laptop's WiFi hotspot capabilities lies within the powerful yet often-overlooked Command Prompt. This isn't a realm of cryptic code, but rather a tool that allows you to precisely configure your wireless network. We will guide you through the process, ensuring a smooth and hassle-free experience.
- Initiating the Process: Begin by opening the Command Prompt. There are several streamlined ways to achieve this:
- Use the search bar (accessible by swiping in from the right edge of your screen or by pressing the Windows key) and type "cmd." Right-click on "Command Prompt" in the search results and select "Run as administrator." This is crucial for granting the necessary permissions to implement the changes.
- Alternatively, navigate to the Start screen and type "cmd" to initiate a search. Again, right-click "Command Prompt" and choose "Run as administrator."
- Setting the Stage: Defining Your Virtual Network: Once the Command Prompt window is open, we are poised to commence our configuration. It’s time to enter the command that will bring your virtual hotspot into existence. Type the following command precisely, and press Enter:
netsh wlan set hostednetwork mode=allow ssid="YourHotspotName" key="YourPassword"- Replace
"YourHotspotName"with your desired name for your WiFi hotspot (e.g., "MyLaptopHotspot"). This is what other devices will see when scanning for available networks. - Replace
"YourPassword"with a strong, secure password (at least eight characters) to protect your network from unauthorized access. Choose a password that is both memorable to you and difficult for others to guess. - Ensure that there are spaces between "netsh," "wlan," "set," and the other components of the command. Pay close attention to detail; even a minor error can hinder the process.
- Replace
- Activation: Turning on Your New Hotspot: With your network now created, the next step is activating it. Enter the following command and press Enter:
netsh wlan start hostednetworkThis command starts the hosted network, effectively turning your laptop into a WiFi hotspot. You should receive a confirmation message indicating your network has successfully started.
Sharing the Connection: Bridging the Internet
Now that your hotspot is up and running, the final step is to share your existing internet connection with the newly created network. This process is as simple as a few clicks.
- Accessing Network Connections: Return to the desktop and right-click on the network icon in the system tray (usually located in the bottom-right corner of your screen). Select "Open Network and Sharing Center."
- Locating Your Internet Connection: In the Network and Sharing Center window, you will see your active internet connection (e.g., your Ethernet connection or your primary WiFi connection). Click on the name of your connection.
- Properties Window: A status window will appear for your active internet connection. Click the "Properties" button within this window.
- Enabling Sharing: In the "Properties" window, navigate to the "Sharing" tab. Check the box that says "Allow other network users to connect through this computer's Internet connection."
- Selecting Your Hosted Network: In the "Home network connection" dropdown menu, select the name of your newly created virtual network adapter. This adapter usually has a name like "Microsoft Hosted Network Virtual Adapter."
- Confirmation: Click "OK" to save the sharing settings. You may receive a notification stating that the network adapter will be automatically reset. This is a normal part of the process.
Verification and Troubleshooting: Ensuring Seamless Connectivity
At this stage, your Windows 8.1 laptop should be functioning as a fully operational WiFi hotspot. The next step is to verify that everything is working as intended and troubleshoot any potential issues.
- Scanning for Your Hotspot: On another device (smartphone, tablet, or another laptop), scan for available WiFi networks. You should see the name of your hotspot (the one you created in the Command Prompt) listed.
- Connecting to the Hotspot: Select your hotspot and enter the password you established. If the password is correct, the device should connect to your network.
- Testing the Connection: Once connected, open a web browser on the connecting device and try browsing the internet. If webpages load successfully, your hotspot is working correctly.
- Troubleshooting Common Issues:
- Connection Issues: If devices cannot connect, double-check the password you entered. Also, ensure "Allow other network users to connect through this computer's Internet connection" is checked in the "Sharing" settings for your primary internet connection. If the problem persists, restart your computer and try again.
- Slow Speeds: WiFi hotspot speeds can sometimes be slower than your primary internet connection. This is because your laptop is sharing its bandwidth. Try moving the devices closer to the laptop to improve signal strength. If speeds remain a persistent problem, consider upgrading your laptop’s WiFi adapter.
- Limited Connectivity: If devices connect but cannot access the internet, ensure that your primary internet connection is active and functioning. Also, check that the correct network adapter is selected for sharing.
- Hotspot Disconnecting: Sometimes, the hosted network can disconnect. To restart it, go back to the Command Prompt (remember to run as administrator) and type
netsh wlan start hostednetworkthen press Enter.
Managing Your Hotspot: Staying in Control
Once your hotspot is up and running, you need to know how to manage it. We will explore the essential commands and techniques to help you adapt to any situation.
- Stopping the Hotspot: To stop your WiFi hotspot when you no longer need it, open the Command Prompt (Run as administrator) and execute the following command:
netsh wlan stop hostednetworkThis command deactivates the virtual network, preventing other devices from connecting. - Viewing Hotspot Status: You can check your hotspot's status by using the following command in the Command Prompt:
netsh wlan show hostednetworkThis will display information such as the SSID (your hotspot name), the authentication type, the number of connected devices, and the status (e.g., "Started" or "Stopped"). - Modifying Settings: You can modify the hotspot name or password by repeating the initial setup steps, altering the "ssid" and "key" parameters. Remember to stop and restart the hosted network after making changes.
- Troubleshooting Persistent Problems: If you encounter persistent issues, make sure your wireless network adapter drivers are up to date. You can update your drivers through the Device Manager (accessible by searching for "Device Manager" in the Start menu). Also, sometimes, third-party firewall software may interfere with the hotspot functionality. Consider temporarily disabling your firewall to see if this resolves the problem.
Advanced Configuration: Unlocking Additional Features
For those looking to customize their hotspot experience further, there are a few advanced configuration options to consider. While the core process is similar, subtle adjustments can enhance its utility.
- Setting Maximum Connections: You can limit the number of devices that can connect to your hotspot. This can be beneficial in situations where you want to control bandwidth usage. Unfortunately, this feature is not directly controlled within the command-line interface. However, you can often implicitly control the number of connections by managing the bandwidth available.
- Improving Security: While a strong password is the first line of defense, consider using WPA2-PSK encryption for Enhanced security. This is the standard encryption protocol for modern WiFi networks.
- Monitoring Bandwidth Usage: While Windows 8.1 does not provide built-in bandwidth monitoring for the hotspot, you can utilize third-party software to track how much data each connected device is using. This will help you understand bandwidth consumption and make informed decisions about connection limits.
- Creating a Scheduled Hotspot: If you frequently need a hotspot for specific periods, you can create a batch file to automate the start and stop process. Put the
netsh wlan start hostednetworkandnetsh wlan stop hostednetworkcommands into a text file and save it with a.batextension. Then, use the Task Scheduler to run the batch file at specific times.
Conclusion: A World of Connectivity at Your Fingertips
By following these easy steps, you have now transformed your Windows 8.
