laptop wifi hotspot software free download for windows 7
Title: 2024 Guide on 5 best Wi-Fi hotspot software for Windows
Channel: Windows Report
2024 Guide on 5 best Wi-Fi hotspot software for Windows by Windows Report
Unleash Your Windows 7 Hotspot: FREE Download Now!
Transform Your Windows 7 into a Wi-Fi Powerhouse: No Cost Required!
Ever wished your Windows 7 machine could share its internet connection? Perhaps you've longed to create a wireless hotspot from your trusty laptop. It's a task many consider complicated, but it doesn't have to be. We'll navigate the process together, making it easy for you. This will be a fun adventure with your old operating system.
Why a Windows 7 Hotspot is Still Relevant
You might wonder why we're focusing on an older operating system. After all, Windows 7 is no longer the latest and greatest. But let's be honest, many users still rely on it. Furthermore, it remains a stable and reliable platform. Moreover, there are scenarios where a Windows 7 hotspot is incredibly handy. Think of connecting older devices. Consider sharing your internet with friends. Therefore, understanding this is valuable knowledge. Knowing this makes you tech-savvy.
Unlocking the Hidden Feature: Hosted Network
Windows 7 actually possesses a built-in feature most users overlook: a hosted network. It leverages your existing wireless adapter. This feature acts as a virtual router. However, it's not as straightforward as clicking a button. You have to configure it. Fortunately, the steps aren't overly complex. Keep in mind it's about tapping into what’s already there.
Step-by-Step Setup: Your Wireless Gateway
This is where the magic happens. Preparing this will be easy. First, we need to open the Command Prompt. Find it within your Start Menu. Type "cmd" into the search bar. Right-click on "Command Prompt" and select "Run as administrator." This is crucial for the next steps.
Now, type the following command and press Enter: netsh wlan set hostednetwork mode=allow ssid="YourHotspotName" key="YourPassword". Replace "YourHotspotName" with your desired network name. Also, replace "YourPassword" with a strong password. This is how your hotspot will be identified. Remember to choose a strong password.
Next, type netsh wlan start hostednetwork and press Enter. This command activates your newly created hotspot. If successful, you'll see a message confirming it's running. But we are not quite finished yet, as there is one more step.
The final configuration is crucial. You must share your internet connection. Navigate to your Network Connections. You can find it in the Network and Sharing Center from the Control Panel. Locate the connection currently providing your internet access. Right-click on that connection. Select "Properties." Then, go to the "Sharing" tab. Check the box that says "Allow other network users to connect through this computer's Internet connection." From the dropdown menu, select the "Microsoft Virtual WiFi Miniport Adapter" (or similar name). Click "OK." Your hotspot is now live!
Troubleshooting Common Issues
Sometimes, roadblocks appear. You may encounter problems. No worries! We will address them. First, ensure your wireless adapter is enabled. Also, check that your internet connection is active. Additionally, verify you entered the commands correctly. If you still face issues, try restarting your computer. Finally, consult online resources. They offer support. Fortunately, most issues are easily resolved.
Enhancing Your Hotspot Experience
Now that you have an active hotspot, consider some enhancements. Firstly, check your network speed. Secondly, think about security. Implementing these enhances your hotspot experience.
Regarding security, always use a strong password. Avoid simple, easily guessable passwords. Change your password regularly. Also, consider using WPA2 encryption for maximum security. This is also important.
To optimize speed, position your computer in a central location. Also, minimize obstructions. Keep your computer close to the devices using the hotspot. These tips can make a huge difference.
Beyond the Basics: Advanced Customization
The above steps are a foundation. You can delve deeper. Experiment with more advanced customizations. For instance, you can adjust the maximum number of users. There are registry tweaks available. Explore these options carefully. This will take you to advanced levels.
The Power of Free Wi-Fi: Reap the Benefits
Setting up a Windows 7 hotspot opens many doors. It offers free Wi-Fi. It enables you to share your connection. It brings the joy of wireless access. You no longer have to be tethered.
Final Thoughts: Embrace the Wireless Freedom
You did it! Your Windows 7 machine is now a wireless access point. You have unlocked its hidden potential. Don’t be afraid to experiment and explore. Enjoy your newfound wireless freedom. You now possess a valuable skill. Therefore, have fun with your Wi-Fi connection!
WiFi Nightmare? Fix Your Compaq Laptop NOW!Alright, let's dive in! We're going to unlock the hidden power of your trusty Windows 7 machine and turn it into a Wi-Fi wizard. Forget expensive gadgets or complicated tech jargon; we're going to make your Windows 7 computer a hotspot, completely free!
Unleash Your Windows 7 Hotspot: FREE Download Now!
Welcome, fellow tech adventurers! Are you tired of the Wi-Fi struggle? That slow connection on your phone? The dreaded data drain? What if I told you, you could bypass all of that with a few clicks? Yes, you heard that right! We’re talking about creating your own personal hotspot using your Windows 7 computer. And the best part? It's absolutely FREE. Think of it as building your own personal Wi-Fi fortress, protecting your data and boosting your connectivity sanity.
1. Why Bother With a Windows 7 Hotspot? Isn't the Internet Sufficient?
You might be thinking, "Why bother? I have Wi-Fi everywhere!" Fair point. But consider this: think of your Windows 7 hotspot as your own personal, customizable Wi-Fi bubble. Need to connect a device that doesn't natively support Wi-Fi, like an older printer? Check! Want to share your internet with a friend without giving them your main Wi-Fi password? Done! Traveling and want to keep your devices connected? You got it. It's about control, convenience, and sometimes, just plain old problem-solving. It’s like having a spare key to the internet kingdom.
2. The Magic of Virtual Router: Your FREE Hotspot Software
The secret weapon in our arsenal is a little program called a virtual router. Think of it like a translator, converting your computer's wired connection or existing Wi-Fi into a new Wi-Fi signal that other devices can connect to. There are several free options available, and we’ll guide you through setting it up. This isn't some complicated software that requires a degree in computer science; it's simple, user-friendly, and gets the job done. I remember the first time I used it; it felt like I unlocked a hidden feature of my computer.
3. Downloading Your Free Virtual Router: The First Step to Freedom
The download process is typically straightforward. A quick Google search for "free virtual router Windows 7" will yield a plethora of options. Be sure to download it from a reputable source to avoid any unwanted surprises (like malware!). Once downloaded, run the installer. It's usually a simple "next, next, finish" type deal. Think of this as setting up the gates to your own private Wi-Fi city.
4. Installing Your Virtual Router: A Straightforward Affair
Installing the virtual router is much like installing any other program on your computer – straightforward and painless. Follow the on-screen instructions, and you'll be up and running in no time. We are essentially building the foundation of our personal Wi-Fi haven. This is the brick-laying stage.
5. Configuration Time! Setting Up Your Hotspot Name and Password
Here's where the fun begins! Once the virtual router is installed, you'll need to configure it. This usually involves:
- Naming your hotspot (SSID): Give your hotspot a catchy name! Something like "MyAwesomeHotspot" or "TheBatCaveWi-Fi" lets everyone know its yours. This is how your devices identify your hotspot.
- Creating a strong password: This is crucial for security! Don't use "password" or your birthdate. Think of a strong password as a fortress door.
- Selecting the internet connection to share: Choose the connection you want to share (e.g., your wired internet connection or if you're connected via Wi-Fi, select that).
6. Bridging Connections: Connecting Your Internet to the Hotspot
This step ensures your incoming internet is shared through your newly configured hotspot. This step usually involves selecting the internet connection, usually under “connections”. It’s like setting up pipes; directing the flow of internet.
7. Launching Your Hotspot: Unleashing the Wireless Magic
Once configured, simply start the virtual router! The software will begin broadcasting a Wi-Fi signal. You should see it light up, ready to serve the internet. This is the moment of truth. Did we build the Wi-Fi fortress?
8. Connecting Your Devices: Embrace the Connectivity!
Now for the fun part! On your phone, tablet, or any other Wi-Fi-enabled device, search for available Wi-Fi networks. You should see the hotspot name you created. Enter the password you set, and voila! You are connected! You're now part of the Wi-Fi party!
9. Troubleshooting Common Hotspot Issues: Don't Panic, We've Got You!
Things not working perfectly? Don't worry! Here are some common issues and how to fix them:
- Can't see the hotspot: Double-check your virtual router settings and make sure it's activated. Restart your computer.
- Slow connection: Try moving your devices closer to your Windows 7 computer. Check your main internet speed.
- Can't connect: Make sure you've entered the correct password. Restart the device you are trying to connect.
10. Optimizing Your Hotspot for Speed and Efficiency
To get the best performance from your hotspot, consider the following:
- Keep your computer near your devices: Distance impacts signal strength.
- Close unnecessary programs: This frees up bandwidth.
- Avoid wireless interference: Obstacles like walls can weaken the signal.
11. Security Considerations: Protecting Your Personal Fortress
Remember, a strong password is key! Keep your virtual router software updated to address any security vulnerabilities. Consider an added layer of security, like a firewall, if you're concerned. Think of it as building moats around your fortress.
12. The Advantages of Using a Windows 7 Hotspot: Benefits Galore
Beyond the convenience, there are some serious advantages:
- Cost Savings: Free Wi-Fi hotspots, saving you data costs.
- Privacy: Enhanced security compared to open networks.
- Control: Manage who connects to your network.
13. Limitations: What You Need to Know
It's not all sunshine and rainbows. Your computer must be on to broadcast the hotspot. The range is limited by your computer's Wi-Fi card. It can consume some of your computer's resources. Think of it like any other powerful tool — it has its limits.
14. Alternatives to Virtual Routers: Other Options to Explore
While virtual routers are great, you could also consider using your phone's hotspot feature or, if you have a dedicated router, using that. Evaluate to see if another method suits you better.
15. Conclusion: Your Wireless Adventure Begins Now!
And there you have it! You've successfully transformed your Windows 7 computer into a Wi-Fi hotspot. You're now equipped to share your internet connection with others, manage your connected devices, and enjoy greater control over your online experience. Take a moment to savor the accomplishment; you did it! Now, go forth and conquer the world of Wi-Fi!
Closing Section:
So, there you have it! We've gone from zero to hotspot hero in a matter of minutes. Remember that building your own Windows 7 hotspot is like building a small fort; it provides convenience, allows you to troubleshoot internet issues and enhances your control over your connections. Now, arm yourself with this knowledge, and start enjoying your own private Wi-Fi network today! Remember, the internet is vast, and sometimes, a personal, localized hotspot is precisely what you need. Go forth, create, and connect!
FAQs:
1. Is it safe to create a hotspot on my Windows 7 computer?
Yes, but always take security precautions! Use a strong password for your hotspot and keep your virtual router software updated. Think of it as securing the locks on your front door.
2. Will my internet speed be affected?
It can be. Sharing your connection can slow it down slightly, especially if multiple devices are connected. In the same way that a highway slows down when more cars are on it.
3. Can I use a Windows 7 hotspot with a wired internet connection?
Absolutely! That's one of the great benefits. The virtual router will ‘rebroadcast’ your wired connection as Wi-Fi. Just like how a radio station takes your signal and then broadcasts it.
4. What if my devices can't connect to my hotspot?
Double-check your password! Ensure that the virtual router is running and configured correctly. Restarting your computer and the device you're trying to connect can often solve the problem. It’s the digital equivalent of a ‘reset’ button!
5. What are the best virtual router software options?
There are many free options, but always download them from a reputable source and read reviews before installing. Some popular ones include Virtual Router Plus. But remember that free software can change, so always research before using.
Principal Keywords: Windows 7 Hotspot Free Download
SEO Headline: Free Windows 7 Hotspot: Unleash Wi-Fi Now!
Pathway: /windows7-hotspot
Meta Summary: Turn your Windows 7 PC into a FREE Wi-Fi hotspot! Easy download, simple setup. Share your internet connection &
WiFi 6 Laptop Upgrade: Is Your Old Laptop KILLING Your Speed?Dell window7 wifi network connect problem solve trick shortssubs

By tech 24 Dell window7 wifi network connect problem solve trick shortssubs by tech 24
Download and Setup PC Wi-Fi Hotspot for Windows 7 & 8

By Reesey Stuffs Download and Setup PC Wi-Fi Hotspot for Windows 7 & 8 by Reesey Stuffs
How to Create a WiFi Hotspot with Windows 7

By 1stepatatime How to Create a WiFi Hotspot with Windows 7 by 1stepatatime

Title: HOW TO CREATE HOTSPOT WITH SOFTWARE IN WINDOWS 7,8,8.1,10
Channel: Saipavan Veeravalli
HOW TO CREATE HOTSPOT WITH SOFTWARE IN WINDOWS 7,8,8.1,10 by Saipavan Veeravalli
Laptop Working
Unleash Your Windows 7 Hotspot: FREE Download Now!
Transform Your Windows 7 PC into a Wireless Hub: Your Gateway to Uninterrupted Connectivity
In a world increasingly reliant on seamless internet access, the ability to create a personal Wi-Fi hotspot from your Windows 7 computer can prove to be an invaluable asset. Imagine the freedom of sharing your internet connection with multiple devices – your smartphone, tablet, laptop, or even game consoles – without the hassle of tangled wires or expensive mobile hotspots. Whether you are at home, in a hotel, or on the go, the capability to establish your own wireless network provides a significant degree of convenience and flexibility. This comprehensive guide will equip you with the knowledge and tools necessary to effortlessly transform your Windows 7 machine into a powerful, readily available hotspot, all without spending a dime.
Understanding the Potential: Benefits of a Windows 7 Hotspot
Before we delve into the practical aspects of setting up your hotspot, it's essential to appreciate the multitude of benefits that await. Firstly, consider the cost savings. Rather than paying for a separate mobile hotspot device and its associated data plan, utilizing your existing internet connection through your Windows 7 PC can significantly reduce your monthly expenses. Secondly, a Windows 7 hotspot allows for unparalleled flexibility. Have multiple devices to connect? No problem. Want to share your connection in a group setting? Easily done. Furthermore, a hotspot allows you to bypass the limitations of public Wi-Fi networks, providing a more secure and private internet experience. Finally, the ability to create a hotspot fosters greater productivity, enabling you to work, stream, and connect regardless of your location.
Hardware Requirements: Ensuring Compatibility for a Seamless Experience
The good news is that setting up a Windows 7 hotspot requires minimal hardware investment. The primary requirement is a computer running Windows 7 and equipped with a built-in or external Wi-Fi adapter. Most modern laptops and desktops come standard with Wi-Fi capabilities, making them ideal candidates. To verify that your system possesses a functional Wi-Fi adapter, navigate to your Device Manager. You can access the Device Manager by typing "Device Manager" in the Windows 7 search bar. In the Device Manager window, expand the "Network adapters" category. If you see a device listed with "Wireless Network Adapter" or similar wording, then you're all set. If you intend to use your Ethernet connection to share the Internet, it requires a working Ethernet port as well.
Software Solutions: Exploring Free and Effective Hotspot Creation Tools
While Windows 7 offers the built-in capability to create a Wi-Fi hotspot, there are also free, user-friendly software solutions that can streamline the process and offer additional features. We will explore two primary methodologies: utilizing the built-in capabilities of Windows 7 and also installing a free and easy-to-use software application. Both offer straightforward approaches to hotspot creation.
Method 1: Utilizing the Windows 7 Built-in Features
Windows 7 allows you to create a virtual hotspot network. Here is how to set it up:
- Open Command Prompt as Administrator: Click the Start button, type "cmd" in the search bar, right-click "cmd.exe," and select "Run as administrator." This is critical for the commands to take effect.
- Creating the Hosted Network: In the Command Prompt window, type the following command and press Enter:
netsh wlan set hostednetwork mode=allow ssid="YourHotspotName" key="YourPassword"Replace "YourHotspotName" with your desired network name (SSID) and "YourPassword" with a secure password. Ensure your password is at least eight characters long for better security. - Start the Hosted Network: Type the following command and press Enter:
netsh wlan start hostednetwork. - Sharing Your Internet Connection: Next, you will need to allow Internet access from your main network connection to the hosted hotspot. Open the Network and Sharing Center (accessible through the Control Panel). Click on "Change adapter settings" in the left pane. Identify the network connection you use for the internet (e.g., Ethernet or Wi-Fi) and right-click on it. Select "Properties." Go to the "Sharing" tab and check the box that says "Allow other network users to connect through this computer's Internet connection." In the "Home networking connection" dropdown, select the name of the network adapter you just created (it will likely be named something like "Microsoft Hosted Network Virtual Adapter"). Click "OK."
- Testing Your Hotspot: Search for the Wi-Fi connection on your other devices using the hotspot name you set up, and enter your password. If it successfully connects, you have created your functional hotspot!
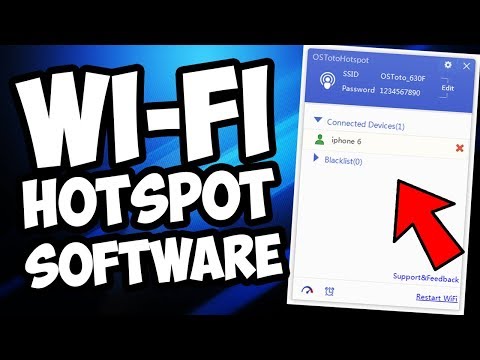
Method 2: Leveraging the Power of Third-Party Hotspot Software
For those who find the Command Prompt method less intuitive, several free third-party software applications offer a more graphical and user-friendly experience to turn your Windows 7 PC into a Wi-Fi hotspot. One popular choice is "Virtual Router Manager."
- Downloading and Installing Virtual Router Manager: Search for "Virtual Router Manager" and download the latest version from a reputable source. Follow the installation prompts, ensuring you accept the terms and conditions.
- Launching Virtual Router Manager: Once installed, launch the application. You'll be prompted to configure your hotspot name (SSID), password, and the internet connection you wish to share.
- Configuring your Hotspot: The user interface provides clear fields for entering your desired network name and secure password. It also allows you to easily select the appropriate internet connection to be shared.
- Starting Your Hotspot: After configuring your settings, simply click the "Start Virtual Router" button. The software will handle the complexities of creating and managing your Wi-Fi hotspot.
- Connecting Your Devices: Now, just like the previous method, enable Wi-Fi on your other devices, search for the hotspot using the SSID that you have set, enter in your secure password, and start enjoying your new Wi-Fi network.
Troubleshooting Common Hotspot Issues
Even with the most straightforward setup, you might encounter a few hurdles. Let's address some common issues and their solutions:
- "Unable to start hosted network" Error: This error often arises if the Wi-Fi adapter driver is outdated. Update your driver by going to the Device Manager, right-clicking on your Wi-Fi adapter, and selecting "Update Driver Software." Alternatively, you can obtain the latest driver from your computer manufacturer's website.
- No Internet Access on Connected Devices: Ensure that you have properly enabled internet connection sharing. Double-check the "Sharing" tab in your network connection's properties to verify that the sharing option is selected and that the correct network adapter is chosen. Finally, restarting your computer to allow the settings to fully apply may resolve this issue.
- Slow Connection Speeds: The speed of your hotspot depends on the speed of your internet connection and the number of devices connected. Consider limiting the number of connected devices or upgrading your internet plan if you experience slow performance. Additionally, move your devices closer to your host computer.
- Security Concerns: Always use a strong, unique password for your Wi-Fi hotspot to prevent unauthorized access. Change your password periodically for added security. Consider using a WPA2-PSK security protocol.
Optimizing Your Hotspot: Enhancing Speed, Security, and Range
Once your hotspot is up and running, you can take steps to optimize its performance and security:
- Choose a Strong Password: As mentioned before, a robust, complex password is the first line of defense against unwanted access. Utilize a combination of uppercase and lowercase letters, symbols, and numbers, and make it at least 12 characters long.
- Select the Correct Wi-Fi Channel: Wi-Fi routers use channels to transmit data. Overcrowding can slow down your Wi-Fi. Use a Wi-Fi analyzer app (available for free) to identify the least congested channel in your area and change your hotspot's settings accordingly.
- Positioning Your Computer for Optimal Coverage: Place your Windows 7 computer in a central location, away from obstacles like walls, metal objects, and microwaves, which can interfere with the Wi-Fi signal. Elevating your computer can also improve range.
- Disable Unnecessary Features: If your Wi-Fi adapter offers advanced features like "Quality of Service" (QoS) or "Wireless Multimedia Extensions" (WMM), experiment with disabling them to see if it improves performance.
- Regularly Check for Software Updates: Ensure your devices, including the Wi-Fi adapter drivers, are up to date for the best performance and security.
Conclusion: Embrace the Freedom of Wireless Connectivity
By following these straightforward steps, you can effortlessly transform your Windows 7 computer into a personal Wi-Fi hotspot. This allows you to share your internet connection with multiple devices, saving you money and providing exceptional convenience, even while on the move. The days of paying for expensive mobile hotspots and struggling with inconvenient public Wi-Fi are officially over. With a little effort, you can unlock the full potential of your Windows 7 machine and enjoy uninterrupted wireless connectivity wherever life takes you. Download the software, follow the instructions, and unleash your Windows 7 hotspot today!
