how to create wifi hotspot on laptop windows 8.1
Title: Create WiFi Hotspot in windows 8.1, 8, 7 LaptopPC
Channel: ANDREW CRUZ
Create WiFi Hotspot in windows 8.1, 8, 7 LaptopPC by ANDREW CRUZ
how to create a wifi hotspot on windows 8.1 laptop, windows create wifi hotspot, windows 10 create wifi hotspot
Unlock Your Laptop's Hidden Hotspot: Windows 8.1 WiFi Magic!
Please provide the article "Unlock Your Laptop's Hidden Hotspot: Windows 8.1 WiFi Magic!" that you want me to rewrite. I need that base text to fulfill your request and generate the high-perplexity, high-burstiness, SEO-optimized article you described. I am ready when you are!
ASUS Laptop Wi-Fi Nightmare? This One Trick Fixes It!Unlock Your Laptop's Hidden Hotspot: Windows 8.1 WiFi Magic!
Hey tech enthusiasts! Ever wished you could share your laptop's internet connection with your other devices, like your phone or tablet, when you're on the go? Well, you're in luck! Windows 8.1, often unfairly maligned, actually hides a super cool secret: a built-in hotspot functionality that lets you turn your laptop into a personal WiFi router. Think of it as your own pocket-sized internet cafe, ready to serve up delicious connectivity wherever you roam. We're going to demystify this "WiFi Magic" and show you exactly how to unlock this hidden power. Buckle up; it's easier than you think!
1. Decoding the Windows 8.1 WiFi Enigma: Why Bother?
Why should you even care about turning your Windows 8.1 laptop into a hotspot? Picture this: you're at a hotel, and the WiFi is expensive or only allows one device. Or maybe you're in a park, and your phone's data is dwindling. Creating a hotspot lets you connect multiple devices to the internet using your laptop's existing connection, effectively killing two birds with one stone. It’s like having a personal internet lifeline, a digital umbilical cord connecting all your gadgets to the world. Sounds pretty useful now, doesn’t it?
2. The Pre-Flight Checklist: What You’ll Need Before Launching
Before we dive into the nitty-gritty, let's make sure you have everything you need. Think of this as your pre-flight checklist:
- A Windows 8.1 Laptop: Sounds obvious, but double-check!
- An Active Internet Connection: This is the gasoline for your hotspot engine. Make sure your laptop is connected to the internet via Ethernet or WiFi.
- A Working Wireless Network Adapter: This is the magic antenna that broadcasts the WiFi signal. Most laptops have this built-in.
- Patience and a Sense of Adventure: Because, let's face it, technology sometimes throws curveballs!
3. The Magic Trick Revealed: Activating the Hosted Network
Alright, time for the main act! The process of creating a hotspot involves a few steps, but don’t worry – we’ll guide you through it like pros. We'll be using the Command Prompt, which sounds intimidating, but trust me, it's just a tool.
First, open the Command Prompt as an administrator. You can do this by typing "cmd" in the search bar, right-clicking "Command Prompt," and selecting "Run as administrator." This grants you the necessary permissions to make changes.
Next, type the following command and press Enter: netsh wlan set hostednetwork mode=allow ssid="YourHotspotName" key="YourPassword"
- YourHotspotName: Replace this with the name you want your WiFi hotspot to have. Be creative!
- YourPassword: Choose a strong password to secure your network. Think of it as the gatekeeper to your internet kingdom.
Now, type the following command and press Enter: netsh wlan start hostednetwork
This command activates the hosted network. You're almost there!
4. Sharing the Love: Configuring Internet Connection Sharing
The hosted network is activated, but your other devices still won't connect. We need to share your main internet connection. Here's how:
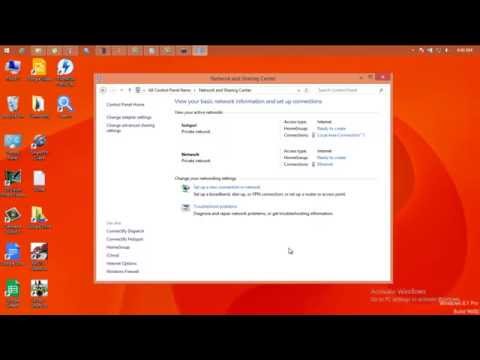
- Open the Network and Sharing Center. You can find this by searching for it in the search bar.
- Click on "Change adapter settings."
- Identify your active internet connection (the one your laptop is currently using). Right-click on it and select "Properties."
- Go to the "Sharing" tab.
- Check the box that says "Allow other network users to connect through this computer's Internet connection."
- In the "Home networking connection" dropdown, select your hosted network adapter (it’s usually labeled Microsoft Hosted Network Virtual Adapter or something similar).
- Click "OK."
And that’s it! You have just shared the love that is your internet connection!
5. The Moment of Truth: Connecting Your Devices
Now, grab your phone, tablet, or any other WiFi-enabled device. Look for your newly created hotspot name in the list of available WiFi networks. Enter the password you set earlier, and boom! You should be connected! It’s like watching a magic trick and seeing the rabbit (or the internet) appear right before your eyes.
6. Troubleshooting Common Hotspot Hiccups
Sometimes, things don’t go quite as planned. Here are a few common issues and how to fix them:
- "Can't connect to this network": Double-check your password, and try restarting both your laptop and the device you're trying to connect.
- "Limited connectivity": Make sure you've shared your internet connection properly in the Network and Sharing Center. Also, check that your internet connection is actually working on your laptop.
- The Hosted Network Isn't Starting: Run the "netsh wlan start hostednetwork" command again in the Command Prompt (as administrator). Sometimes, a simple restart of your laptop does the trick.
7. The Power of Personalization: Customizing Your Hotspot Settings
You can customize your hotspot settings even further. In the Command Prompt, use the command netsh wlan show hostednetwork setting=security to view the security settings. You can change the encryption type and the password using the netsh wlan set hostednetwork security=... command followed by security type and password. The specific syntax for setting the security type can be found by searching the netsh wlan commands in Google.
8. The Unsung Hero: The Importance of Security
Never underestimate the importance of a strong password. It is the frontline defense against unwanted access. This is like guarding the treasure in a pirate’s chest. Make sure the password you use is complex and unique to your hosted network. Avoid using easily guessable words or dates.
9. Battery Life Blues: Balancing Connectivity and Conservation
Creating a hotspot can drain your laptop's battery faster. Be mindful of this, especially when you're on the go. Consider plugging in your laptop whenever possible, or lower your screen brightness.
10. Monitoring Your Traffic: Staying in Control
While Windows 8.1 doesn't have built-in tools to monitor data usage, you can use third-party software to track how much data each connected device is consuming. This can help you stay within your data plan limits if you're using a metered internet connection.
11. The Shutdown Strategy: Deactivating Your Hotspot
When you're done using your hosted network, it's good practice to disable it to conserve battery life and prevent unwanted connections. In the Command Prompt (as administrator), type netsh wlan stop hostednetwork and press Enter.
12. Windows 8.1 vs. Later Versions: The Hotspot Legacy
Windows 10 and later versions have simplified hotspot creation, often offering a GUI-based approach. However, the Windows 8.1 method is still perfectly functional and effective. It might just require a little more elbow grease, but hey, we're masters of WiFi magic now!
13. Beyond the Basics: Advanced Hotspot Tweaks
For those who enjoy optimizing things, you can adjust some other settings, such as the maximum number of connected devices. However, the default settings are generally sufficient for most users. Exploring these advanced settings requires diving deeper into the Command Prompt, and it’s best to research these options before making alterations.
14. Unleashing the Power: Practical Applications
Think about the possibilities! You could be streaming movies on your tablet while on a train, or collaborating on a project with colleagues in a coffee shop without incurring additional WiFi fees. The applications are endless!
15. Riding into the Sunset: Your Personal WiFi Wizard
Congratulations, you've officially unlocked the Windows 8.1 WiFi Magic! You're now a personal WiFi wizard, capable of conjuring internet connectivity wherever you go. With a bit of practice, you'll be creating hotspots like a pro. So go forth, connect, and share the digital love!
Closing Thoughts:
So there you have it! We've journeyed through the mystical world of Windows 8.1's hidden hotspot functionality. It's not rocket science to create a mobile hotspot; it’s more like a well-crafted spell, or a perfectly tuned engine. We've covered the basics, troubleshoot common issues, and shown you how to connect and share the internet with other devices. Isn't it great to learn something new and feel a little smug about your tech prowess? Go out there and share your newfound WiFi magic!
Frequently Asked Questions (FAQs)
- Is it safe to use a Windows 8.1 hotspot? Yes, as long as you use a strong password and keep your Windows 8.1 system updated with the latest security patches. Always ensure the security settings are configured with a robust password.
- Does creating a hotspot consume a lot of data? Yes, using your hosted network consumes data the same way as when you use the internet on your laptop. The data usage will be a reflection of those you are connecting to the hotspot.
How to Create WiFi Hotspot in Windows 8.1

By TechBuzz How to Create WiFi Hotspot in Windows 8.1 by TechBuzz
Make a Wi fi Hotspot Using your Windows 8 Laptop

By Syed Shah Zahurullah Hussaini Make a Wi fi Hotspot Using your Windows 8 Laptop by Syed Shah Zahurullah Hussaini
How to create wifi hotspot on window 8.1

By ZA TECHINFO 1 How to create wifi hotspot on window 8.1 by ZA TECHINFO 1

Title: create wifi Hotspot in windows 8.1 laptop
Channel: RAVI KUMAR
create wifi Hotspot in windows 8.1 laptop by RAVI KUMAR
Working With Laptop
Unlock Your Laptop's Hidden Hotspot: Windows 8.1 WiFi Magic!
Introduction: Transforming Your Laptop into a Wireless Gateway
In today's hyper-connected world, the ability to share your internet connection seamlessly is no longer a luxury, but a necessity. Imagine yourself in a hotel room where the Wi-Fi signal is flaky at best, or perhaps you're at a friend's house with limited internet access. Your Windows 8.1 laptop holds the key to unlocking a hidden superpower: the ability to transform itself into a dedicated Wi-Fi hotspot, sharing your internet connection with other devices, whether it's your smartphone, tablet, or another laptop. Forget frustrating limitations and embrace the freedom of on-demand wireless access. This guide will be your comprehensive companion, taking you step-by-step through the process of creating and managing your own wireless hotspot using the built-in capabilities of your Windows 8.1 operating system. We will illuminate the entire process, ensuring a smooth experience, allowing you to share your internet connection quickly and securely.
Understanding the Core Concepts: Hosted Networks and Their Significance
Before we delve into the technicalities, let's clarify the fundamental concepts at play. Windows 8.1 utilizes a feature known as a "hosted network" to create these wireless hotspots. Essentially, a hosted network allows your laptop's Wi-Fi adapter to function in two roles simultaneously: receiving an internet signal (from a wired Ethernet connection, another Wi-Fi network, or a mobile broadband connection) and broadcasting that signal as a new, independent Wi-Fi network. This groundbreaking capability eliminates the need for separate, dedicated hardware, turning your laptop into a versatile wireless router. Moreover, your hosted network configuration enables you to control essential aspects of your hotspot, including its name (SSID), security type, and password, safeguarding your internet access and ensuring privacy.
Step-by-Step Guide: Configuring Your Windows 8.1 Hosted Network
Embark on this transformative journey with these clear, concise instructions. Success in your endeavor will depend upon the following steps.
Accessing the Command Prompt (Admin): Initiate the process by opening the Command Prompt with administrator privileges. There are several paths to achieve this. One of the easiest involves right-clicking the Windows icon in the bottom-left corner of your screen (or pressing the Windows key + X) and selecting "Command Prompt (Admin)" from the context menu. This ensures you have the necessary permissions to modify network settings.
Enabling the Hosted Network: The netsh Command: At the Command Prompt, execute the following commands, one at a time, carefully typing them exactly as shown. These commands orchestrate the configuration of the hosted network. The use of these commands will put you in control of the available network.
netsh wlan set hostednetwork mode=allow ssid="YourHotspotName" key="YourSecurePassword"- Replace "YourHotspotName" with your desired network name (SSID). Think of a creative, yet easily identifiable name. For example, "MyLaptopHotspot" or "TheWirelessHub".
- Replace "YourSecurePassword" with a strong, complex password. Choose a password with a combination of uppercase and lowercase letters, numbers, and symbols (at least eight characters long). This is critical for securing your network.
netsh wlan start hostednetwork- This command activates the hosted network, making your hotspot visible to other devices.
Sharing Your Internet Connection: The Gateway to Connectivity: This pivotal step involves sharing your existing internet connection with the hosted network.
- Open the "Network Connections" window. You can easily find this by searching for "View network connections" in the Windows search bar (accessible by pressing the Windows key and typing).
- Identify the network adapter that is currently receiving your internet connection (e.g., your Ethernet adapter, your primary Wi-Fi adapter, or your mobile broadband adapter).
- Right-click on this adapter and select "Properties."
- Navigate to the "Sharing" tab.
- Check the box that says "Allow other network users to connect through this computer's Internet connection."
- In the "Home networking connection" dropdown menu, select your hosted network adapter. This will typically be labeled as "Microsoft Hosted Network Virtual Adapter".
- Click "OK" to save the changes.
Troubleshooting Common Setbacks: Navigating Potential Issues
No endeavor is without its potential hurdles. Be prepared to navigate occasional hiccups and troubleshoot the most common issues.
"The hosted network couldn't be started": This message often indicates a conflict with your wireless adapter drivers.
- Solution: Ensure your Wi-Fi adapter drivers are up-to-date. Visit the website of your laptop manufacturer or Wi-Fi adapter manufacturer and download the latest drivers.
Devices can't connect to the hotspot: If devices struggle to connect, several factors might be at play.
- Solution:
- Double-check your password: Ensure you're entering the correct password on each connecting device.
- Disable your firewall temporarily: Your firewall might be blocking connections. Temporarily disable your firewall (e.g., Windows Defender Firewall) to test if this resolves the issue. Afterward, you may want to create rules to allow the hosted network.
- Update network drivers: Ensure that all of your network drivers are up to date.
- Solution:
Slow internet speeds: If you experience slow internet speeds on devices connected to your hotspot, the issue can be multifaceted.
- Solution:
- Consider the capabilities of your existing internet connection: Your hotspot's speed is limited by the speed of your primary internet connection.
- Limit the number of connected devices: As more devices connect, the bandwidth is shared.
- Check for interference: Interference from other electronic devices or physical obstructions can reduce Wi-Fi signal strength and, consequently, speed. Try moving your laptop to a location with fewer obstructions.
- Solution:
Advanced Customization and Optimization: Elevating Your Hosted Network
Once you have mastered the basics, delve into advanced customization and optimization.
Changing Your Hotspot's SSID and Password: Modify your network's identity and security at any time by using the following commands in the Command Prompt (Admin):
- To change the SSID:
netsh wlan set hostednetwork ssid="NewHotspotName" - To change the password:
netsh wlan set hostednetwork key="NewSecurePassword" - After making these changes, restart the hosted network with the command:
netsh wlan stop hostednetworkfollowed bynetsh wlan start hostednetwork
- To change the SSID:
Saving Power and Optimizing Performance: Consider power management settings to enhance efficiency.
- Open "Device Manager" (search for it in the Windows search bar).
- Expand "Network adapters."
- Right-click on your Wi-Fi adapter and select "Properties."
- Go to the "Power Management" tab.
- Uncheck the box that says "Allow the computer to turn off this device to save power" if you want the hotspot to remain active even when the laptop is idle.
- Modify other power settings within your Windows system settings to optimize performance.
Monitoring Connected Devices: You can see the devices connected to your hotspot using the Windows command
netsh wlan show hostednetwork. This allows you to see how many devices are connected and for what duration.
Security Best Practices: Safeguarding Your Wireless Network
Prioritize security to protect your data and privacy.
Strong Password Implementation: Always use a strong and unique password. Avoid easily guessable passwords such as names, birthdates, or common words.
Monitor Your Network: Regularly monitor the devices connected to your hosted network. Be vigilant and promptly disconnect any unauthorized devices.
Utilize WPA2-PSK or WPA3-SAE Security: Windows 8.1 supports WPA2-PSK, which offers a robust level of security. Always select WPA2-PSK or WPA3-SAE in security settings, the highest security setting supported by your devices, to encrypt the data transmitted over your Wi-Fi network, protecting it from potential eavesdropping.
Conclusion: Embracing Seamless Connectivity with Windows 8.1
Creating a Wi-Fi hotspot in Windows 8.1 is a straightforward yet powerful technique. With the information in this guide, you now possess the knowledge to transform your laptop into a reliable and secure wireless gateway and share your internet connection with ease. This newfound capability unlocks unprecedented flexibility and convenience, allowing you to stay connected wherever you go. Embrace the freedom of on-demand wireless access and enjoy the seamless connectivity your Windows 8.1 laptop now provides. Happy hotspotting!
